


4
| ENGLISH
9 0 G T | W i F i
T E L E S C O P E
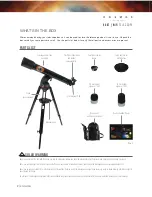
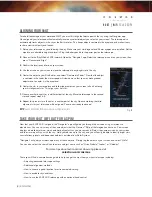
ALIGNING THE STARPOINTER FINDERSCOPE
The first time you assemble your telescope, you’ll need to align the StarPointer finderscope with the main optics of the
telescope. This step can be done without powering on the telescope. Although this step can be done out in the field
at night, it is significantly easier to accomplish this outdoors in daylight. Once you have completed the finderscope
alignment, you should not have to repeat this step unless the finderscope is bumped or dropped.
1.
Take the telescope outside during the day and, using your naked eye, find an easily recognizable object, such as
a streetlight, car license plate, or tall tree. The object should be as far away as possible, but preferably at least a
quarter mile away.
2.
Remove the main dust cover from the front of the telescope by pulling it straight off. Make sure your star diagonal and
25 mm eyepiece are installed in the focuser.
3.
Do not try to move the telescope left and right while it is off. Move the assembled tripod so the telescope is pointed
in the direction of the object you chose in step 1.
4.
Look through the telescope and move it up and down until the object you chose lies in the center of the view. If the
image is blurry, gently turn the focus knobs on either side of the telescope until it comes into sharp focus.
NOTE:
The image you see in the eyepiece will appear mirror reversed. This is perfectly normal in an astronomical telescope.
THE EYEPIECES AND STAR DIAGONAL
The 90GT WiFi comes with two eyepieces (low power 25 mm and high
power 10 mm) and a star diagonal. The eyepiece you choose determines
your magnification and field of view. The star diagonal positions the
eyepiece at a more comfortable 90º angle to the telescope and provides
a right-side-up image. Note that because the telescope is designed for
astronomical use, the image will be inverted. Whenever you set up your
telescope, always start with the 25 mm eyepiece. After locating your
target, you can switch to the higher power 10 mm eyepiece to get a more
detailed view.
Remove all dust caps, then insert the star diagonal into the focuser and
tighten the 2 silver thumbscrews. Insert the 25 mm eyepiece and secure
it by tightening the 2 thumbscrews on the star diagonal.
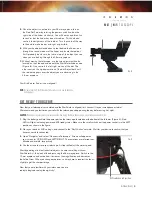
THE STARPOINTER FINDERSCOPE
Your telescope comes with a StarPointer red-dot finderscope that you
will use as a sighting tool when aiming the telescope at a distant target.
To install your StarPointer Finderscope:
1.
Locate the silver thumbscrew at the back of the tube, near the
focuser. Loosen it enough to allow the StarPointer bracket to slide
into the dovetail slot (Figure 7).
2.
Slide the base of the StarPointer into the dovetail base on the
telescope near the focuser. Lock it in place by tightening the silver
thumbscrew.
Fig. 7
Fig. 6


