`
6
S
S
t
t
a
a
r
r
P
P
o
o
i
i
n
n
t
t
e
e
r
r
O
O
p
p
e
e
r
r
a
a
t
t
i
i
o
o
n
n
The star pointer is powered by a long life 3-volt lithium battery (#CR2032) located underneath the front portion of the Star Pointer. Like all finderscopes, the Star
Pointer must be properly aligned with the main telescope before it can be used. This is a simple process using the azimuth and altitude control knobs located on the side
and bottom of the Star Pointer. The alignment procedure is best done at night since the LED dot will be difficult to see during the day.
1.
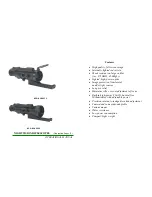
Before using the StarPointer, you must first remove the protective plastic cover over the battery (see image at left below).
2.
To turn on the Star Pointer, rotate the variable brightness control (see figure 2-13) clockwise until you here a "click". To increase the brightness level of the red
dot, continue rotating the control knob about 180º until it stops.
3.
Locate a bright star or planet and center it in a low power eyepiece in the main telescope.
4.
With both eyes open, look through the glass window at the alignment star. If the Star Pointer is perfectly aligned, you will see the red LED dot overlap the
alignment star. If the Star Pointer is not aligned, take notice of where the red dot is relative to the bright star.
5.
Without moving the main telescope, turn the Star Pointer's azimuth and altitude alignment controls (see image at right below) until the red dot is directly over the
alignment object.
If the LED dot is brighter than the alignment star, it may make it difficult to see the star. Turn the brightness control counterclockwise, until the red dot is the same
brightness as the alignment star. This will make it easier to get an accurate alignment. The Star Pointer is now ready to be used
.
TELESCOPE BASICS
A telescope is an instrument that collects and focuses light. The nature of the optical design determines how the light is focused. Some telescopes, known as refractors, use
lenses, .and other telescopes, known as reflectors (Newtonians), use mirrors.
A
Newtonian
reflector uses a single concave mirror as its primary. Light enters the tube traveling to the mirror at the back end. There light is bent forward in the tube to a
single point, its focal point. Since putting your head in front of the telescope to look at the image with an eyepiece would keep the reflector from working, a flat mirror
called a
diagonal
intercepts the light and points it out the side of the tube at right angles to the tube. The eyepiece is placed there for easy viewing.
Newtonian Reflector telescopes replace heavy lenses with mirrors to
collect and focus the light, providing much more light-gathering
power for the money spent. Because the light path is intercepted and
reflected out to the side, you can have focal lengths up to 1000mm
and still enjoy a telescope that is relatively compact and portable. A
Newtonian Reflector telescope offers such impressive light-gathering
characteristics you can take a serious interest in deep space
astronomy even on a modest budget. Newtonian Reflector telescopes
do require more care and maintenance because the primary mirror is
exposed to air and dust. However, this small drawback does not
hamper this type of telescope’s popularity with those who want an
economical telescope that can still resolve faint, distant objects.
Figure 3-2
I
I
m
m
a
a
g
g
e
e
O
O
r
r
i
i
e
e
n
n
t
t
a
a
t
t
i
i
o
o
n
n
Newtonian reflectors produce a right-side-up image but the image will appear rotated based on the location of the eyepiece holder in relation to the ground (Fig.3-2).
F
F
o
o
c
c
u
u
s
s
i
i
n
n
g
g
To focus your telescope, simply turn the focus knob located directly below the eyepiece holder (see Figure 2-11). Turning the knob clockwise allows you to focus on
an object that is farther than the one you are currently observing. Turning the knob counterclockwise from you allows you to focus on an object closer than the one you
are currently observing.
Note:
If you wear corrective lenses (specifically glasses), you may want to remove them when observing with an eyepiece attached to the telescope. However, when
using a camera you should always wear corrective lenses to ensure the sharpest possible focus. If you have astigmatism, corrective lenses must be worn at all times.
Figure 3-1
Cutaway view of the light path of the Newtonian optical design
Figure 2-11
– Aligning the StarPointer
Azimuth
adjustment
Knob
Red
Alignment
Dot
Battery
Protective
Cover
Figure 2-10
– Battery Compartment


