CDA FW552 Скачать руководство пользователя страница 8

Care and cleaning

Always disconnect the appliance from the power supply before any 
cleaning or maintenance.
The fridge sections should be cleaned using a solution of bicarbonate 
of soda and lukewarm water. Do not use abrasive products or 
detergents.  After washing, rinse and dry thoroughly.

Clean the shelves and balconies separately by hand with soap and 
water.  Do not put them in the dishwasher.

The water drain hole at the back of the fridge compartment and 
the evaporating tray should be clened periodically to prevent the 
defrosted water from collecting inside the fridge compartment. The 
drain plug can be used to clean the drain hole.

Once cleaning is complete, then reconnect the power.

•   

Keep the door gasket clean.  If damaged, the gasket should be 
replaced.

•   

If the appliance is not used for prolonged periods of time, unplug 
and clean the appliance.  The door should be left slightly open to 
prevent the formation of mildew and smell.

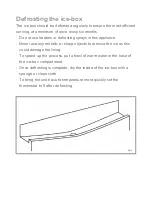
Defrosting the fridge

The fridge is self-defrosting. Any water created will run out of the 
fridge through the channel at the back of the fridge.
It is important to keep the channel clear at all times. The defrosted 
water is collected in the evaporating tray at the back of the appliance.

Содержание FW552

Страница 1: ...tment The Group Ltd Harby Road Langar Nottinghamshire NG13 9HY T 01949 862 012 F 01949 862 003 E customer care cda eu W www cda eu FW552 integrated three quarter height fridge Manual for Installation...

Страница 2: ...or instructions on how to use the appliance by someone who is responsible for their safety Under no circumstances should any external covers be removed for servicing or maintenance except by suitably...

Страница 3: ...ts working life the product must not be disposed of as urban waste It must be taken to a special local authority differentiated waste collection centre or to a dealer providing this service Disposing...

Страница 4: ...en to play with or near the appliance The internal surface of freezer compartment is very cold when the appliance is running Do not touch the surface especially with wet hands Do not splash water onto...

Страница 5: ...on again to prevent unnecessary damage to the compressor Setting the temperature You must allow the fridge to settle for at least twenty four hours prior to switching the power on To adjust the tempe...

Страница 6: ...s of moisture keep food fresh and avoid unpleasant odours Sort foods prior to storing Any foods to be used soon should be stored at the front of the shelf to prevent deterioration caused by the door b...

Страница 7: ...hat can be frozen within 24 hours is shown on the rating plate as freezing capacity Freezing more than this amount will affect the quality of the frozen food Storing frozen food products When shopping...

Страница 8: ...to prevent the defrosted water from collecting inside the fridge compartment The drain plug can be used to clean the drain hole Once cleaning is complete then reconnect the power Keep the door gasket...

Страница 9: ...prays in this appliance Never use any metallic or sharp objects to remove the ice as this could damage the lining To speed up the process put a bowl of warm water in the base of the ice box compartmen...

Страница 10: ...r appliance you should check the troubleshooting prior to calling CDA Customer Care to prevent unnecessary service calls and potential cost If the appliance is not working Check there is power to the...

Страница 11: ...oling gas in the refrigerator will make a slight bubbling noise even when the compressor is not running There is water in the lower part of the refrigerator compartment The drain hole in the channel a...

Страница 12: ...and depth of 550mm the diagram below shows the product dimensions and aperture required Note also the arrows on the diagram show ventilation requirements In the diagram a plinth vent is fitted to allo...

Страница 13: ...re from the underside surface of kitchen unit to the top of next unit door Fig 4 Fitting the decor door bracket Substract C from B and put the fixing bracket 2 in place using this measurement for vert...

Страница 14: ...ts on the fixing bracket for other directions Lock the screws into place as shown in 4 Fig 7 Fitting the decor door base fixings With the appliance door open remove the screws at the bottom of the app...

Страница 15: ...m gap between the cabinet door and fix it Never cover over the ventilation slots Once installed the plinth must not block the ventilation slots in the appliance This may require cutting the plinth dow...

Страница 16: ...ate carefully to gain access to the hinge screws 3 Loosen the hinge fixing screws 1 and remove the door 4 Remove the door fixing screws 2 5 Remove the cover caps 3 6 Relocate the hinges as shown 7 Ref...

Страница 17: ...fuse 2 Fit replacement 13A fuse ASTA approved to BS 1362 type into the fuse cover 3 Replace fuse cover Important Do not use the appliance without the fuse cover in position How to connect an alternat...

Страница 18: ...oloured BLUE must be connected to the terminal which is marked with the letter N or coloured BLACK The wire which is coloured BROWN must be connected to the terminal which is marked with the letter L...

Страница 19: ......

Страница 20: ...ct our Customer Care Department or for Service on the details below Customer Care Department The Group Ltd Harby Road Langar Nottinghamshire NG13 9HY T 01949 862 012 F 01949 862 003 E service cda eu W...

Отзывы: