background image

49

SMP-PRO SERIES USER MANUAL

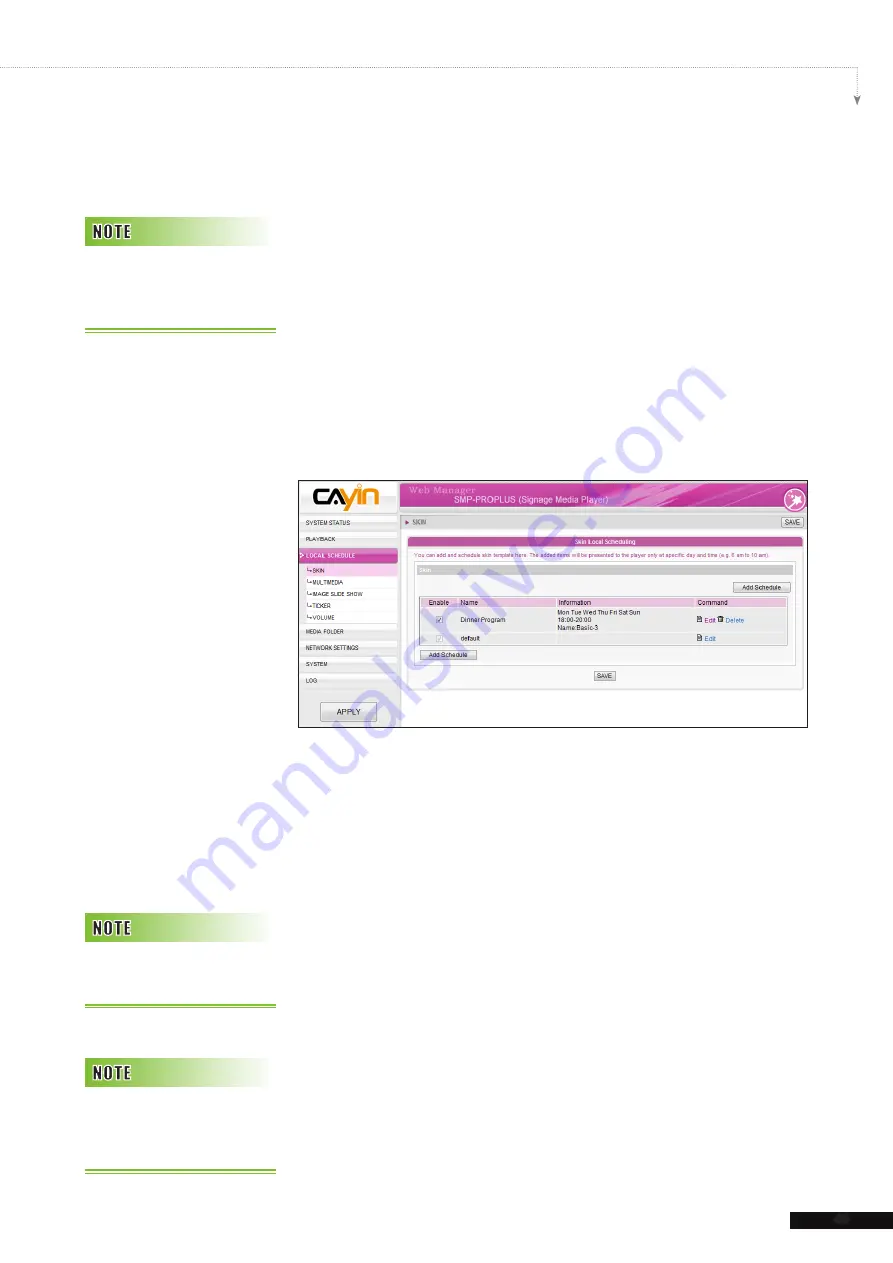
3. Name your new schedule here, e.g. “

Dinner Program

”. 

Then, set the “

Start Time

” and the “

End Time

” for your 

schedule.

4. Select a skin. You can choose one from local skins or select 

“No Skin” and play your multimedia files in full screen. If you 

want to use CMS to centrally schedule skin files, please 
choose “

Central Scheduling

”. 

5. After completing configuration, click [

SAVE

].

6. You can see a new schedule on the list now. Please tick this 

item and press [

SAVE

] and [

APPLY

]. SMP will only display 

the checked item.


4-2 Multimedia Zone

When you add a schedule for the multimedia zone, it will be 
applied only to the specified period of time (e.g. 6 am to 10 am). 
SMP will playback based on the settings in the default schedule 

during the rest of the time. 

For example, you can follow the steps below to add a new 
schedule: play selected files in Media Folder from 9:00 to 9:30. 
1.  Enter Web Manager and go to 

LOCAL  SCHEDULE  > 

MULTIMEDIA

 page.

2.  If  you purchase SMP-PROPLUS player,  you  can  select 

MULTIMEDIA 1

” or “

MULTIMEDIA 2

” based on the skin 

you choose. If there are two multimedia zones in the skin, you 

have to configure these two zones separately.

You can design your own skin 

by  “

CAYIN  Skin  Editor

” 

and upload it to Web Manager.

Yo u   c a n   a d d   u p   t o   9 9 
scheduling tasks.

O n l y   S M P - P R O P L U S 
supports  two  multimedia 
zones.

Содержание SMP-PRO3

Страница 1: ...en N Rd Taipei City 104 Taiwan TEL 886 2 25951005 FAX 886 2 25951050 2010 CAYIN TECHNOLOGY CO LTD All Rights Reserved MPPO00 EN 100514 SIGNAGE MEDIA PLAYER SMP PRO SERIES SMP PROPLUS Version 1 5 Versi...

Страница 2: ...ge without the prior written permission of CAYIN Specifications and information in this manual are subject to change at any time without obligation to notify any person of such revision or changes Thi...

Страница 3: ...Front View P N LB 300 3 1 2 2 Rear View P N LB 300 3 1 2 3 Front View P N LB 500 4 1 2 4 Rear View P N LB 500 4 1 3 SMP PRO3 SMP PRO3N Appearance 5 1 3 1 Front View SMP PRO3 SMP PRO3N P N LB 400 LB 40...

Страница 4: ...1 Step1 Time Language Settings 21 2 4 2 Step2 Display Settings 22 2 4 3 Step3 Media Folder Security Settings 24 2 5 Content Update Wizard 25 2 5 1 Content Update Settings 25 2 6 Playback Wizard 26 2 6...

Страница 5: ...Function 41 3 4 Image Slide Show Settings 41 3 5 Ticker 43 3 5 1 Define Font Format 44 3 5 2 Set Background Color 45 3 5 3 Scrolling Effect 45 3 6 Volume 46 4 Edit Schedule on SMP Player Local Schedu...

Страница 6: ...Manage Media Folder 81 7 System Status and Settings 82 7 1 System Status 83 7 1 1 Basic Information 84 7 1 2 Advanced Information 84 7 1 3 Firmware Information 85 7 2 System Settings 86 7 2 1 Set Syst...

Страница 7: ...Configure Display Properties SMP PROPLUS 97 7 4 3 Configure Display Properties SMP PRO3 PRO3N 99 7 4 4 Video Input Settings 99 7 4 5 Turn On Off Display 101 8 Network Settings 102 8 1 Ethernet 103 8 2...

Страница 8: ...w P N LB 500 4 1 2 4 Rear View P N LB 500 4 1 3 SMP PRO3 SMP PRO3N Appearance 5 1 3 1 Front View SMP PRO3 SMP PRO3N P N LB 400 LB 400N 5 1 3 2 Rear View SMP PRO3 P N LB 400 5 1 3 3 Rear View SMP PRO3N...

Страница 9: ...deos audios graphics and texts SMP PRO Series provides an easy to use platform where they can promote inform educate and entertain specific audiences in a variety of commercial applications 1 1 SMP PR...

Страница 10: ...1 Front View P N LB 300 1 Power Indicator 2 Hard Disk Indicator 3 Reset 4 Power 1 2 3 4 1 2 2 Rear View P N LB 300 1 2 3 4 5 6 7 8 1 Power Connector 2 RS 232 3 Ethernet 4 VGA 5 USB 4 6 Line In reserve...

Страница 11: ...3 Front View P N LB 500 1 2 4 Rear View P N LB 500 1 RS 232 x 2 2 VGA Connector 3 Ethernet LAN 4 USB x 4 5 PS 2 6 Power Connector 1 2 3 4 5 6 1 Power Button 2 DVI Connector 3 MIC IN Reserved 4 Audio o...

Страница 12: ...Connectors 2 1 1 3 2 Rear View SMP PRO3 P N LB 400 1 2 3 4 5 6 7 8 9 1 AV in 2 RS 232 3 Power Connector 4 Ethernet 5 AV out 6 S Video Out 7 VGA Connector Output 8 USBx2 9 Power Switch 1 3 3 Rear View...

Страница 13: ...0 100 Mbps Ethernet 10 100 1000Mbps Ethernet Internal Storage 160GB 3 5 IDE HDD 80GB 2 5 IDE HDD 80GB 2 5 IDE HDD 160GB 2 5 SATA HD Video Out VGA D Sub VGA D Sub DVI D No HDCP support VGA D Sub Compos...

Страница 14: ...2 To avoid system running in the low performance we suggest you do not use the following screen resolutions when SMP player is playing 720p HD video 1920x1200 1920x1080 1600x1200 1280x1024 75Hz or si...

Страница 15: ...ork Interface 10 100 1000 Mbps Ethernet P N LB 300 10 100 Mbps Ethernet P N LB 500 802 11b g wireless LAN adaptor optional 10 100Mbps Ethernet 802 11b g wireless LAN adaptor optional 10 100 1000 Mbps...

Страница 16: ...installing SMP please login and complete the initial settings based on your network environment DHCP Auto IP If you are in the DHCP network SMP will get an IP address automatically after installation...

Страница 17: ...n on the system Click Wizard Mode or Advanced Mode on the Web Manager and enter a username and password Default Username webadmin Default Password admin 2 Click NETWORK SETTINGS or Network Wizard on t...

Страница 18: ...SMP PRO SERIES USER MANUAL 11 Wizard Mode Advanced Mode...

Страница 19: ...pen the Media Folder of any player by CAYIN Device Seeker Select the player you want to connect and click Open Folder If the IP address of SMP player shown in CAYIN Device Seeker is 169 254 x x it mea...

Страница 20: ...e we take SMP PRO4 for illustration 1 Please find the enclosed brackets and mounting screws 2 Attach the brackets with your SMP player and secure brackets with provided mounting screws 3 Hanging your...

Страница 21: ...p3 Ping Gateway 20 2 4 System Wizard 21 2 4 1 Step1 Time Language Settings 21 2 4 2 Step2 Display Settings 22 2 4 3 Step3 Media Folder Security Settings 24 2 5 Content Update Wizard 25 2 5 1 Content U...

Страница 22: ...ment 2 Click Seek and the seeker will search all available SMP clients or CMS servers in the same LAN When the devices are found select the one you want to connect and click Open Folder 3 Your PC will...

Страница 23: ...the SMP player via Network Neighborhood and then you can start to play those files in the SMP player Method 3 1 Open Network Neighborhood of your PC All PCs in Workgroup will be listed You can see al...

Страница 24: ...a Folder in the main page 2 Go to Media Folder Management and tick the checkbox Allow updating content from USB storage device Click Save to save the settings and then click Apply on left side column...

Страница 25: ...you can finish network related settings including Ethernet and Wi Fi configurations 2 3 1 Step1 Ethernet Configuration Here you can configure the wired Ethernet network settings Firstly please enter t...

Страница 26: ...rk administrator 2 3 2 Step2 Wifi Configuration Optional If you attach a compatible USB Wi Fi adaptor to a SMP player you will see the page Wireless Settings and can configure wireless network setting...

Страница 27: ...3 Step3 Ping Gateway When the DHCP server is unstable and results in poor network connection the function ping gateway can automatically try to repair the network connection If the SMP player uses a d...

Страница 28: ...onnected to the Internet it is suggested to use an NTP server e g time nist gov to automatically synchronize the time You can also manually configure the correct time and select the language of Web Ma...

Страница 29: ...you would like to cut off the VGA signal in specific time to let the screen switch to standby mode applicable to most today s screens for power saving you can configure the applied time and days SMP...

Страница 30: ...ocess Most screens will enter the sleep mode when the VGA signal is cut down by the SMP player However some s c r e e n s m i g h t r e s p o n d u n e x p e c t e d l y s u c h a s showing a blue scr...

Страница 31: ...password while you access the SMP Media Folder You can also use user mode and assign a password After finishing the configuration press Finish to accomplish the System Wizard settings Settings If you...

Страница 32: ...ver If the SMP player is only for offline use and does not connect to a CMS server please skip this wizard 1 Configure how frequently minutes the SMP player will check with CMS server for updated cont...

Страница 33: ...so upload your self designed skins created by CAYIN s Skin Editor from the bottom of the page for uses If you want to use a CMS server to control the playlist of this SMP player please select Central...

Страница 34: ...les in the Media Folder will be listed on the left You can select the files to be played and the selected files will be listed on the right Unless you check Random to enable random playback SMP will p...

Страница 35: ...ayback all image or specific image files JPEG or GIF in the Media Folder or play image files centrally scheduled by CMS server You can also configure the slide show playback duration sequence and whet...

Страница 36: ...e the text characters including the text font color font size text direction from left to right or the reverse and ticker mode and speed etc Since there are only one line space for ticker mode Simple...

Страница 37: ...edia Folder 35 3 3 2 Play Files in USB Storage Device 38 3 3 3 Central Scheduling by CMS Server 38 3 3 4 RTB RTP Streaming 39 3 3 5 HTTP MMS Streaming 40 3 3 6 Video Input 40 3 3 7 Image Slide Show 40...

Страница 38: ...nsert the product CD into your CD ROM and run CAYIN Device Seeker Tool Device Seeker seeker exe You can also copy this file to your PC for future management 2 Click Seek to search all available SMP pl...

Страница 39: ...ROPLUS please enter SMP PROPLUS or 172 16 1 2 Copy multimedia files from your PC to the SMP player via Network Neighborhood and then you can start to play those files in the SMP player Method 3 Open N...

Страница 40: ...dia Folder in the main page 2 Go to Media Folder Management and tick the checkbox Allow updating content from USB storage device Click Save to save the settings and then click Apply on left side colum...

Страница 41: ...ins You can also upload your self designed skins created by CAYIN Skin Editor from the bottom of the page If you want to use a CMS server to control the playlist of this SMP player please select Centr...

Страница 42: ...o configure settings for both zones 4 Click Multimedia files in and select the content source from the drop down menu Then you can click Edit Playlist to edit the playlist of files in the Media Folder...

Страница 43: ...one time by holding the Shift or Ctrl key or just select files one by one In the left column the item with sign represents a folder s name If you choose this item it means you will select all files in...

Страница 44: ...ed Files in the right column please select files and click Remove Then those files will be removed from the right column but will not be deleted from the Media Folder Remove all Click Remove all and a...

Страница 45: ...can be centrally scheduled and controlled by CMS Please follow the following steps 1 Login SMP player and enter Web Manager 2 Go to PLAYBACK MULTIMEDIA page 3 Click Central Scheduling by CMS Server Th...

Страница 46: ...Media Folder when there is no video packet delivered from the streaming RTB and RTP are different protocols 1 RTB Client only works with CMS s RTB Server function 2 You can use RTP compliant software...

Страница 47: ...dia Folder or USB device please enable this option You can enter the duration in seconds for playing each picture Furthermore you can also select the play senquence for files such as forward backward...

Страница 48: ...r to create subfolders for your image files and also upload files into corresponsive subfolders before use this function After that you can assign a created subfolder for one area via Web Manager and...

Страница 49: ...control the slideshow playlist from CMS server See CMS manual for detail configurations 4 Set the Duration in seconds for playing each picture 5 Set the Sequence You can select to play files in forwa...

Страница 50: ...TF 8 character encoding If the content is not written in English please choose encoding type UTF 8 when you save the text file Text from remote URL RSS To show a text message available on a URL enter...

Страница 51: ...the text from left to right or right to left to suit your own language We provide two methods for you to change the font color You can enter the number of R G B 1 Enter Web Manager and go to PLAYBACK...

Страница 52: ...o see the accurate color 3 Click SAVE and APPLY to apply the ticker color 3 5 3 Scrolling Effect You can change the speed of the scrolling text here Please follow the following steps 1 Enter Web Manag...

Страница 53: ...to top and pause then it is moving from left to right to finish a line 3 Set duration of Pause when you choose Simple bottom up or Bottom up and crawl This option will let text pause specific seconds...

Страница 54: ...Edit Schedule on SMP Player Local Schedule 4 4 1 Skin 48 4 2 Multimedia Zone 49 4 3 Image Slide Show Zone 51 4 4 Ticker Zone 53 4 5 Volume 55...

Страница 55: ...ault schedule This default schedule is the same as the one you set in Chapter 3 4 1 Skin When you add a schedule for skin the selected skin will be applied only to the specified period of time e g 6 a...

Страница 56: ...e for the multimedia zone it will be applied only to the specified period of time e g 6 am to 10 am SMP will playback based on the settings in the default schedule during the rest of the time For exam...

Страница 57: ...50 SMP PRO SERIES USER MANUAL 3 Click Add Schedule button and you will see a pop up window 4 Name your new schedule here e g Training Course Then set the Start Time and the End Time for your schedule...

Страница 58: ...will be applied only to the specified period of time e g 6 am to 10 am SMP will playback based on the settings in the default schedule during the rest of the time 1 Enter Web Manager and go to LOCAL S...

Страница 59: ...e to fit the screen area proportionally or non proportionally 7 Select files you want to play in the left column and click Select to move them into your playlist right column You can also click Refres...

Страница 60: ...d only to the specified period of time e g 11 to 13 SMP will playback based on the settings in the default schedule during the rest of the time 1 Enter Web Manager and go to LOCAL SCHEDULE TICKER page...

Страница 61: ...ingle color on the background of the ticker zone you can set background color here 7 Set a text scrolling effect You can choose one of options from No scrolling effect Simple crawl Simple bottom up an...

Страница 62: ...Add Schedule button and you will see a pop up window 3 Name your new schedule here e g Night Then set the Day of the week Start Time and the End Time 4 Select dates and a period of time 5 Set the vol...

Страница 63: ...5 1 2 Create a new skin file csk 58 5 1 3 Upload a Skin File into Skin Template 64 5 1 4 Edit a Skin File in Skin Template 65 5 2 Create Your Own Clock clk 66 5 2 1 Create a Clock clk 66 5 2 2 Upload...

Страница 64: ...Chinese and Traditional Chinese 5 1 Create Your Own Skin 5 1 1 Install Skin Editor You can find the editing tool CAYIN Skin Editor in the product CD Tool Skin Editor Multiple Language Here please choo...

Страница 65: ...r own skin 1 Execute the program Skin Editor in Start menu or on your desktop 2 You can prepare at least one JPEG image file or you can choose single color background 3 Go to File Create New Skin or j...

Страница 66: ...lect User define to configure your own resolution Click OK to proceed 6 Now name your skin and description optional Click OK to proceed 7 You can see an area that matches with the resolution you choos...

Страница 67: ...if you want to edit a multimedia zone first please click on the multimedia icon on the toolbar and drag the area size you want for the multimedia zone When it is done you can see an area with a multim...

Страница 68: ...tal 11 If you want to adjust the size of each element just click the element you want to adjust and move your cursor to the edge of that element When you see the arrow show please left click your mous...

Страница 69: ...ation process 13 If you would like to save the unfinished skin temporarily please go to File Save skin to template Then you can save the skin in Template and come back to edit it again later You may d...

Страница 70: ...Open created skin Publish skin Save your skin and publish csk file Skin settings Configure skin properties such as name model and resolution Zoom in Zoom out Enlarge or reduce the view of a skin 1 1 D...

Страница 71: ...an easily upload a new skin to Skin Editor 1 Download a csk file from CAYIN s partner website to your PC 2 Open CAYIN Skin Editor and go to Template Manage Skin Templates and click Import button Choos...

Страница 72: ...ollow steps below to reload and adjust skin settings 1 Open the CAYIN Skin Editor 2 Go to File Load skin from template You will see a pop up menu 3 Choose the skin you want to adjust and click Load 2...

Страница 73: ...many resolutions you want to create for your clock Size here Click OK to continue 3 Here you can configure all the settings for your clock Please follow the following steps to complete your settings...

Страница 74: ...hand side of window Hour Minute Second Here you can create the hour hand minute hand and second hand for your clock 1 Input the exact coordinate value x y on clock face in hour minute second column 2...

Страница 75: ...If you want to show the date please choose True otherwise please choose False to disable and skip this step 2 Input the exact coordinate value x y to decide the location of the date You can also choo...

Страница 76: ...of week e Image for 12 hour Now you can start to create your own clock Choose digital clock image you can see a digital clock image pop up window General Settings 1 Select your clock background here...

Страница 77: ...r 12 hour or 24 hour clock Hour Minute Second Here you can create the hour minute and second for your clock 1 Enable hour minute second columns and input the exact coordinate value x y 2 Import the pr...

Страница 78: ...th day and day of week columns 2 Then you can choose to enable AM PM function and import the image to this column 3 Check the preview and fine tune your configuration if required 4 After finishing all...

Страница 79: ...kground image you can see the preview on the right hand side of the window You can also enable the 12 Hour indicate function If you want to enable this function please select True otherwise choose Fal...

Страница 80: ...play on your clock If you want to enable AM PM function please choose True otherwise please choose False to disable it Please make sure to enter a serial text when you input text in month day of week...

Страница 81: ...e to your PC or have any existing clk file at hand 2 Open the CAYIN Skin Editor and go to Template Manage Clock Templates and click Import button 3 Choose the skin you want to upload and press Open No...

Страница 82: ...ing table for more functions No Skin play multimedia in full screen Choose this option if you want to play Multimedia Content in full screen mode Central Scheduling skin centrally scheduled by CMS The...

Страница 83: ...Content Update and Media Folder Management 6 6 1 Update Media Folder 77 6 2 Manage Media Folder 81...

Страница 84: ...d you can update the content of Media Folder automatically with CMS server or a web server Please specify the duplicate frequency and source of media files by completing the following settings of CMS...

Страница 85: ...the server and player Please note you have to choose at least one method We suggest you check both of them 5 Please set the frequency of content checking Check for new content every minutes Set the t...

Страница 86: ...ssign the group name which this SMP player belong to Username The username is the account you create in CMS server and this account should be authorized to mange this group Password User s password Ho...

Страница 87: ...layer will download new or updated URL s in the playlist and remove the local files which do not exist in the playlist You may type a text file like below and enter the URL of this text file in this f...

Страница 88: ...ss To allow access from particular IP address or subnet enter the IP address or partial IP address e g type 172 16 0 1 to allow access only from this IP address or type 172 16 0 to allow access from a...

Страница 89: ...uage 89 7 2 6 Set System Reboot 89 7 2 7 Frequency of Server Communication 90 7 2 8 RS 232 Setting 90 7 3 System Maintenance 92 7 3 1 Upload Firmware 92 7 3 2 Restart Shutdown System 92 7 3 3 Upload B...

Страница 90: ...MANUAL In this chapter you can access comprehensive system information about a SMP PRO series player You can also configure system settings 7 1 System Status Login Web Manager of SMP and you will see...

Страница 91: ...Firmware Version and Date Time of a SMP player in this section You can specify the hostname in 8 1 Ethernet section and change the date time time zone in 7 2 1 Set System Time section 7 1 2 Advanced I...

Страница 92: ...rate due to other possibilities such as sensor error or malfunction 2 The Fan Speed area will show N A if your player is SMP PRO3 N or SMP PRO4 because of its fanless design SMP PROPLUS LB 500 does no...

Страница 93: ...system restart and system shutdown 7 2 1 Set System Time You can set the system date and time manually for the SMP player 1 Login SMP Web Manager and go to SYSTEM SYSTEM page 2 Enable Set system date...

Страница 94: ...update the system time from NTP server every 7 days or when the system restarts 1 Login SMP Web Manager Click SYSTEM and switch to SYSTEM page 2 Click Enable NTP service and enter the address of the...

Страница 95: ...vironment The default Web Manager port number is 80 We suggest you use the port number larger than 1024 so that the new port number will not be in conflict with other services After changing the port...

Страница 96: ...7 2 6 Set System Reboot You can assign up to three particular day and time sections within a day that SMP will restart automatically Enable Set system reboot at function choose Restart mode and tick...

Страница 97: ...ive period every heartbeat 5 10 seconds 20 seconds 4 30 seconds 30 seconds 3 60 seconds 60 seconds 2 180 seconds 180 seconds 1 600 seconds 600 seconds 7 2 8 RS 232 Setting You can configure RS 232 com...

Страница 98: ...will see a pop up window shows 5 Click Add RS 232 Command button and you can add edit command here Name your command first and choose a command type in drop down menu You can see a list of correspondi...

Страница 99: ...essfully uploading the system will re start The system will inform you the uploading status after uploading If you fail to upload the firmware please make sure that the firmware is used for this model...

Страница 100: ...cording to your display standard 2 Click Browse to locate the image you would like to upload and click Upload button to apply the change You may see the uploaded image by clicking Preview If you are n...

Страница 101: ...7 3 5 System Recovery You can recover the SMP system remotely Firmware and configurations will be restored to the factory default You can only upload this file to a SMP player with the identical mode...

Страница 102: ...and switch to DISPLAY page 2 Choose single mode in output method drop down menu SMP PRO4 only outputs signals to a display connector 3 Choose the orientation of the screen 4 Choose a video source You...

Страница 103: ...reens You can specify a predefined screen resolution and refresh rate or enter your own specification by selecting User define Video Resolution and Specification may differ for different output method...

Страница 104: ...olution and refresh rate You can specify a predefined screen resolution and refresh rate or enter your own specification by selecting User define Screen Resolution 640x480 800x600 1024x768 1152x864 12...

Страница 105: ...ait Screen Screen Resolution User Interface 1920x1080 Max by User define 2048x2048 Min by User define 320x240 User Interface 1920x1080 Max by User define 2048x2048 Min by User define 320x240 Video Res...

Страница 106: ...sh rate Screen Resolution 640x480 800x600 1024x768 1152x864 1280x1024 1280x720 720p 1280x768 1360x768 1366x768 1600x900 Refresh Rate Auto 60 70 72 or 75 4 After completing settings click SAVE and APPL...

Страница 107: ...use this option to adjust the image size For example 5 105 and 10 110 SMP players also supports USB UVC video capture device Please plug the compatible USB UVC device before the SMP player boots up an...

Страница 108: ...on the following day s Set a specific day in weekly basis to turn off the screen The screen will be turned off on the day you pick here 4 Click SAVE and APPLY If you configure the RS 232 command to t...

Страница 109: ...Network Settings 8 8 1 Ethernet 103 8 2 Wireless Network 104...

Страница 110: ...nd a Hostname of SMP 3 Select Obtain IP by DHCP Client if the network supports DHCP protocol for obtaining the IP address automatically To use static IP address enter the relevant information in Stati...

Страница 111: ...DHCP or static IP address for the wireless connection of the SMP player Please contact CAYIN to purchase compatible USB Wi Fi adaptors S M P p l a y e r s d o e s n o t support 802 11N adaptor and can...

Страница 112: ...Log Management 9 9 1 Enable Syslog 106 9 2 Use log_rcv to Change PORT 107 9 3 View Logs 108 9 4 Export Log File 109...

Страница 113: ...P and enter the IP address of your designated server to enable remote log function If you choose to send log by TCP log records can be assured to transmit completely without losing packet if SMP is on...

Страница 114: ...ber for both SMP and log rcv is 35000 You can follow stpes below to change the port number for log_rce to receive log files 1 Add a new batch file log_rcv bat 2 For example if you want to change the p...

Страница 115: ...ll run the log_rcv exe automatically 9 3 View Logs You can check the log records in the SMP player 1 Login SMP Web Manager and you will see the LOG page 2 Click View Logs the log dialog box will pop u...

Страница 116: ...d you will see the LOG page 2 Click Export then you can export and save the log files as abc log The export procedures will vary from browser to browser Please follow the instructions of your browser...

Страница 117: ...SMP Console 10...

Страница 118: ...r Manage Storage Expert Only Manage formatting storage Hard Disk or USB storage device Please consult your system administrator for these functions Format Internal Hard disk This function is designed...

Страница 119: ...System Recovery 11...

Страница 120: ...em firmware will be restored to the original one i e you have to upload all patches again after the system recovery 6 When the instruction The configuration will recover to factory default is shown yo...

Страница 121: ...Appendix Use log_rcv to collect syslog from clients 115...

Страница 122: ...s IP address Chapter 9 1 Enable Syslog 3 Log_rcv exe will start to receive the log messages from SMP clients and display the results on your PC s screen 4 After log records are collected Log_rcv exe w...

Страница 123: ...SUMMARY TXT COUNT section Let you know for how many times those files have are played SUMMARY section Let you know how long seconds each file has been played content_update Store all logs recording t...

Отзывы: