background image

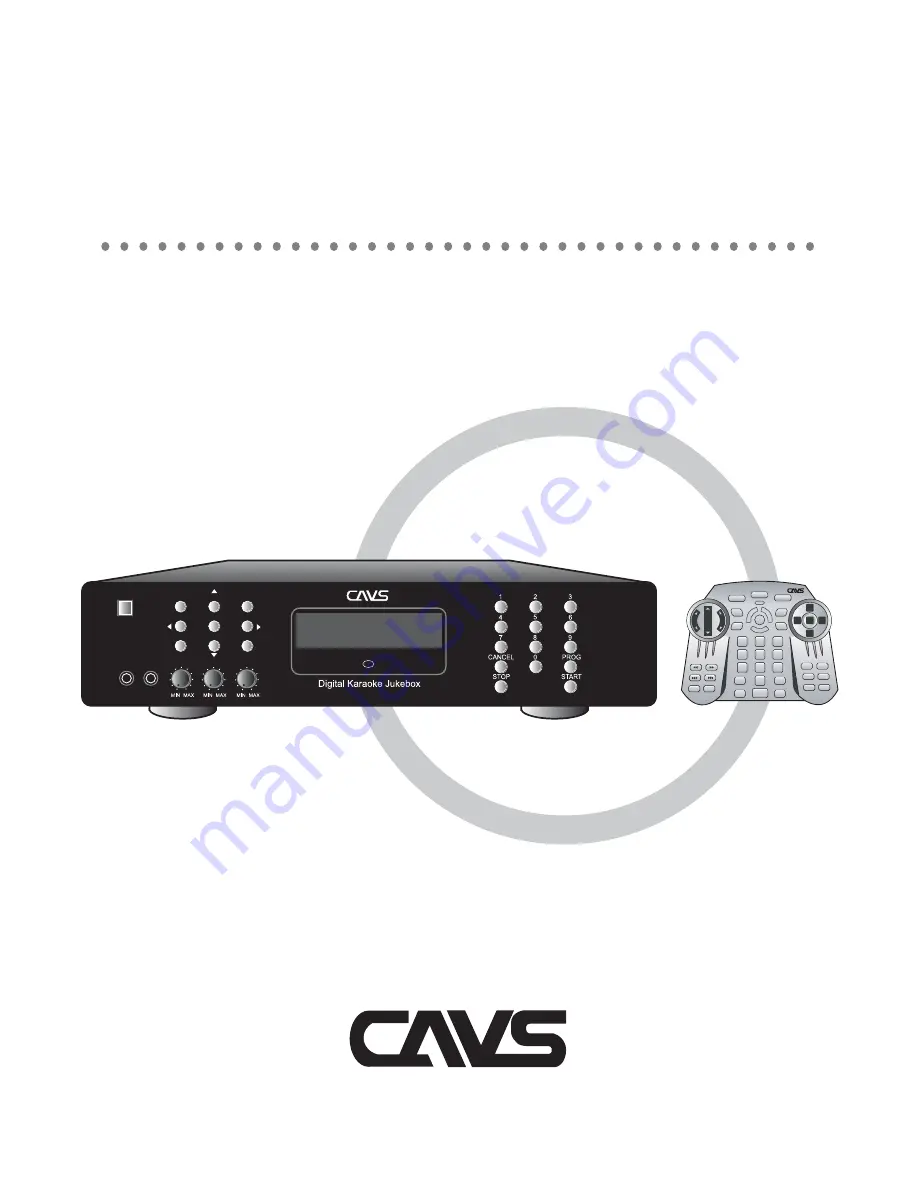
Digital  Karaoke Jukebox Player

CAVS  JB-199

USER’S MANUAL

MUTE

POWER

Open/Close

SET UP

MENU

TIME

LIST

PROG

PAUSE

STOP

JB/CD

1

2

3

4

5

6

7

8

0

9

CANCEL

PLAY

INFO

TITLE

BGV

RANDOM

REPEAT

VOCAL

PPgm

ENTER

TEMP

KEY

VOL

VOL

R

E

C

O

RD

  C

LE

A

R

FANFARE

LEFT

SELECT

RIGHT

UP

DOWN

Be sure to read this manual before starting the 
operation of the unit.

..

.

. .

. . .

.

..

..

.

. .

. . .

.

..

..

.

. .

. . .

.

..

JB/CD

TEMPO UP

LIST

BGV

KEY 

b

KEY

 #

MENU

VOCAL

TEMPO  DOWN

JB-199

R

MIC.1

MIC. 2

MIC.1

MIC. 2

ECHO

POWER

Содержание JB-199 Premier

Страница 1: ...D 1 2 3 4 5 6 7 8 0 9 CANCEL PLAY INFO TITLE BGV RANDOM REPEAT VOCAL PPgm ENTER TEMP K E Y VOL VOL R E C O RD C L E A R FANFARE LEFT SELECT RIGHT UP DOWN Be sure to read this manual before starting the operation of the unit JB CD TEMPO UP LIST BGV KEY b KEY MENU VOCAL TEMPO DOWN JB 199 R MIC 1 MIC 2 MIC 1 MIC 2 ECHO POWER ...

Страница 2: ...and in the operating instructions should be adhered to All operating and using instructions should be followed Unplug this product from the wall outlet before cleaning Do not use liquid cleaners or aerosol cleaners Use damp cloth for cleaning Do not use attachments not recommended by the product manufacturer as they may cause hazards Do not use this product near water for example near a bath tub w...

Страница 3: ... following conditions When the power supply cord or plug is damaged If liquid has been spilled or objects have fallen into the product If the product has been exposed to rain or water If the product does not operate normally If the product has been dropped or damaged in any way When the product exhibits a distinct change in performance When replacement parts are required be sure the service techni...

Страница 4: ...radiate radio frequency energy and if not installed and used in accordance with the instructions may cause harmful interference to radio communications However there is no guarantee that interference will not occur in a particular installation If this equipment does cause harmful interference to radio or television reception which can be determined by turning the equipment off and on the user is e...

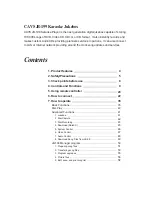
Страница 5: ...Contents 1 Product features 2 Safety Precautions 3 Check points before use 4 Controls and Functions 5 Using remote controller 6 How to connect 7 How to operate Basic Functions Disc Play Advanced Functions 1 Jukebox 2 Disc Capture 3 Disc Recording 4 Download DateCD 5 System Control 6 Video Control 7 Audio Control 8 Download Song Files from JB 99 4 5 8 9 20 22 35 35 40 41 41 42 43 45 46 47 48 49 JB ...

Страница 6: ...rive 2 External hard drive 3 VGA monitor 4 Keyboard and mouse 63 64 64 64 Making DataCD 60 Windows platform 65 1 USB Camera 2 NTSC PAL 3 Play DVD and Video CD 4 Change Welcome title page 5 Copy a song list 6 JB 199 Manager program 65 66 66 66 67 67 8 E Songbook 68 9 Iphone Ipad 76 8 Android Smartphone and Tablet 81 ...

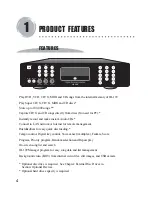
Страница 7: ...ogram for easy song data and list management Background video BGV from internal video files still images and USB camera PRODUCT FEATURES FEATURES JB 199 1 Tempo control Digital key control Voice cancel multiplex Fanfare Score Play Super CD G CD G MIDI and CD discs JB CD TEMPO UP LIST BGV KEY b KEY MENU VOCAL TEMPO DOWN JB 199 R MIC 1 MIC 2 MIC 1 MIC 2 ECHO POWER Connect to LAN network or Internet ...

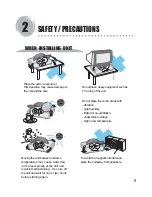
Страница 8: ...igh humidity limited or no ventilation under direct sunrays high or low temperature WHEN INSTALLING UNIT SAFETY PRECAUTIONS 2 To avoid the magnetic interference place the unit away from speakers Moving the unit between extreme temperatures may cause water dew on the laser pickup of the unit and result in malfunctioning If so turn off the unit and wait for one or two hours before starting again ...

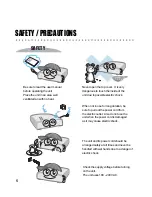
Страница 9: ...electric shock When not in use for long duration be sure to pull out the power cord from the electric outlet Also do not use the unit when the power cord is damaged as it may cause electric shock SAFETY PRECAUTIONS SAFETY The unit and its power cord should be arranged safely at all times and never be handled with wet hands due to a danger of electric shock Check the supply voltage before turning o...

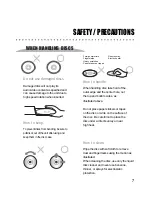
Страница 10: ...ay Electric heater Do not use damaged discs Damaged disc will not play its audio video content as specified and can cause damage to the unit due to high speed rotation when inserted How to keep To prevent discs from bending be sure to pull discs out of the unit after using and keep them in the disc case SAFETY PRECAUTIONS WHEN HANDLING DISCS How to clean Wipe the disc with soft cloth to remove dus...

Страница 11: ...199 Program CDs Lan cable 1 Power cord 1 ACCESSORIES CHECK POINTS BEFORE USE 3 U s e r s m a n u a l MUTE POWER Open Close SET UP MENU TIME LIST PROG PAUSE STOP JB CD 1 2 3 4 5 6 7 8 0 9 CANCEL PLAY INFO TITLE BGV RANDOM REPEAT VOCAL PPgm ENTER TEMP K E Y VOL VOL R E C O RD C L E A R FANFARE LEFT SELECT RIGHT UP DOWN ...

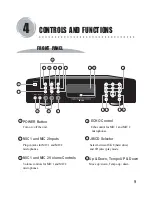
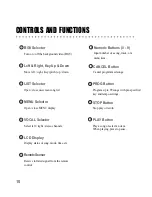
Страница 12: ...tton Turn on off the unit MIC 1 and MIC 2 Inputs Plug in jacks for MIC 1 and MIC 2 microphones 2 1 17 16 18 15 1 10 8 JB CD TEMPO UP LIST BGV KEY b KEY MENU VOCAL TEMPO DOWN JB 199 R MIC 1 MIC 2 MIC 1 MIC 2 ECHO POWER 6 7 9 11 5 13 12 4 3 2 14 JB CD Selector Select between JUKE hard drive and CD disc play mode Up Down Tempo UP Down Move up down Tempo up down 5 6 microphones 9 ...

Страница 13: ...Display Display status of song mode time etc 10 CONTROLS AND FUNCTIONS 8 7 9 10 11 12 RemoteSensor Receive infrared signal from the remote control Numeric Buttons 0 9 Input number of a song track or a menu item CANCEL Button Cancel programmed songs PROG Button Program up to 99 songs with pre specified key and tempo settings STOP Button Stop play or return PLAY Button Play a song or select an item ...

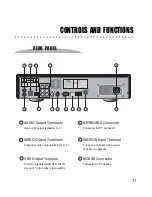
Страница 14: ...CAUTION TO REDUCE THE RISK OF ELECTRIC SHOCK DO NOT REMOVE COVER NO USER SERVICEABLE PARTS INSIDE REFER SERVICING TO QUALIFIED SERVICE PERSONNEL WARNING TO REDUCE THE RISK OF FIRE OR ELECTRIC SHOCK DO NOT EXPOSE THIS APPLIANCE TO RAIN OR MOISTURE CAUTION RISK OF ELECTRIC SHOCK DO NOT OPEN This device complies with Part 15 of the FCC Rules Operation is subject to the following two conditions 1 This...

Страница 15: ... VGA Connector Connector for PC monitor RESET Button Restart JB 199 12 CONTROLS AND FUNCTIONS 8 14 7 10 9 11 13 12 CONTROL Terminal Audio video signal control output BILL COIN Connector Connector for bill coin or card acceptor POWER Selector Select power input between 110V 60Hz and 230V 50Hz POWER Cord Plug Plug for power cord terminal ...

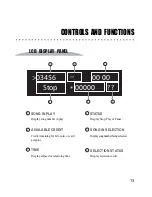
Страница 16: ...bill coin or card TIME Display elapsed or remaining time STATUS Display Stop Play or Pause SONG IN SELECTION Displaysongnumberbeingselected SELECTION STATUS Display selection result 13 LCD DISPLAY PANEL CONTROLS AND FUNCTIONS 1 2 3 4 4 5 6 03456 Stop 00000 00 00 5 6 1 2 3 acceptor ...

Страница 17: ... master music volume 14 REMOTE CONTROLLER CONTROLS AND FUNCTIONS 1 3 4 5 2 MUTE POWER Open Close SET UP MENU TIME LIST PROG PAUSE STOP JB CD CANCEL PLAY INFO TITLE BGV RANDOM REPEAT VOCAL PPgm ENTER TEMP K E Y VOL VOL R E C O RD CL E A R FANFARE 1 2 3 10 9 11 13 14 17 16 15 19 20 21 23 8 6 4 5 7 12 18 29 32 34 35 30 31 33 28 22 24 26 27 25 0 1 2 3 5 6 7 8 9 4 LEFT SELECT RIGHT UP DOWN TEMPO Contro...

Страница 18: ...gain to close 15 CONTROLS AND FUNCTIONS 11 12 13 14 7 8 9 10 disabled for stand alone JB 199 Press to start stop recording 18 17 16 15 UP DOWN Buttons Move cursor up down SELECT Button Press to select NUMERIC Buttons Input number of a song title or menu item LEFT RIGHT Buttons Press to select return FAST BACKWARD Move fast backward during play FAST FORWARD Move fast forward during play PREVIOUS Go...

Страница 19: ... pause Press again to play BGV Press to select background video from 29 28 26 25 27 30 Off Internal video Still images USB camera ENTER Press to select RANDOM PPGM Press to priority program a song in front of the program queue REPEAT Press to select REPEAT ONE ALL OFF VOCAL Voice Cancel Press to select L R Stereo channels 31 33 32 34 35 Select on off to play a song in random ...

Страница 20: ... on the front panel Mute NA Disc 1 Press to start stop recording mode DISC 2 Press to delete the last recorded track DISC 3 Select between off 75 85 95 Press Play 17 REMOTE CONTROLLER CONTROLS AND FUNCTIONS 1 3 4 5 2 Disc Change Mute on off master music volume 6 ...

Страница 21: ...ys 18 CONTROLS AND FUNCTIONS 11 12 13 14 7 8 9 10 Select elapsed or remaining time 18 17 16 15 Skip Move cursor up down PBC Rewind the track by 3 seconds Next Press the access the menu for BGV REP VOC etc Prev Go to previous song Return NA Select Press to show the elapsed time on lyrics screen Numeric Keys Input number of a song title or meny item JB CD Button Select JUKE Hard Drive or CD Disc for...

Страница 22: ...video from Off Internal Video Still images USB camera Random Select on off to play a song in random Repeat Press to select REPEAT ONE ALL OFF 29 28 26 25 27 30 Sort Fan NA Key Control Raise lower key pitch level JB Mode NA Disc Mode NA 31 33 32 34 35 Vocal Press to select L Left R Right Stereo channels NA Not Available 36 Capt Mode NA 36 Tempo Raise lower tempo speed level ...

Страница 23: ...me size When using a battery charger Use the battery charger only after checking carefully its charging time and voltage Use only direct voltage of 2 4V to 3 6V for both batteries combined When handling batteries 1 Do not over charge heat disassemble or short circuit the batteries 2 For long term storage take out the batteries from remote controller as the batteries may leak electrolytic liquid wh...

Страница 24: ...he remote controller within this distance If remote controller is not working check the batteries and also the AC power plug of the main unit If remote controller is malfunctioning it may be due to cross interference from other equipment nearby Try using the remote controller at a closer distance and directly in front of the main unit HOW TO USE USING REMOTE CONTROLLER Operating range Precaution A...

Страница 25: ...22 The connection for JB 199 unit with a TV is illustrated below HOW TO CONNECT 6 When connecting video audio output to TV ...

Страница 26: ... output please contact CAVS Tech Support HOW TO CONNECT When connecting Video output to TV and audio output to amplifier Note For better vocal sound try connecting microphones directly to the amplifier if microphone jacks are available on the amplifier rather than connecting to microphone jacks of JB 199 unit 23 ...

Страница 27: ... external disc drives and external hard drive to JB 199 unit is illustrated below Note Two external disc drives or one external disc drive with one external hard drive can be connected to JB 199 When connecting external disc drives and external hard drive to JB 199 unit USB USB 24 ...

Страница 28: ... REDUCE THE RISK OF FIRE OR ELECTRIC SHOCK DO NOT EXPOSE THIS APPLIANCE TO RAIN OR MOISTURE CAUTION RISK OF ELECTRIC SHOCK DO NOT OPEN AUDIO INPUT VIDEO INPUT VIDEO INPUT AUDIO OUTPUT VIDEO OUTPUT VIDEO OUTPUT When connecting TV and PC Monitor to JB 199 This device complies with Part 15 of the FCC Rules Operation is subject to the following two conditions 1 This device may not cause harmful interf...

Страница 29: ...he connection from a remote PC to JB 199 unit is illustrated below Use the LAN 100Mbps to connect JB 199 unit to a HUB or ROUTER for local network or Internet HOW TO CONNECT Note Use the LAN 100Mbps cable included in JB 199 unit INTERNET HUB ROUTER ...

Страница 30: ...trated below using cross network cable Although phisically comparable to LAN cable cross network cable has distinct functionality Refer to FAQ for detail 27 HOW TO CONNECT Note Static IP address must be assigned to JB199 and to PC Refer to USER FORUM at www cavsusa com for detail cross network cable ...

Страница 31: ...ERVICEABLE PARTS INSIDE REFER SERVICING TO QUALIFIED SERVICE PERSONNEL WARNING TO REDUCE THE RISK OF FIRE OR ELECTRIC SHOCK DO NOT EXPOSE THIS APPLIANCE TO RAIN OR MOISTURE CAUTION RISK OF ELECTRIC SHOCK DO NOT OPEN This device complies with Part 15 of the FCC Rules Operation is subject to the following two conditions 1 This device may not cause harmful interference and 2 This device must accept a...

Страница 32: ...external video source such as a USB camera to JB 199 unit is Note To install the USB camera to JB 199 see Section Advanced Functions HOW TO CONNECT When connecting external USB camera to JB 199 unit illustrated below USB 29 ...

Страница 33: ...username and password are both admin 4 On the left hand side menu go to DHCP Please check that the Start IP address End IP address and Default Gateway are 192 168 1 100 192 168 1 199 and 192 168 1 1 respectively 5 Under DHCP go to DHCP Clients List and Copy the MAC address of your JB199 machine 6 Under DHCP go to Address Reservation click on Add New 7 Paste the MAC address and enter the IP address...

Страница 34: ...ver on JB199 Premier unit It will start CAVS RS II Server HOW TO CONNECT 31 Connect TP Link router to JB199 Premier using LAN cable 1 Turn on the E Songbook by pressing the Power switch usually for 2 3 seconds of the tablet After the initial sequence the main Home page will appear with the CAVS RS icon Press the Application window 2 Tap on the Settings in the App window Note To connect TP LINK rou...

Страница 35: ...nect If the router is password protected input the password 5 Return to the Home window HOW TO CONNECT 32 When connecting Iphone Version 4 or Higher and Ipad Version 2 or higher to JB 199 Premier unit 1 Go to Apple App store from your iPhone iPad and download the CAVS RS II App for free We demonstrate below only the steps for iPhone as they are very similar to those for iPad ...

Страница 36: ...the Settings in the iPhone Ipad home window Go to WiFi 4 Turn on the Wi Fi and select the wireless router for example CAVS Router to which the CAVS RS II Server program is connected If the wireless router is password protected input the password 5 Return to the home window HOW TO CONNECT 33 ...

Страница 37: ...re from the App page of your Android Smart phone or tablet 2 Download and install the CAVS RS II App into Android phone or tablet 3 Go to app page select settings select Wifi 4 Next select the Wireless Router that is connected to the CAVS RS II Server program In this example the router is CAVS Router Tap on the CAVS Router and Press connect 5 Return to the home window ...

Страница 38: ...ou can also input directly a song number using the numeric buttons and press PLAY Select a song 2 1 HOW TO OPERATE 7 internal hard drive mode are TRACKS FROM FILE FORMAT CD MP3 CD Graphics MP3 MCG MP3 CDG Video CD VCD AVI MP3 MP3 DVD AVI MP3 MP3 Press PAUSE button to pause the song in play Press again to return to normal play Pause a song 3 Be sure to set the power input of JB 199 in the back pane...

Страница 39: ... press CANCEL Priority program songs 6 To program a song in front of the program queue select a song and press PPgm button in the remote control With no song selected press PROG button Input a song number followed by TEMPO control and KEY control settings Press PLAY to play or PROG to program the song Presetting TEMPO and KEY controls before play or program The song will play with the specified te...

Страница 40: ...o channels For multiplex tracks selecting Left channel will eliminate the lead vocal in the track Fanfare 12 Press FANFARE button on the remote control repeatly to make a selection Press PLAY to play the fanfare and display a score Master Volume Control 13 Raise lower the master volume of JB 199 by pressing VOLUME UP DOWN button on the remote control Background Video BGV 9 Press BGV button repeatl...

Страница 41: ...peat All is on during playback of programmed songs only the programmed songs will be repeated in circle Random play 18 Press RANDOM to set the random play mode on Press PLAY to play a song in random Press RANDOM again to set the random play mode off Next and Previous play 19 Press to skip to the previous next song TIME 14 Press TIME button on the remote control to select between elapsed time and r...

Страница 42: ...cord mode off To listen to the recorded track press a song number between 99901 99999 with the last two digits matching the recorded track number For example for a recorded track 02 press 99902 Press PLAY to begin playback To erase the recorded track press CLEAR to display the SYSTEM STATUS Press CLEAR again to delete the last recorded track To make an Audio CD from the recorded tracks go to MENU ...

Страница 43: ...scs To play the songs in DVD and Video CD discs the tracks must first be converted to AVI files and stored into JB 199 The instruction for making AVI files from DVD and Video CD discs are given in Chaper Preparing song files Compatible discs To return to JUKE mode for playing songs from internal memory press JB CD button The input field to select a song will change to 00000 Return to JUKE mode 2 4...

Страница 44: ...ction see Chapter JB 199 Manager Program Juke FTP Version xx xxx Indicate the version numbers of the current Juke and FTP program running inside JB 199 FTP Status Running Stop Indicate the status of FTP program in JB 199 Normally it will show as Running DISK Total xxxxxx Free xxxxxx Total xxxxxx Free xxxxxx Indicate the total and free spaces of the system partition and song data partition in the i...

Страница 45: ... JB 199 unit So the actual song number that would be assigned is the Starting song number 1 For example if you wish to assign the number 15 14 should be the Starting song number 4 Conversion speed 1X 2X 52X DVD 1X DVD 20X MAX Select the disc drive speed at which the disc will be read 5 Compression rate 32Kbps 128Kbps 320Kbps Select the rate at which the audio data will be compressed Normally it is...

Страница 46: ...t Save and Print Song list To edit save and print the song list of JB 199 see Chapter Edit Save and Print Song List HOW TO OPERATE 43 7 Convert Tracks All Select Choose to convert all tracks or some selected tracks only If some choose select and press A new window SELECT TRACK will appear Use the buttons to move along the tracks and use button to select or unselect each track when the selection is...

Страница 47: ...ection is complete press to return 3 Writing speed 1 2 40 Press to enter Select a speed for recording Normally it is set at 8x 4 Write files Press to record the selected files onto the CD ROM 5 Delete files Press to delete the selected files Disc Recording 3 This chapter describes how to make Audio CD from the recorded tracks From the initial Welcome screen press JB CD button to switch from JUKE t...

Страница 48: ...g the songs and use button to select or unselect each track When the selection is completed press to return For upgrades set as All 5 Download songs Press to begin downloading song files The song numbers and the titles will be displayed during download When the downloading is completed Go to 1 Jukebox in the MENU to register the songs files See Chapter Jukebox for more details 6 Program upgrades P...

Страница 49: ...he credit debited for each karaoke song for use with bill acceptor 6 Debit per Music 1 2 3 Indicate the credit debited for each music jukebox song for use with bill acceptor 7 Recording mode None Song to song Stop to end Indicate the recording mode The Song to song option records one song per track The Stop to end option records from the time the recording is turned on until the time it is turned ...

Страница 50: ...ss A new window SELECT FILE will appear Use the buttons to move along the files and use button to select or unselect each file When the selection is completed press to return 4 Still image interval 5 10 15 Indicate the time period in seconds allocated for each image 5 Display title on off Select to turn on off the Welcome To CAVS Sing Along message in the inital screen This message can be changed ...

Страница 51: ...ut It is also controlled by MUTE button on the remote control 3 WaveOut Volume 1 2 15 Indicate the wave output volume level Normally it is set at 15 4 Synthesizer Volume 1 2 15 Indicate the MIDI output volume level Normally it is set at 15 5 LineIn Volume 0 100 Indicate the music input volume level for recording Normally it is set at 12 6 Microphone Volume 0 100 Indicate the microphone input volum...

Страница 52: ...h to begin downloading 5 Go to 7 Download from JB 99 and press to begin downloading Approximately 1 000 songs will download in 15 minutes 6 Press STOP to stop the downloading When stopped the transferred songs from JB 99 will be saved in group of 100 songs and the last group of 100 songs that was stopped will not be saved in JB 199 Download song files from JB 99 8 The instruction below may damage ...

Страница 53: ...anager program in the remote PC and start the program 2 Remote PC connected to JB 199 by Internet Connect JB 199 to an Internet using a broadband modem or a Router If using a network with a Router assign JB 199 to be a FTP server with Port 21 in the network Install the CAVS JB 199 Manager program in a remote PC with Internet connection and start the program Following chapters describes the steps t...

Страница 54: ...ert the CD G disc into the disc drive and close the tray Press SOURCE DRIVE button to select a disc drive if there is more than one which contains the CD G disc Press READ TOC button to display the tracks of the CD G disc in the left side panel Press Target button to select a directory in which the encoded files will be stored Select a track you wish to encode by placing a check mark and inputting...

Страница 55: ...G B Encoding MIDI MID and KAR files Install the CAVS JB 199 Manager program into the remote PC Start the program and click on MDK ENCODER Click on Folder and select the directory in which the MID or KAR files are Select Code for the text language If the text file is in English choose 1 English Press MDK ENCODER button to start encoding When the encoding is completed Status will show as Finish Pres...

Страница 56: ...tton Note Be sure to change the password from the factory setting With JB 199 connected the song list of JB 199 will display in the right side panel Click on FOLDER button on the left side panel Select a directory in which the new song files are prepared The song files in the directory will be displayed Edit the song list on the left side panel inputing title and singer Click on SAVE LIST button o...

Страница 57: ...ed They are assigned temporarily for sending files only Click on the right arrow button to begin sending song files to JB 199 Note Songs that are grayed out are missing some components and cannot be sent to JB 199 B Backing up song files from JB 199 Check the songs you wish to backup in the right side JB 199 panel Click on the left arrow button to begin backing up song files to the remote PC HOW T...

Страница 58: ... button to send the file and upgrade the JB 199 player Reboot the JB 199 player B Upgrading JB 199 system files Download the latest system files from www cavsusa com jb 199 htm Note Save the downloaded file in a directory of your PC and double click on the file to unzip You will see a folder for example config prog or image Start the CAVS JB 199 Manager program and click on Program upgrade button ...

Страница 59: ...mally the BMP files of size 800 x 600 24 bit color are recommended For still images that are of different sizes JB 199 will automatically adjust the image to the TV screen Images of larger than the recommended size may cause blurriness in the picture To make BMP files there are many shareware programs available on the Internet You can also use the Paint program in Windows for most standard convert...

Страница 60: ...he method of Program Upgrades Make folder config in your PC Insert the screen saver picture file into the config folder Start the CAVS JB 199 Manager program and click on Program upgrade button on the right side panel Click on Folder button Find the config folder in your PC that has the screen saver picture file Click on Upgrade Files button to send the folder and its contents to the JB 199 player...

Страница 61: ...on the right side panel Select To JB 199 to save the song list in JB 199 Note This will change the song list permanently You can also save a copy of the song list to your PC by pressing SAVE LIST button on the right side panel and then selecting To My PC The song list will be saved in a text format C Making a CD copy of the song list from JB 199 player A copy of the song list can also be written o...

Страница 62: ...n song number title and artist It can be edited in a PC using Word Excel or other programs for printing D Printing a song list To print the song list of JB 199 from your PC press PRINT LIST button on the right side panel Follow the display window to select a printer in your PC and press OK to print Note The song list printed directly from JB 199 will have the default page layout of CAVS To design ...

Страница 63: ...G configuration files When a directory is empty it can be deleted from the structure of DataCD A Song files The song file format that can be downloaded into JB 199 are MP3 for Audio tracks MP3 MCG CD G tracks MP3 CDG CD G tracks MP3 MP3 AVI DVD tracks MP3 AVI Video CD tracks MDK MIDI tracks The CDG file noted in this list is of the graphic file format produced by JBManager or JB 199 Manager progra...

Страница 64: ... or Wordpad editor make a text file named Juke txt of the song list in the following format 00001 Unbreak My Heart Braxton Tony 00002 After The Loving Humperdink Englebe The song number title and singer name are separated by divider this symbol is typed by Shift Each title and singer name cannot be longer than 48 characters 3 Insert the song files and Juke txt file in the root directory of the Dat...

Страница 65: ...write the files and the directories into a CD ROM using any standard disc writing program The DataCD after having been written should look as follows 00001 MP3 00002 MP3 00002 CDG 00003 MP3 00003 MCG 00004 MP3 00004 MP3 00004 AVI 00005 MP3 00005 AVI 00006 MDK juke txt IMAGE MOVIE homemade AVI IMAGE STILL barclosingtime BMP PROG startup EXE CONFIG config TXT The DataCD created for JB 99 is compatib...

Страница 66: ...h from JUKE to DISC mode Press the OPEN CLOSE button on the remote control to open or close the disc drive After inserting a disc wait a few seconds for JB 199 to load the disc and return the control Two disc drives may not be necessary in JB 199 as a song will be read ahead of its play This can be seen by a display of a rotating disc on the TV screen The display will close when the song has been ...

Страница 67: ...1 Jukebox of MENU It can be changed from its factory setting of 99999 to any number inbetween 1 99999 Note that no song number above 99999 can be called in JB 199 Thus for a JB 199 with a Disc 2 number 80000 for example only the songs with numbers 1 19 999 in the external hard drive can be played External hard drive 2 HOW TO OPERATE VGA Monitor 3 A VGA monitor can be connected to JB 199 using 15 p...

Страница 68: ...er the driver CD ROM that came with the camera into the disc drive and follow the instruction for installation To return to JB 199 double click on JB 199 Startup exe at the desktop USB Camera 1 When in Windows follow carefully the instruction given by this User s Manual or the website www cavsusa com jb 199 htm Any addition or deletion of files or programs may result in serious and un repairable d...

Страница 69: ...with the TV screen and sound system If you do not wish to share the signals click on AVOFF exe on the desktop Double click on PowerDVD exe to start the program Use the program to play the DVD or Video CD disc To maximize the viewing screen double click on the DVD viewing screen To return double click on the viewing screen To return to JB 199 double click on JB 199 Startup exe at the desktop Play D...

Страница 70: ...w cavsusa com jb 199 htm Any addition or deletion of files or programs may result in serious and un repairable damages to JB 199 HOW TO OPERATE CAVS JB 199 Manager program shown in Section CAVS JB 199 Manager program is also available in Windows At the desktop double click on CAVS JB 199 Manager icon to start Click on JB199 Manager and press JB199 IN button You will see the song list of JB 199 on ...

Страница 71: ...f the E Songbook tap on the CAVS RS II App icon and start the app The main menu of CAVS RS program will appear with the following selections Song Book Search by Title Search by Artist Queue Remote Control Podium Favorite List Contest Board Settings ...

Страница 72: ...l of communication with CAVS RS II server Red Not Connected Blue Connecting Importing a song list Green Importing a song list completed Ready to go Tap on settings The following popup will appear The default PINCODE is 0000 Four Zeros Input the PINCODE and press OK Note Without a proper Wi Fi connection the burst will remain in red color ...

Страница 73: ...ppear asking you to input the IP address of the CAVS RS II server The IP address can be found on the CAVS RA II server program in the CAVS Karaoke Player on windows PC Copy the IP address and put it in your E Songbook Note Factory Deafult IP address is 192 168 1 100 ...

Страница 74: ...on The burst will then turn to green when importing the song list is completed You will see your E songbook on CAVS RS II Server Means your E Songbook is connected and ready to use 1 Reserve Remote Controller In the Settings tap on the Reserve Remote Controller and the following pop up will appear Select from the three levels of controls that can be permitted in the E Songbook ...

Страница 75: ...r program to all E Songbooks In the Settings tap on the Change PINCODE and a pop up will appear The PINCODE is for the security of accessing the E Songbook Settings Change the PINCODE according to the instruction given on the screen Tap on the song book The song list sorted in title by default will appear You can tap on the Index Title or Artist button to re sort You can scroll the song list with ...

Страница 76: ...to type in the customer name or press the down arrow button to lower the keyboard You can also preset the key and tempo levels of the song being reserved Press the Reserve to reserve the song to the Queue Press the Add Fav button to add the song to your Favorite List or press the Cancel to return ...

Страница 77: ...Press GO Songs with matching artists will appear Press the Index Title or Artist button to re sort the list From this window you can tap on a song to reserve add to a Favorite List or cancel to return 5 Search by Artist Note Any part of the word can be searched Queue Remote Control Enable to use E Songbook as a remote control for your JB199 Premier unit 6 7 Podium The Podium screen is designed for...

Страница 78: ...song to reserve you can also delete the song from the favorite list 8 Favorite List 5 Tap on the contest board A popup will show with the simple menu for scoring Select the score level and press the Confirm button to send Note that your score will not be accepted until it is asked for by the CAVS RS II Server Watch the TV showing the karaoke lyrics The Send in Your Score message will begin to roll...

Страница 79: ...eue Status Favorite List Contest Board Settings Iphone and Ipad 1 Menu Tap on the settings tap on the servwe IP address which will bring up the screen keyboard Type in the IP address of the CAVS RS II server program in your CAVS Karaoke player or Windows based PC 2 Settings Note After setting the Server IP be sure to save by pressing the Save button ...

Страница 80: ...ing the alphanumeric bar on the right side You can also search songs by title or artist Tap on search buttons at the bottom A window will appear ready with an input field Type in the word or a part of the word you wish to search for and press search Songs with matching title will appear on the screen Again you can re sort the list by title artist or index by pressing the sort button Once a song is...

Страница 81: ...e lists you will be asked to create a new Favorite list Press Create to make the new Favorte list 4 Queue Status Before starting the favorite list please note that you can enable disable the Auto save option in the settings When enabled the favorite list will save the added songs automatically If you wish to save only at your command turn off the feature At the main menu tap on the favorite list 5...

Страница 82: ... songs will appear on the facorite list From the list tap on any song Press the Reserve to reserve the song press the delete to remove the song from the favorite list Contest Board Tap on the contest board The screen will show the menu for scoring Select the score level and press the confirm button to send Note Your score will not be accepted until it is asked for by the CAVS RS II Server 6 Note Y...

Страница 83: ...W TO OPERATE 80 Message Receiving To view a message from CAVS karaoke player press the i button This button is in the top right corner The message sent will appear Press Dismiss to close the message box 7 ...

Страница 84: ...Not connected Blue Conneecting Doenloading a song list Green Downloading completed Ready to go Tap on the settings tap on the set server IP which will bring up a popup window Type in the IP address of the CAVS RS II Server program Press OK After setting the server IP the color of the burst icon on the bottom right corner will turn blue signaling a successful Intranet connection The burst will then...

Страница 85: ...he pitch key and tempo levels Press the reserve button to reserve the song Add fav button to add the song to a favorite list or cancel to return If you wish to skip the customer name pitch and tempo controls press the down arrow on the keyboard Press Add Fav button to add the song to the favorite list Type the account name or create a new account by inputting a new accounr name Press the add butto...

Страница 86: ...earch by artist Input field and the keyboard will appear Type in the word or any part of the word you wish to search Press GO Song with matching artist will appear You can re sort the list by index Title or artist pressing the respective buttons Tap on a song to reserve or add to a favorite list You can also press and hold on a song to add to your favorite list Tap on the queue status A window wil...

Страница 87: ...ong from the favorite list When reserving a song from the favorite list the customer name field is pre filled with the account name Tap on the contest board a window will appear Select the score level and press the confirm button to send Note your score will not be accepted until it is asked by the CAVS RS II Server You may send in your score once or multiple times Depending on the setting in the ...

Страница 88: ...the batteries inside working After a boot up JB 199 may ignore the first 1 or 2 inputs 6 Video is colorless and or Check the setting of NTSC PAL mode See Section Advanced scrolling Functions for changing the mode 7 VHS S Video is not To use VHS S Video output contact CAVS Tech Support working 8 Recording only captures Connect the microphones to MIC 1 and MIC 2 of JB 199 music not vocal To record w...

Страница 89: ...X 708 PX 712 etc Input terminals Microphone input 1 2mV 600 ohm x 2 Keyboard input Mini din Mouse input Mini din LAN input 100 Mbps 10Mbps USB input 2 0 x 2 Video in RCA Composite Power input 110V 60Hz 220V 50Hz Output terminals Video output Composite 1Vp p 75Ohm x 2 Audio output Stereo 2 0 Vrms max x 2 VHS S Video output VGA output 15 pin D sub RGB Control output Pin header 2 x 4 Bill Coin connec...

Страница 90: ...RBISHED PRODUCT WARRANTY PLEASE REFER TO THE REFURBISHED PRODUCT WARRANTY INFORMATION PACKAGED WITH EACH REFURBISHED PRODUCT CAVS SHALL NOT BE LIABLE FOR THE LOSS OF USE OF THE PRODUCT INCONVENIENCE LOSS OR ANY OTHER DAMAGES WHETHER DIRECT INCIDENTAL OR CONSEQUENTIAL INCLUDING WITHOUT LIMITATION DAMAGE TO TAPES RECORDS OR DISCS RESULTING FROM THE USE OF THIS PRODUCT OR ARISING OUT OF ANY BREACH OF...

Страница 91: ...CAVS USA INC ...
Отзывы: