background image

CAVE-TEK TeamUp P20 Camera                                                                                     User Guide


16


Tick Flip to realize image upside down, tick mirror to realize image around the mirror. Default value is not 
tick. 
 

5.5.4


Audio Settings 


1) 

Audio Switch


Enable or disable audio switch.


2) 

Audio Type


Audio type AAC.


3) 

Sample Rate


Sample rate 44.1K and 48K selectable. 

4) 

Bit Rate


Bit rate 96K, 128K, 256K selectable. 

5) 

Input Type


Input type line in. 

6) 

Input Vol L


The volume of the left channel. 

7) 

Input Vol R


The volume of the right channel. 

8) 

ADTS Options


Optional items: On, Off.


Содержание TeamUp P20

Страница 1: ...CAVE TEK TeamUp P20 Camera User Guide CAVE TEK TeamUp P20 Camera User Guide English V1 2 ...

Страница 2: ...ISE REDUCTION 7 4 7 SETUP 7 4 8 COMMUNICATION SETUP 8 4 9 RESTORE DEFAULT 8 5 Network Function 9 5 1 Operating Environment 9 5 2 Equipment Installation 9 5 3 Internet Connection 9 5 4 Camera controlled by LAN 9 5 4 1 Setup IP address 9 5 4 2 Login IP Camera admin 10 5 4 3 Open Network stream with VLC player 11 5 5 Camera Setup 12 5 5 1 Homepage Introduction 12 5 5 2 Video Settings 14 5 5 3 Image S...

Страница 3: ...rt 1 Please check below connects first 2 Connect the power adapter to the power connector on the rear panel of the camera The power indicator on the front panel of the camera is on 3 After the camera is powered on it starts to boot up to the initialization position Then both horizontal and vertical go to the middle position the motor stops running and the initialization is completed Note If preset...

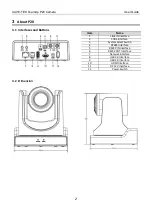
Страница 4: ...nd Buttons Item Name 1 LINE IN Interface 2 CVBS Interface 3 System Select Switch 4 RS485 Interface 5 RS232 IN Interface 6 RS232 OUT Interface 7 Network Interface 8 USB 3 0 Interface 9 USB 2 0 Interface 10 HDMI Interface 11 DC 12V Interface 12 Power Switch 3 2 Dimension ...

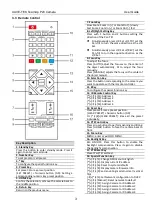
Страница 5: ...r to adjust the focus manually Press MANUAL adjusts the focus on the center of the object manual 10 Selection Key Press the button corresponding to the camera you want to operate with the remote controller 11 Key To configure the special function key 12 IR Remote Control Key F1 Address 1 F2 Address 2 F3 Address 3 F4 Address 4 13 Reset Key Clear preset Erase a preset position CLEAR PRESET Numeric b...

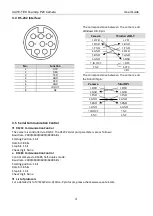
Страница 6: ... 9600 38400 bit s Starting Position 1 bit Data bit 8 bits Stop bit 1 bit Check digit None RS485 Communication Control Control camera via RS485 half duplex mode Baud rate 2400 4800 9600 38400 bit s Starting position 1 bit Data bit 8 bits Stop bit 1 bit Check digit None List of protocols For a detailed list of VISCA Pelco D Pelco P protocols please check www cave tek com 9 RI 8 CTS 8 NC 7 RTS 7 IR O...

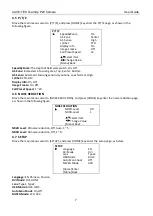
Страница 7: ...URE Mode Auto ExpCompMode Off Backlight Off Gain Limit 3 Anti Flicker 50Hz Meter Average DRC 2 Select Item Change Value Menu Back Mode Exposure mode Auto Manual SAE AAE Bright ExpCompMode Exposure the compensation mode On Off Effective only in Auto mode ExpComp Exposure the compensation value 7 7 Effective only in ExpCompMode item to On Backlight Set the backlight compensation On Off Effective onl...

Страница 8: ...sh VAR mode BG Tuning Blue gain fine tuning 10 10 Effective only in Auto One Push VAR mode Saturation 60 200 Hue 0 14 AWB Sens The white balance sensitivity Low Middle High 4 4 IMAGE Move the main menu cursor to IMAGE and press HOME key enter the image page as shown in the following figure IMAGE Luminance 6 Contrast 8 Sharpness 3 Flip H Off Flip V Off B W Mode Off Gamma 0 5 Style Clarity Select It...

Страница 9: ...splay Info On Off Image Freeze On Off Call Preset Speed 1 24 4 6 NOISE REDUCTION Move the main menu cursor to NOISE REDUCTION and press HOME key enter the noise reduction page as shown in the following figure NOISE REDUCTION NR2D Level Off NR3D Level 3 Select Item Change Value Menu Back NR2D Level 2D noise reduction Off Auto 1 5 NR3D Level 3D noise reduction Off 1 8 4 7 SETUP Move the main menu cu...

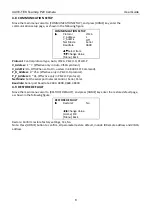
Страница 10: ..._AddrFix On Off When set to On useless in 88 30 01 FF Command P_D_Address 0 254 Effective only in PELCO D protocol P_P_Address 0 31 Effective only in PELCO P protocol Net Mode Set the serial port network control Serial Paral Baudrate Serial port baud rate 2400 4800 9600 38400 4 9 RESTORE DEFAULT Move the main menu cursor to RESTORE DEFAULT and press HOME key enter the restore default page as shown...

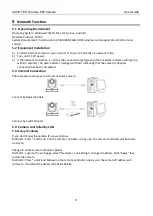
Страница 11: ...e data indicator orange will flash indicating that the camera s physical connection has been completed 5 3 Internet Connection There are two main ways to connect network camera Connect by Network Cable Connect by Switch Router 5 4 Camera controlled by LAN 5 4 1Setup IP address If you don t know the camera IP view as below Method 1 Press and and 4 on the remote controller one by one the camera IP a...

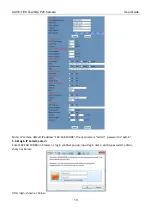
Страница 12: ...e IP camera default IP address 192 168 100 88 the username is admin password is admin 5 4 2Login IP Camera admin Enter 192 168 100 88 on browser a login window pop up input login name admin password admin shown as below After login shown as below ...

Страница 13: ...ideolan org vlc download and Install VLC player software After installation login again will show as above 5 4 3Open Network stream with VLC player Step 1 Open VLC media player Step 2 Click Media Open Network Stream or click Ctrl N as below Step 3 Input URL address rtsp ip port number 1 First stream rtsp ip port number 2 Second stream Step 4 Finish Note RTSP default port number 554 ...

Страница 14: ... direction control box Up down left right home button as above Rate Pan Speed can be chosen as 1 24 Tilt Speed can be chosen as 1 20 Select the corresponding speed and click the direction button to realize PTZ speed up or speed down Zoom In Zoom out For zooming in or zooming out Focus In Focus Out Focusing on distant the objects or focusing on close the objects Set Call When PTZ turns to the expec...

Страница 15: ...ition PTZ MENU When system in menu mode OSD menu display in the upper corner of the image page PTZ direction control box Up down button select menu and the home button enter the submenu the left right button modify the submenu After the menu to be modified select PTZ If in the main menu save the setting and exit automatically Otherwise return to the previous menu PTZ system in PTZ mode C Language ...

Страница 16: ... support 1920x1080 1280x720 1024x576 960x540 640x480 640x360 Second stream support 1280x720 1024x576 720x576 50Hz support 720x480 60Hz support 720x408 640x360 480x270 320x240 320x180 The bigger resolution is the clearer the image will be more network bandwidth will be taken 5 Bit Rate The user can specify the bit rate Generally speaking the larger the bit rate the better image quality However the ...

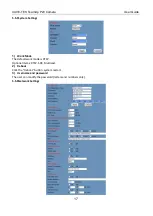
Страница 17: ...itude of variable rate grade 1 6 10 Slice Split Enable Enable or disable slice split function 11 Split Mode Select split mode optional items Fixed blocks Fixed bytes 12 Slice Size Set the size of slice 5 5 3Image Settings 1 Brightness Image bright 0 14 slider control on the right shows the corresponding numerical Default value is 6 2 Saturation Saturation 0 14 slider control on the right shows the...

Страница 18: ...ck 5 5 4Audio Settings 1 Audio Switch Enable or disable audio switch 2 Audio Type Audio type AAC 3 Sample Rate Sample rate 44 1K and 48K selectable 4 Bit Rate Bit rate 96K 128K 256K selectable 5 Input Type Input type line in 6 Input Vol L The volume of the left channel 7 Input Vol R The volume of the right channel 8 ADTS Options Optional items On Off ...

Страница 19: ... 5System Settings 1 Work Mode The default work mode is RTSP Optional items RTSP SDK Multicast 2 Reboot Click the Reboot button system restart 3 Username and password The user can modify the password letters and numbers only 5 5 6Network Settings ...

Страница 20: ...lect enable or disable video and audio You can select the control code stream of On Off Video Audio between in the two streams 5 RTSP Settings Turn On Off RTSP auth 6 ONVIF Settings Turn On Off ONVIF and ONVIF auth 7 Multicast Settings Turn On Off multicast Setting the multicast address default value is 224 1 2 3 and port default value is 6688 then 6688 is the multicast port of the first stream 66...

Отзывы: