background image


IMPORTANT SAFETY INSTRUCTIONS 


WARNING


To reduce the risk of fire, electrical shock, 
or injury when using your appliance, follow 
these basic precautions: 


  Read all instructions before using the Wine Cellar. 

  DANGER or WARNING:  Risk of child entrapment.   

Child entrapment and suffocation are not problems of the past. Junked or abandoned 
appliances are still dangerous . . . even if they will “just sit in the garage a few days”. 

  Before you throw away your old Wine Cellar: Take off the door.  Leave the 

shelves in place so that children may not easily climb inside. 

  Never allow children to operate, play with, or crawl inside the appliance. 

  Never clean appliance parts with flammable fluids.  The fumes can create a fire 

hazard or explosion. 

  Do not store or use gasoline or any other flammable vapors and liquids in the vicinity 

of this or any other appliance.  The fumes can create a fire hazard or explosion. 


-Save these instructions- 


INSTALLATION INSTRUCTIONS 


  BEFORE USING YOUR WINE CELLAR 


Remove the exterior and interior packing. Read the Installer’s Directions. 


Check to be sure you have all of the following parts: 


5 Roll-out Shelves 


1 Small Bottom Shelf 


2 Keys 


1 Stainless Steel Handle Assembly with 2 Screws, 2 Flat Washers and 2 Lock Washers 


1 Door Lower Hinge Bracket for Door Opening from the Right Side 


1 Instruction Manual 


Before connecting the Wine Cellar to the power source, let it stand upright for approximately 2 hours. 
This will reduce the possibility of a malfunction in the cooling system from handling during 
transportation. 


Clean the interior surface with lukewarm water using a soft cloth. 


Install the handle on the left side of the door. 
 

  INSTALLATION OF YOUR WINE CELLAR 


This appliance is designed to be for free standing installation or built-in (fully recessed). 


Place your Wine Cellar on a floor that is strong enough to support it when it is fully loaded. To level 
your Wine Cellar, adjust the front leveling leg at the bottom of the Wine Cellar. 


Locate the Wine Cellar away from direct sunlight and sources of heat (stove, heater, radiator, etc.). 
Direct sunlight may affect the acrylic coating and heat sources may increase electrical consumption. 
Extreme cold ambient temperatures may also cause the unit not to perform properly. 


Avoid locating the unit in moist areas.  


Plug the Wine Cellar into an exclusive, properly installed-grounded wall outlet. Do not under 
any circumstances cut or remove the third (ground) prong from the power cord. Any 
questions concerning power and/or grounding should be directed toward a certified electrician 
or an authorized Cavavin service center.


Содержание CAVA46S-1DZ

Страница 1: ... ATTENTIVEMENT LES RÈGLES DE SÉCURITÉ ET LES INSTRUCTIONS L image peut varier Picture may vary CAVAVIN 2000 INC CAVAVIN 2000 INC CAVAVIN 2000 INC CAVAVIN 2000 INC 4575 Sir Wilfrid Laurier Boulevard Saint Hubert Quebec Canada J3Y 3X3 E Mail info cavavin com Cavavin a une politique d amélioration continue de ses produits et se réserve le droit de changer les matériaux et les spécifications sans préa...

Страница 2: ...née 8 Branchement au réseau électrique 9 Rallonge 9 Fonctionnement de l appareil 9 Recommandation relatives à la température 9 Interrupteur marche arrêt 10 Réglage de la température 10 Capacité d entreposage 11 Éclairage intérieur 11 Verrouillage de la porte 11 Tablettes 11 Entretien de l appareil 12 Nettoyage de l appareil 12 Panne de courant 12 Déplacement de l appareil 12 Conseils éconergétique...

Страница 3: ... ATTENTION Danger signifie que le fait de ne pas tenir compte de ce signal de sécurité pourrait entraîner des blessures corporelles ou la mort Avertissement signifie que le fait de ne pas tenir compte de ce signal causer des dommages matériels importants au produit des blessures corporelles graves et même la mort Attention signifie que le fait de ne pas tenir compte de ce signal pourrait causer de...

Страница 4: ... réparer l appareil ni d en remplacer une pièce à moins que ce ne soit spécifiquement recommandé dans ce manuel Laisser à un technicien qualifié le soin de procéder à toute réparation non recommandée SUIVEZ LES INSTRUCTIONS SUIVANTES LORSQU ELLES S APPLIQUENT A VOTRE MODÈLE Déplacez l appareil à deux ou à plusieurs personnes afin d éviter les blessures Pour assurer la ventilation convenable de l a...

Страница 5: ...concernant votre appareil Si vous avez reçu un appareil endommagé avisez en immédiatement le vendeur ou le fabricant Économisez du temps et de l argent Avant de faire appel à nos services vérifiez la liste des problèmes de fonctionnement mineurs faciles à résoudre dressée dans ce manuel POUR TOUTE ASSISTANCE Nous sommes fiers de notre service et désirons votre entière satisfaction Si pour une quel...

Страница 6: ...AVA46 1SDZ 46 bouteilles extérieur inox 1 Panneau de commande inoxydable 2 Verrou de sécurité 3 Porte en acier inoxydable 4 Poignée en acier inoxydable 5 Tablettes amovibles 5 en tout 6 Séparation de zones 7 Petite tablette inférieure 8 Grille inférieure 9 Pieds réglables 4 10 Armoire ...

Страница 7: ...mode d emploi Assurez vous d avoir toutes les pièces suivantes 5 tablettes 1 petite tablette 2 clés 1 poignée en acier inoxydable 1 mode d emploi Placez l appareil à l endroit qui lui est réservé puis attendez environ deux heures avant de le brancher Vous éviterez ainsi des troubles de fonctionnement au niveau du système de refroidissement possiblement occasionné lors du transport Nettoyez les sur...

Страница 8: ...ns décoratifs du coté gauche de la porte comme dans illustration 1 Gardes les bouchon decoratifs 3 Utilisez les deux 2 vis de poignée cruciformes incluses dans le sac contenant le mode d emploi et insérez les avec la rondelle plate et la rondelle de blocage qui les entourent dans le côté de la porte de l intérieur vers l extérieur tel qu illustré ci dessous 2 4 Alignez les trous de la poignée aux ...

Страница 9: ...ui pourrait provoquer un incendie Ne débranchez jamais l appareil en tirant sur le cordon d alimentation Tenez plutôt fermement la prise Réparez ou remplacez immédiatement le cordon d alimentation s il est effilé ou abîmé N utilisez jamais de cordon d alimentation fissuré ou usé au niveau de la gaine ou de la fiche Lorsque vous devez déplacer l appareil assurez vous de ne pas abîmer le cordon d al...

Страница 10: ...r la flèche Pour entreposer principalement du vin rouge il est préférable de le ranger à L ÉTAGE INFÉRIEUR la température contrôlée en appuyant sur les flèches ascendante ou descendante du dessus doit être réglée entre 15 et 18 C 59 et 64 F et la lampe à DEL au dessus de l icône représentant le ROUGE s allumera Pour entreposer principalement du vin blanc il est possible de le ranger à L ÉTAGE SUPÉ...

Страница 11: ... contenant le manuel de mode d emploi Insérez la clé dans le verrou et tournez la dans le sens inverse des aiguilles d une montre pour déverrouiller la porte Pour la verrouiller faîtes l opération inverse en vous assurant que la fiche métallique est complètement enfoncée Retirez la clé et placez la dans un endroit sûr où vous ne risquez pas de la perdre et où elle ne sera pas facilement accessible...

Страница 12: ...uide doux Rincez bien et essuyez le tout à l aide d un chiffon doux et propre ATTENTION En ne débranchant pas l appareil vous vous exposez à des risques d électrocution ou de préjudice corporel PANNE DE COURANT La plupart des coupures de courant se rétablissent en quelques heures et ne devraient pas affecter la température de votre cellier si vous ouvrez la porte le moins possible Si le courant ne...

Страница 13: ... est mal fermée Le contrôle de la température est mal réglé Le joint d étanchéité de la porte n est pas suffisamment étanche La lumière ne fonctionne pas L appareil est débranché Le disjoncteur est éteint ou le fusible grillé L ampoule a grillé L interrupteur de la lumière est en position d arrêt L appareil vibre Vérifiez que l appareil est bien à niveau L appareil semble faire trop de bruit Le so...

Страница 14: ...sposition Commande de pièces info cavavin com télécopieur 450 676 5022 Vous pouvez commander des pièces ou des accessoires qui vous seront livrés directement à domicile Nous acceptons les chèques les mandats Master Card ou Visa SCHÉMA DE CÂBLAGE M M AC 115V 60Hz Jaune Vert Blanc Rouge OLP Noir M Noir LED PCB 1 LED PCB 2 COMPRESSEUR Ventilateur de evaporateur Appareil de Chauffage PTC Transformateu...

Страница 15: ...exclus de la garantie A Les pertes de vin ou autres produits en raison de leur altération B Les dommages connexes la perte d usage ou les délais résultant du bris du produit ou de difficultés que pourrait rencontrer Cavavin à effectuer les réparations nécessaires en vertu de la présente garantie C Les diagnostics de type aucun problème trouvé ou tout appel relatif à la procédure d inversion de la ...

Страница 16: ...1 ...

Страница 17: ...nsion Cord 8 Installing Stainless Steel Handle 9 Operating Your Wine Cellar 10 Recommended Temperature Settings 10 ON OFF Power 10 Setting the Temperature Control 10 Storage 11 Interior Light 11 Door Lock 11 Shelves 11 Care and Maintenance 12 Cleaning Your Wine Cellar 12 Power Failure 12 Vacation Time 13 Moving Your Wine Cellar 13 Energy Saving Tips 13 Troubleshooting Guide 14 Service for Your App...

Страница 18: ... the words DANGER WARNING or CAUTION Danger means that failure to heed this safety statement may result in severe personal injury or death Warning means that failure to heed this safety statement may result in extensive product damage serious personal injury or death Caution means that failure to heed this safety statement may result in minor or moderate personal injury or property or equipment da...

Страница 19: ...ified technician FOLLOW WARNING CALL OUTS BELOW ONLY WHEN APPLICABLE TO YOUR MODEL Use two or more people to move and install appliance Failure to do so can result in back or other injury To ensure proper ventilation for your appliance the front of the unit must be completely unobstructed Choose a well ventilated area with temperatures above 60 F 16 C and below 90 F 32 C This unit must be installe...

Страница 20: ...cerning your wine cellar If you received a damaged wine cellar immediately contact the dealer or builder that sold you the wine cellar Save time and money Before you call for service check the Troubleshooting Guide It lists causes of minor operating problems that you can correct yourself IF YOU NEED SERVICE We re proud of our service and want you to be pleased If for some reason you are not happy ...

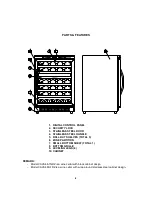
Страница 21: ...odel CAVA46S 1DZ is a wine cellar with wrap around stainless steel cabinet design 1 DIGITAL CONTROL PANEL 2 SECURITY LOCK 3 STAINLESS STEEL DOOR 4 STAINLESS STEEL HANDLE 5 ROLL OUT SHELVES TOTAL 5 6 ZONE PARTITION 7 SMALL BOTTOM SHELF TOTAL 1 8 BOTTOM GRILLE 9 LEVELING LEGS 4 10 CABINET ...

Страница 22: ...crews 2 Flat Washers and 2 Lock Washers 1 Door Lower Hinge Bracket for Door Opening from the Right Side 1 Instruction Manual Before connecting the Wine Cellar to the power source let it stand upright for approximately 2 hours This will reduce the possibility of a malfunction in the cooling system from handling during transportation Clean the interior surface with lukewarm water using a soft cloth ...

Страница 23: ...ce and not left exposed or dangling to prevent accidental injury The appliance should always be plugged into its own individual electrical outlet which has a voltage rating that matches the rating label on the appliance This provides the best performance and also prevents overloading house wiring circuits that could cause a fire hazard from overheated Never unplug the appliance by pulling the powe...

Страница 24: ...ration 1 Save the decorative plugs for future use 8 Insert the two 2 Phillips head handle screws with the lock washers and flat washers attached through the gasket side of the door frame until the screws pass through the door frame Follow the sequence shown below in Illustration 2 9 Align the handle with the screws installed in the above step 3 Tighten the screws using a Phillips head screwdriver ...

Страница 25: ...emperature of the upper zone and touch the right side UP and DOWN marks to control the internal temperature of the lower zone The temperature indicators will appear in the display window marked for UPPER ZONE and for LOWER ZONE The temperature range of the LOWER ZONE is 13º 18ºC 55 65ºF which is suitable for storing white and red wines The temperature range of the UPPER ZONE is 5º 13ºC 40 55ºF whi...

Страница 26: ...or lights are available in both upper and lower zones You can turn the interior light on in each zone by pushing the button marked with the bulb symbol or touch the mark The lights will turn off automatically if they remain ON for 10 minutes or more You have to push the button marked with the bulb symbol or touch the mark again and the light will turn back on DOOR LOCK Your unit is provided with a...

Страница 27: ...e about 2 tablespoons of baking soda to a quart of water Wash the shelves with a mild detergent solution Wring excess water out of the sponge or cloth when cleaning area of the controls or any electrical parts Wash the outside cabinet with warm water and mild liquid detergent Rinse well and wipe dry with a clean soft cloth Do not use steel wool or steel brush on the stainless steel These will cont...

Страница 28: ...ightly blocking it open if necessary MOVING YOUR WINE CHILLER Remove all items Securely tape down all loose items shelves inside your appliance Turn the adjustable legs up to the base to avoid damage Tape the door shut Be sure the appliance stays secure in the upright position during transportation Also protect outside of appliance with a blanket or similar item ENERGY SAVING TIPS The Wine Cellar ...

Страница 29: ...operly The light does not work Not plugged in The circuit breaker tripped or there is a blown fuse The light button is OFF Vibrations Check to assure that the Wine Chiller is level The Wine Cellar seems to make too much noise The rattling noise may come from the flow of the refrigerant which is normal As each cycle ends you may hear gurgling sounds caused by the flow of refrigerant in your Wine Ce...

Страница 30: ...ence that if you ever need additional information or assistance the Cavavin Customer Service team will be here for you CAVAVIN CUSTOMER SERVICES Product Information info cavavin com fax 450 676 5022 Whatever your questions are about our products help is available Part Orders info cavavin com fax 450 676 5022 You may order parts and accessories that will be delivered directly to your home by person...

Страница 31: ...e limit of this contract EXCLUSIONS The following damages parts and costs are excluded from this Warranty A Loss of wine or any other product due to their alteration B Consequential damages loss of use or delay resulting from the failure of the product or from Cavavin inability or delay to make the necessary repairs under this Warrany C No fault found diagnosis or any service call related to the d...

Страница 32: ...té en uso o tome alguna medida para asegurar que no presente peligro INSTRUCCIONES DE INSTALACION Saque los embalajes exteriores limpie bien el exterior con un paño suave seco y el interior con un paño húmedo y tibio Evite colocar la vinera cerca de una fuente de calor luz de sol directa o lugar húmedo UBICACION 1 Seleccione un lugar con su piso fuerte y nivelado 2 Evite la luz directa del sol o c...

Страница 33: ...erior El indicador marcado se alumbrará en color rojo Ud necesita programar esa temperatura entre los 58 65ºF 15 18ºC Si Ud solamente guarda vinos blancos usted puede colocarlos en cualquier zona pero tendrá que mantener una temperatura entre 55 57ºF 13 14ºC en la zona inferior y una temperatura de 48 55ºF 9 13ºC en la zona superior El indicador marcado se alumbrará en color verde Cuando Ud guarda...

Страница 34: ...ra remover los estantes de madera corredizos mueva cada uno de ellos aproximadamente una tercera parte fuera de los raíles Presione el lado plástico derecho usando un destornillador plano siga la flecha como se muestra en el dibujo A de la página 14 y a la misma vez haga lo mismo con el plástico del lado izquierdo como se muestra en el dibujo B de la página 14 Saque el estante corredizo suavemente...

Страница 35: ...s importantes para el uso correcto de la vinera Las bebidas se deben guardar en botellas cerradas No sobrecargue el compartimiento interior No abra la puerta a menos que sea necesario Si la vinera se guardara sin uso por períodos largos se sugiere que luego de una limpieza cuidadosa se deje la puerta entreabierta para permitir que el aire circule dentro de la caja y evitar una posible formación de...

Отзывы: