Cavalry BULLDOG CABD2B Скачать руководство пользователя страница 5

BULLDOG [CABD2B]

3

USB

1.

2.

Setup Your Dock
Find Your Drive

Initialize and Format Your Drive

2

CHAPTER

INSTALLATION GUIDE

INSTALLATION OUTLINE

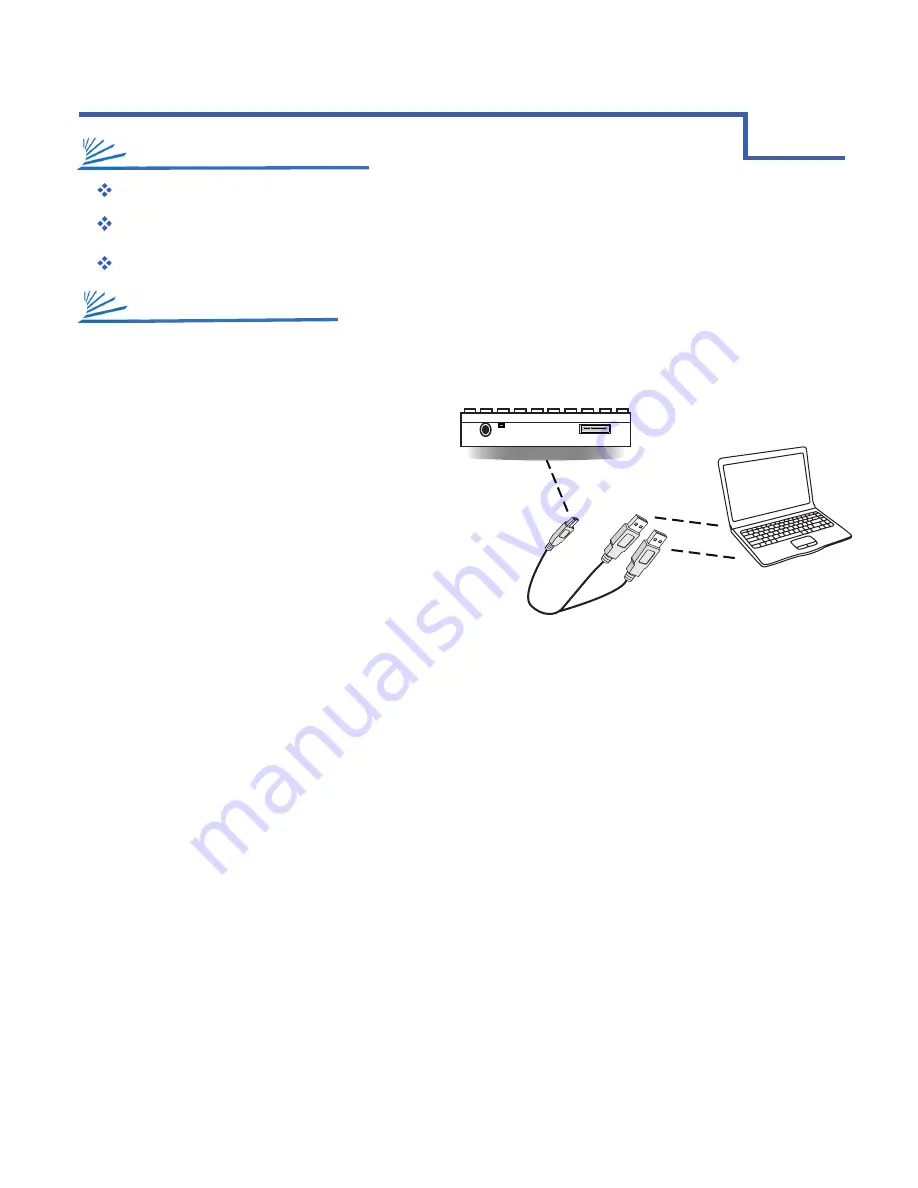
Connect the USB 3.0 Y-Cable to your Bulldog.

Connect both ends of the included USB Y-Cable* 

to 2 ports on your computer that you have used 

recently and know to work well. Take this time 

to temporarily eject and disconnect any other 

external storage devices you have. This will 

make it easier to find any drives you insert into 

your Cavalry dock.

Insert the hard drives that you are going to use into the 

Bulldog. Check that they are firmly inserted. Be sure that 

you never touch any exposed circuitry or data ports on the 

drive or the dock. Hard drives are very fragile devices!

Proceed to Find Your Drive below.

A)

B)

C)

D)

*note:

 The Bulldog requires both ends of the Y-cable in order to draw power from 2 USB ports simultaneously. If you do not 

have 2 extra USB ports, contact customer support for information on obtaining the accessory power supply.

Open up the disk management utility of your specific OS. This will be the only control interface for your Bulldog. 

For more info on the functions of your specific disk management utility, go to http://www.cavalrystorage.com/

manuals.aspx.

Wait for your drive(s) (which you should have just inserted) to appear in your disk management utility. If the drives 

are blank, “unallocated” or have been formatted on a different operating system, they will need to be partitioned 

and formatted before they can be used. 

Windows users will need to check the “disk number” and see if a drive-letter has been assigned for their drive(s). 

You can verify your drive by checking that the listed capacity for that disk # is close to that of the quoted drive size. 

(i.e. 1 TB drive will appear as 931.51 GB)

Mac users will need to check for their drive(s) in the left-hand column of Disk Utility. Cavalry drives will usually 

be listed as a “DMI” drive of a size very close to the quoted capacity. (i.e. 1 TB drive will appear as 931.51 GB)

Proceed to Initializing and Formatting Your Disk below.

A)

B)

C1)

C2)

D)

1

INSTALLATION STEPS

STEP 1: SET UP YOUR DOCK

2

STEP 2: Find Your Drive

Содержание BULLDOG CABD2B

Страница 1: ...te or TB equals one trillion bytes Your computer s operating system may use a different standard of measurement and report a lower capacity In addition some of the listed capacity is used for formatting and other functions and thus will not be available for data storage Actual quantities will vary based on various factors including file size file format features and application software Cavalry re...

Страница 2: ...ent 1 Specifications 1 Product Part Identification 2 Your Disk Managment Utility 2 Chapter 2 installation guide 3 Installation Outline 3 Installation Step 1 3 Installation Step 2 3 InitializationStep3 4 chapter 3 support 5 HDD LED Status Codes 5 Troubleshooting 5 Warranty Information 6 Contact Information 6 ...

Страница 3: ...iple operating systems The convenient pocket dock form means you ll have access to any bare SATA drives available with the blinding speed of USB 3 0 The hot swappable dock design allows you to cycle through as many disks as you like in mere seconds all without ever restarting your PC or Mac Model Interfaces Power Supply Dimensions Weight OS Compatibility Windows 7 Vista XP 2000 Mac OS X 10 3 Hardw...

Страница 4: ... your dock and the disks within it How to Find Your Disk Management Utility Windows Navigate to Disk Management Start Menu right click My Computer select Manage select Disk Management Mac Click an empty space on your Desktop Then select from the top of the screen Go Utilities Disk Utility Seeing Your New Disk in the Disk Management Utility In Mac this is a pretty straight forward affair Just look ...

Страница 5: ...he accessory power supply Open up the disk management utility of your specific OS This will be the only control interface for your Bulldog For more info on the functions of your specific disk management utility go to http www cavalrystorage com manuals aspx Wait for your drive s which you should have just inserted to appear in your disk management utility If the drives are blank unallocated or hav...

Страница 6: ...it does not show up you will need to use the guides below according to your operating system Windows Once you ve found your drive in Disk Management using the Find Your Drive Guide right click the disk number and then select the Initialize option Select MBR Primary Partition and NTFS for XP or for drives that are smaller than 1TB For later versions of Windows 7 and Vista select GPT GUID and NTFS f...

Страница 7: ...e Device Can Perform Faster message This means that your computer does not support USB 3 0 You will need to purchase an adapter card that allows you to use the USB 3 0 protocol Please contact us at customersupport cavalrystorage com for more details on how to purchase an adapter card My drive doesn t seem to fit This is probably because you are using an obsolete IDE drive Our authorized parts reta...

Страница 8: ...ible for any defects in products loss or inaccuracy of data of any kind or for any direct indirect incidental or consequential damages resulting there from Packing and Shipping Any product sent to Cavalry Storage Inc for service or repair must be packed and shipped according to the Cavalry Storage standards and guidelines Please note that packages received which deviate from Cavalry Storage packin...

Отзывы: