background image

Remtron

®

 Engineered Systems 

User Manual 


41 

9M02-9028-A021-EN 
Version 4.0 

7.6.1  Receiver Repairs 

Note:

  Before repairs are carried out, we recommend that power to the crane is isolated and that all 

tag/lockout procedures applicable to your facility are applied. 


WARNING


Throughout the troubleshooting procedure, work is performed within the receiver cabinet while the 
system is powered. Certain points in the cabinet contain dangerous voltages. Use extreme caution 
when working inside the cabinet with power on. 


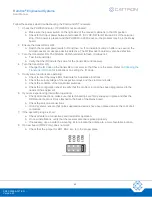
7.6.2  Replacing the Circuit Boards 

Refer to 

Figure 6

Figure 8

, and 

Error! Reference source not found.

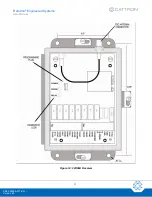
1.  Switch the power off to the receiver and open the cabinet door. 
2.  Unplug the RF coax connector by pulling straight up and gently twisting it back and forth. Unplug all of the 

electrical connectors. 

3.  Remove the nut from the ground strap on the mounting plate  
4.  Remove the four screws from the corners of the receiver assembly mounting plate and remove the 

assembly from the cabinet. 

5.  Reassemble in reverse order. 

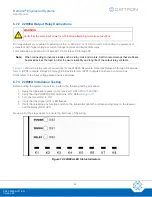
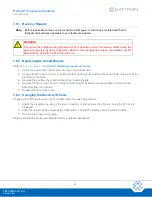
7.6.3  Changing the Receiver ID Code 

Changing the ID Code requires use of a Cattron RAC16 series programmer.  

1.  Attach the programming plug to the 6-pin connector on the receiver circuit board. Verify the ID Code is 

displayed. 

2. 

Enter the new ID Code and press the PRG button. The RAC16 display should read ‘SUCCESS’. 

3.  Remove the programming plug. 

Refer to the RAC16 series User Manual for more detailed instructions. 


!

Содержание Remtron 21R14A

Страница 1: ...Remtron Engineered Systems User Manual ...

Страница 2: ...nd its agents cannot be aware of all potential uses Cattron makes no warranties as to non infringement nor as to the fitness merchantability or sustainability of any Cattron products for any specific or general uses Cattron Holdings Inc or any of its affiliates or agents shall not be liable for incidental or consequential damages of any kind All Cattron products are sold pursuant to the Terms and ...

Страница 3: ...erage 12 5 1 3 License Free Channels 12 5 1 4 Command Format 13 5 1 5 Safety 13 5 1 6 Carrying Strap for Belly Box Controllers 13 5 2 Transmitter Operation and Features 14 5 3 Wireless Operation 14 5 4 Pendant Operation 14 5 5 Commands 15 5 5 1 Command Switches 15 5 6 Status Indicators 17 5 6 1 Status LED 17 5 6 2 Function Select LEDs 17 6 Installation 18 6 1 General 18 6 2 Locating the Equipment ...

Страница 4: ...trol Wiring 30 6 7 2 22R08A Output Relay Connections 32 6 7 3 22R08A Installation Testing 32 7 Maintenance Troubleshooting 34 7 1 Monthly Inspection 34 7 2 Installation Troubleshooting 34 7 3 Transmitter Troubleshooting 34 7 3 1 Normal Operation 34 7 3 2 Transmitter Repair 35 7 3 3 Replacing the Transmitter Batteries 35 7 3 4 Changing the Transmitter ID Code 36 7 4 Transmitter Spare Parts List 38 ...

Страница 5: ...Remtron Engineered Systems User Manual 5 9M02 9028 A021 EN Version 4 0 Certifications 46 Appendix II Receiver Specifications 47 Certifications 48 ...

Страница 6: ...WARNING The remote control system you have purchased is designed to stop in a safe mode under a variety of conditions Some examples of these conditions are excessive radio signal interference loss of battery or electrical power failure of certain components operation beyond signal range and others Although Cattron and its subsidiaries do not specify the position of the operator when controlling th...

Страница 7: ...r manual it may cause harmful interference to radio communications However there is no guarantee that harmful interference will not occur in a particular installation If this equipment does cause harmful interference to radio or television reception which can be determined by switching this equipment on and off the user is encouraged to try to correct the interference by one or more of the followi...

Страница 8: ...maged by heat in excess of 160º F DO NOT INSTALL IN HIGH VIBRATION AREAS The life of this apparatus may be shortened through long exposure to intense shaking or vibration 3 2 Personal Safety MAKE SURE MACHINERY IS CLEAR BEFORE OPERATING Do not activate the remote system unless it is safe to do so TURN OFF THE RECEIVER POWER BEFORE WORKING ON MACHINERY Always disconnect the remote system before doi...

Страница 9: ... Many new features have been added but most changes are transparent to the user If you are already familiar with Cattron transmitters you are encouraged to read the section on operating the transmitters where there is information about the latest changes in operation To help you identify your system Figure 1 and Figure 2 provide a reference for the transmitters and receivers covered in this manual...

Страница 10: ...T14 A 21T18 A 21T20 21T23 21T34A Stepped Lever Control Transmitter 21T44A Proportional Lever Control Transmitter 21T54A Joystick Control Transmitter T08C Remotely Operated Transmitter 21T74A Custom Lever Control Transmitter Figure 1 Cattron CommandPro Engineered Systems Transmitters ...

Страница 11: ... Engineered Systems User Manual 11 9M02 9028 A021 EN Version 4 0 22R08A 8 Function Receiver 21R14A 14 Function Receiver 21R22 22 to 66 Function Receiver Figure 2 Cattron CommandPro Engineered Systems Receivers ...

Страница 12: ...ert radio waves back into radio signals They can send and receive in all directions or in a single direction depending on their design An omnidirectional antenna is like a light bulb and a directional antenna is like a flashlight Metal objects reflect radio waves just as a mirror next to a light bulb will reflect light Metal objects near an antenna alter the intended pattern of an antenna by eithe...

Страница 13: ...iver tracks the time of the transmitter and ignores all other transmissions that do not fall within the expected time frame of the transmitter Maintained link systems must receive at least one valid transmission each second in order to allow the remote controlled equipment to function The receiver provides a loss of signal control output that safely shuts down the equipment if a loss of signal occ...

Страница 14: ... rate If equipped the Alarm function sounds 4 Press the required switches to operate the desired function Note that more than one function may be controlled at any time 5 To stop sending any command release the switch 6 To switch the transmitter off press the OFF STOP button Note that the transmitter switches itself off if no commands send for a predetermined time and if Auto Off is enabled 7 If e...

Страница 15: ...ical function can operate consult the Configuration Sheet if this switch has an alternate use in your system First Come First Serve FCFS Optional The First Come First Serve option allows use of multiple transmitters with one receiver one at a time The receiver scans a preset list of ID Codes When a valid signal is received the receiver stops scanning and responds only to that transmitter s signal ...

Страница 16: ...ign uses one button labeled MAG LIFT or LIFT and one button labeled MAG DROP or DROP Pressing the LIFT button energizes the magnet Pressing LIFT and DROP at the same time de energizes the magnet and drops the load A time delay is built into the circuit so the buttons must be held for nearly one second before the magnetic controls activate An additional switch may be provided for fanning or dribbli...

Страница 17: ...normal mode LED flashes at high rate Command Switch is pressed LED flashes Red Green A series only Batteries getting low change batteries at the next convenient opportunity LED flashes on off at a slow rate second on and second off Batteries getting low change batteries at the next convenient opportunity LED remains on continuously LED might flicker slightly A switch was activated at the time the ...

Страница 18: ...most severe conditions A direct line of sight path between the transmitter and receiver antenna provides the best performance refer to Figure 3 Controlled range systems require a special flat panel antenna Refer to Installation Procedure SAFE T RANGE 21R22CR for special considerations for the antenna used with that system Figure 3 Transmitter Receiver Communication In most cases the antenna may be...

Страница 19: ...F 71º C All connections to the receiver enclosure must be watertight Avoid mounting the receiver enclosure on a surface where excessive vibration or shock is present For easy access to wiring and for service provide sufficient room to open the enclosure door To ensure that the receiver enclosure is electrically at earth ground remove all paint from the mounting hole surfaces refer to Figure 5 Figu...

Страница 20: ...nerated from arcing relay contacts When a contactor opens the contactor coil produces a large voltage potential much like automotive ignition systems When the points open on automotive ignition systems the coil sends a large voltage to the distributor which jumps across the spark plug called arcing The result is a large amount of noise generated in the system A snubber is a device designed to redu...

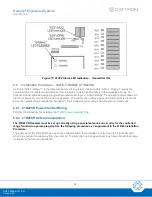
Страница 21: ...eceiver board A 2 If you also need 21R14A receiver installation pendant control connect a wire from the top right lug on the RADIO PENDANT transfer switch to the X1 input for the pendant B 3 Install a wire 16 gauge from the X2 terminal 12 X2 of connector TB1 to the neutral wire from the Crane Control Power source C 4 Install a wire 16 gauge from the MLC terminal 1 MLC of connector TB1 to the main ...

Страница 22: ...Remtron Engineered Systems User Manual 22 9M02 9028 A021 EN Version 4 0 Figure 6 21R14A Receiver ...

Страница 23: ...Remtron Engineered Systems User Manual 23 9M02 9028 A021 EN Version 4 0 Figure 7 Typical 21R14A Power Control Wiring ...

Страница 24: ...ne power has been disconnected and that all applicable safety precautions are followed Use the following steps to install the wiring to the receiver board and or control transfer switch 1 Disconnect the hot input wire X1 from the pendant and connect it to terminal 9 of connector TB4 on the receiver board A 2 If pendant control of the 21R22 receiver installation is also desired connect a wire from ...

Страница 25: ...Remtron Engineered Systems User Manual 25 9M02 9028 A021 EN Version 4 0 Figure 8 21R22 Receiver Note For R30 and R52 configurations you must connect a Relay Expansion Board to the proper control voltage ...

Страница 26: ...Remtron Engineered Systems User Manual 26 9M02 9028 A021 EN Version 4 0 Figure 9 Typical 21R22 Power Control Wiring ...

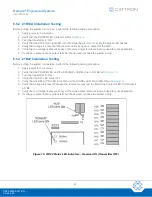
Страница 27: ...sent at any output terminal that is used recheck the system wiring 6 5 3 21R22 Installation Testing Before putting the system into service perform the following testing procedure 1 Apply power to the receiver 2 Verify that the POWER LED and the K23 MLC LED both turn ON Refer to Figure 10 3 Turn the transmitter to ON 4 Verify that the K23 LED turns OFF 5 Verify that the K24 OPR LED turns ON and the...

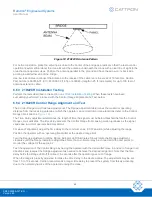
Страница 28: ...y stops and inhibits selected functions when the operator steps outside the boundary This is done without shutting down the main contactor line 6 6 1 21R22CR Power Control Wiring Perform the procedure for installing the 21R22 Power Control Wiring 6 6 2 21R22CR Antenna Installation The 21R22CR Receiver must be set up correctly using a special antenna and circuitry for the controlled range function ...

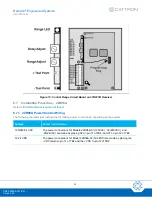
Страница 29: ...ical crane functions refer to the Control Range circuit board in Figure 13 The Time Delay adjustment determines the length of time the signal must be below threshold before the Control Range circuit activates The time delay prevents the Control Range from causing motion jerkiness as the signal varies due to normal operator load movement For ease of alignment adjust the time delay to the minimum va...

Страница 30: ...Control Wiring The following chart provides instructions for making power connections depending on the system System Power Connections 120 240 24 VAC The power connections for Models 22R08A 01 120VAC 03 240VAC and 05 24VAC are made by placing X2 on pin 11 of TB2 and X1 on pin 12 of TB2 12 24 VDC The power connections for Model 22R08A 02 12 24DC are made by placing the VDC return to pin 11 of TB2 a...

Страница 31: ...Remtron Engineered Systems User Manual 31 9M02 9028 A021 EN Version 4 0 Figure 14 22R08A Receiver ...

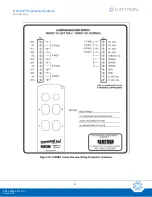
Страница 32: ...f the output relay contacts Figure 15 shows the relay output connections for the 22R08A Receivers Note that Relays K1 through K4 provide form C SPDT outputs Relays K5 through K8 provide form A SPST outputs and share a common bus COM refers to the input voltage placed across all relays 6 7 3 22R08A Installation Testing Before putting the system into service perform the following testing procedure 1...

Страница 33: ...Remtron Engineered Systems User Manual 33 9M02 9028 A021 EN Version 4 0 Figure 15 22R08A Series Receiver Relay Output Connections ...

Страница 34: ...ossible Cause Remedy Receiver will not respond to the transmitter Wrong transmitter code Make sure transmitter is the correct one for the receiver Re program the transmitter Transmitter problem See Transmitter Troubleshooting Receiver problem See Receiver Troubleshooting System has short range Antenna placement Move the antenna See Antenna Location Antenna cable shorted or open Check cable and con...

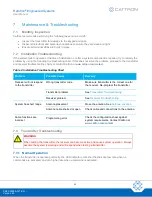
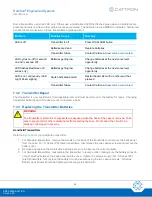
Страница 35: ...smitter is not considered a field repairable item and must be returned to the factory for repair Changing transmitter batteries and ID codes are not considered repairs 7 3 3 Replacing the Transmitter Batteries WARNING The transmitter s electronic components are exposed when the back of the case is removed Take care to prevent dirt or other contaminants from entering the case Do not allow the circu...

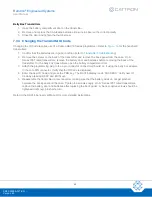
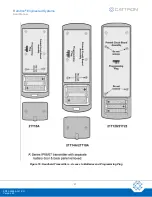
Страница 36: ...rs remove the battery door and batteries before removing the back of the transmitter On the belly box transmitters open the battery compartment door 3 Attach the programming plug to the 4 pin connector on the circuit board or if using the belly box adapter to the mini DIN connector Verify that the ID Code is displayed 4 Enter the new ID Code and press the PRG key The RAC16 display reads SUCCESS Ve...

Страница 37: ...Remtron Engineered Systems User Manual 37 9M02 9028 A021 EN Version 4 0 Figure 16 Handheld Transmitters Access to Batteries and Programming Plug ...

Страница 38: ...l No Shoulder Strap 600057 Case screws 6 32 5 8 Phillips stainless steel 500047 Case and battery door screws captive A series transmitters 500132 Replacement Transmitter Label Use Model No Serial No Model Leather Holster Clear Protective Pouch 21T10A 620022 620024 21T14A 620023 620025 21T18A 620023 620025 21T20 620009 620012 21T23 620009 620012 7 4 2 Belly Box Transmitters Item Part Number Spare T...

Страница 39: ...ndication POWER Receiver operating voltage is present SIGNAL OUTPUT A signal is being received that matches the decoder s address SIGNAL OUTPUT Also may indicate scanning mode in receivers with scanning function except 21R22 SCAN 1 through SCAN 3 21R22 only These LEDs cycle while receiver is scanning When on steady indicates which frequency receiver is locked onto K1 through Kxx Corresponding rela...

Страница 40: ...e same Refer to Changing the Transmitter ID Code for instructions on setting the ID Code 5 If only some functions are operating a Check to see if the relay LEDs illuminate for inoperative functions b Check the output voltage of the respective relays and the electrical circuits c Check the condition of the transmitter switches d Check the configuration sheet to verify that the problem function has ...

Страница 41: ... the power off to the receiver and open the cabinet door 2 Unplug the RF coax connector by pulling straight up and gently twisting it back and forth Unplug all of the electrical connectors 3 Remove the nut from the ground strap on the mounting plate 4 Remove the four screws from the corners of the receiver assembly mounting plate and remove the assembly from the cabinet 5 Reassemble in reverse ord...

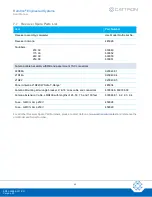
Страница 42: ...B and panel mount TNC connectors 22R08A 920040 01 21R14A 920040 04 21R22 920040 05 Panel Antenna 21R22CR Safe T Range 485034 Antenna Mounting Kit w angle bracket 9 18 coax cable and connectors 600038 600038 02 Antenna Extension Cable LMR400 with lengths of 25 50 75 and 100 feet 600048 01 02 03 04 Fuse GMC Amp 250V 458028 Fuse GMC Amp 250V 458029 For all other Receiver Spare Part Numbers please con...

Страница 43: ...Remtron Engineered Systems User Manual 43 9M02 9028 A021 EN Version 4 0 8 Warranty Statement For service and repairs go to www cattron com contact ...

Страница 44: ...er Manual 44 9M02 9028 A021 EN Version 4 0 9 CE Declaration of Conformity Hereby Cattron declares that the radio equipment is in compliance with Directive 2014 53 EU View the EU Declaration of Conformity document at www cattron com ...

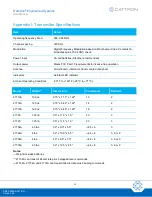
Страница 45: ...dicators Self test LED indicator Ambient Operating Conditions 20º F to 160º F 28º C to 71º C Model Weight 1 Dimensions Commands Batteries 21T10A 10 9 oz 2 75 x 7 11 x 1 22 10 2 21T14A 12 9 oz 2 75 x 8 48 x 1 22 14 2 21T18A 12 9 oz 2 75 x 8 48 x 1 22 18 2 21T20 1 25 lb 3 5 x 11 5 x 1 0 20 3 21T23 1 25 lb 3 5 x 11 5 x 1 0 23 3 21T34A 4 5 lbs 5 0 x 9 0 x 5 5 2 24 6 3 21T44A 4 lbs 5 0 x 10 0 x 6 5 3 2...

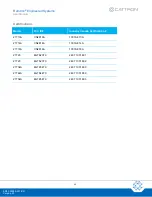
Страница 46: ...fications Model FCC ID Industry Canada Certification 21T10A CN2810A 1007A 810A 21T14A CN2814A 1007A 814A 21T18A CN2818A 1007A 818A 21T20 EGT820TX 249 710 31891 21T23 EGT823TX 249 710 31892 21T34A EGT834TX 249 710 31890 21T44A EGT844TX 249 710 31889 21T54A EGT854TX 249 710 31893 ...

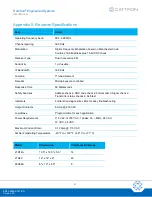
Страница 47: ...t Decoder Microprocessor controlled Response Time 60 Milliseconds Safety Features Address check CRC code check Format test Signal check Transmitter status checks Self test Indicators Full function diagnostics LEDs for easy troubleshooting Output Contacts 8 Amp 230 VAC Logic Base Programmable for each application Power Requirements 115 VAC or 230 VAC 1 phase 50 60Hz 24 VAC 12 VDC 24 VDC Maximum Cur...

Страница 48: ...Manual 48 9M02 9028 A021 EN Version 4 0 Certifications Model FCC ID Industry Canada Certification 21R14A 1 249 710 31887 21R22 1 249 710 32139A 22R08A 1 249 710 32139A Note 1 Self Certified for operation under Part 15 of the FCC rules ...

Страница 49: ...vement the information provided in this document is subject to change without notice Cattron Support For remote and communication control systems support parts and repair or technical support visit us online at www cattron com contact Cattron North America Inc 655 N River Rd NW Suite A Warren OH 44483 ...

Отзывы: