

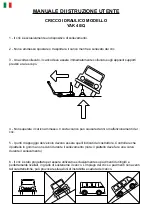
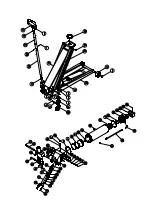


Pos.
Pc.
YAK40/Q Description
36 025 00
jack, complete
1
1/2
02 02800
screw
2
1/2
02 072 00
nut
3
2
02 121 00
washer
4
4
02 204 00
locking ring
5
4
02 206 00
locking ring
6
2
02 209 00
locking ring
7
2
02 261 00
thrust bearing
8
4
02 308 00
screw
9
2
02 322 00
screw
10
1
36 009 00
plastic covering
11
1
36 010 00
lever tube
12
1
36 011 00
handle
13
1
handle extension
14
2
36 028 00
wheel fork
15
2
36 029 00
wheel
16
2
36 030 00
wheel
17
1
36 031 00
saddle
18
2
36 033 00
axle
19
1
36 026 00
base frame
20
1
36 027 00
lifting frame
21
2
36 044 00
steering rod
22
1
91 019 00
pump, complete
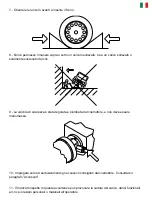
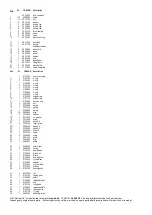
Pos.
Pc.
YAK40/Q Description
1
91 019 00
pump, complete
1*
1
01 007 00
o-ring
2*
1
01 025 00
o-ring
3*
1
01 039 00
o-ring
4*
2
01 051 00
o-ring
5*
1
01 071 00
o-ring
6*
1
01 089 00
o-ring
7*
1
01 050 00
o-ring
8*
1
01 239 00
o-ring
9*
1
01 254 00
scraper ring
10*
1
01 271 00
scraper ring
11*
1
01 309 00
back-up ring
12
2
02 016 00
nut
13
1
02 029 00
spring
14
1
02 054 00
spring
15
1
02 078 00
spring
16
1/3
02 088 00
plug
17
2
02 108 00
washer
18*
1
02 132 00
cu-washer
19
1
02 155 00
screw
20*
1
02 183 00
ball ø2,5
21
2
02 224 00
locking ring
22*
1
02 291 00
ball ø3,5
23*
1
02 292 00
ball ø6,5
24*
1
02 294 00
ball ø10
25
1
02 313 00
screw
26
2
02 346 00
screw
27
1
02 417 00
gland
28
1
02 448 00
plug
29
1
02 498 00
gland
30
1
02 683 00
stop screw
31
1
02 685 00
spring
32
1
91 021 00
pump body
33
1
91 025 00
piston rod
34
1
91 024 00
piston
35
1
91 005 00
pump piston
36
1
91 022 00
cylinder nut
37
1
91 026 00
adaptor
38
1
91 032 00
cylinder tube
39
1
91 013 00
oil hose
40
2
91 033 00
bearing bush
41
1
91 023 00
roll
42
1
91 027 00
tipping gear
43
1
91 028 00
pedal
44
1
91 029 00
release bracket
45
1
91 030 00
axle
46
1
91 031 00
rolling axe
47
1
91 056 00
release spindle
48
1
91 057 00
release guide
49
1
91 077 00
¼" plug
50
1
95 005 02
adjusting screw
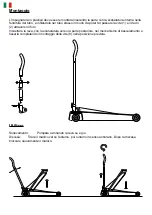
GB: Parts with * only delivered in complete
repair kit
.: YAK40/Q:
09 049 00
Please always state model and part number.
Always apply original spare parts. - All major parts may not be provided as spare parts after discontinuation of production of a model.


