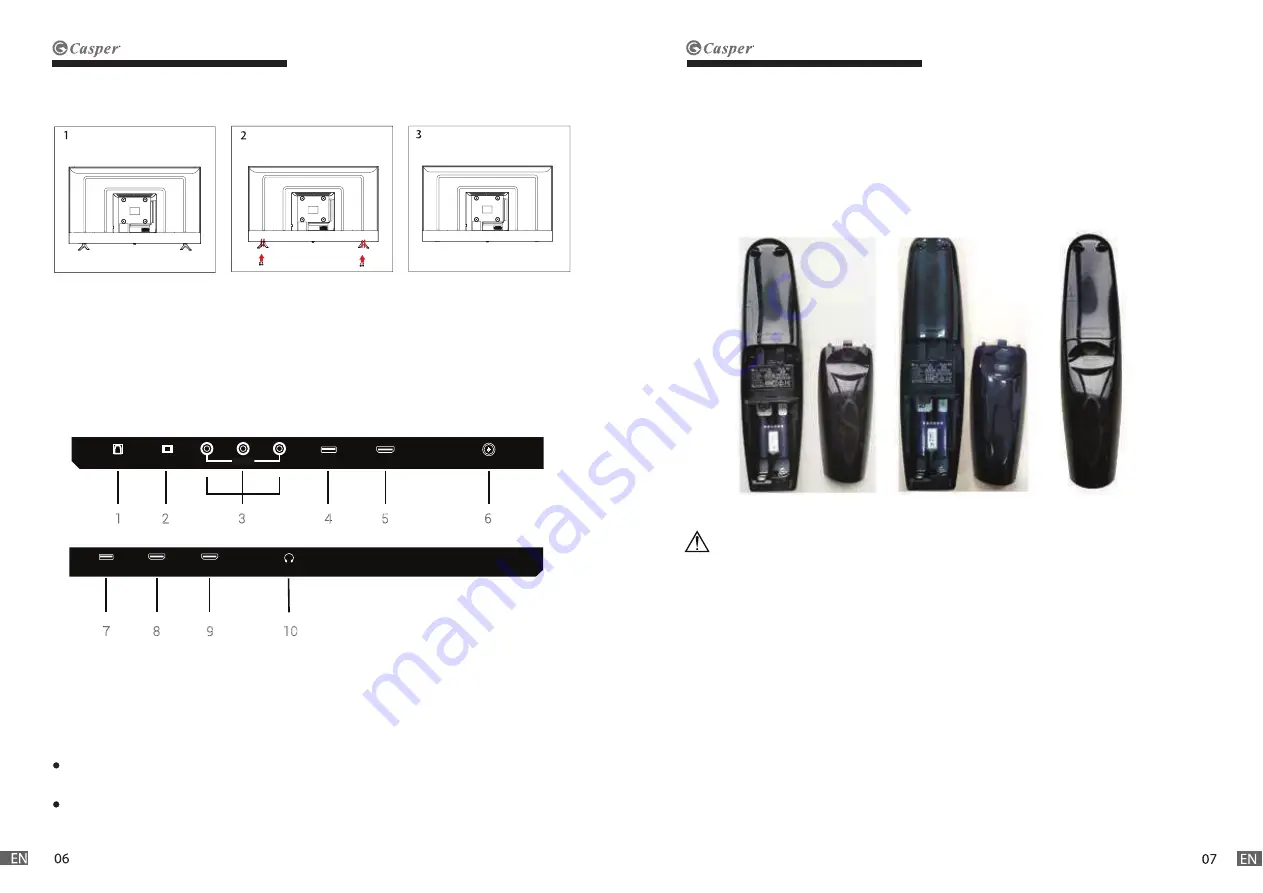
1. Lay the TV flat on a table with the LED screen face down. To prevent the TV from
being scratched, put a piece of soft cloth on the table on which the screen will be set.
(see Figure 1)
2. Remove the 4 screw on the stand, then pull up the stand slowly. (see Figure 2)
3. Then remove the base. (see Figure 3)
•
Only use the specified AA batteries.
•
Do not mix new and old batteries. This may result in creaking or leakage, posing a risk
of fire or lead to personal injury.
•
Insert batteries according to (+) and (-) markings. Inserting the batteries incorrectly
may result in leakage, which may pose a risk of fire or lead to personal injury.
•
Dispose of the battery in accordance with local laws and regulations.
•
Keep the batteries away from children or pets.
•
When the remote control will not be used for an extended period, remove the batter-
ies.
USB1
HDMI2
(ARC)
HDMI1
EARPHONE
RJ45
L
V
R
AV I
N
OPTICAL
USB2
HDMI3
LNB
1 2 3 4 5 6
7 8 9 10
1. RJ45
2. OPTICAL OUT
3. VIDEO/ AUDIO LEFT & RIGHT
4. USB 2 INPUT
5. HDMI 3 INPUT
USB connection: Insert a USB storage device into the USB port to record, playback of
video/photo/music.
1. Remove the battery cover by pulling then lifting the knob on the cover.
2. Insert the batteries, corresponding to the (+) and ( - ) markings on the battery
compartment.
3. Reattach the battery cover.
6. LNB
7. USB 1 INPUT
8. HDMI 2 (ARC)
9. HDMI 1
10. EARPHONE
CAUTION!
2. Disconnect the stand
3. Connections
HDMI supporting signals: 480i; 576i; 480P; 576P; 720/ 50Hz; 720P/ 60Hz; 1080i/ 50Hz;
1080i/ 60Hz; 1080P/ 50Hz; 1080P/ 60Hz.
4. Insert Remote Control’s batteries
Содержание 55UW6000
Страница 1: ...55UW6000...


