background image

8

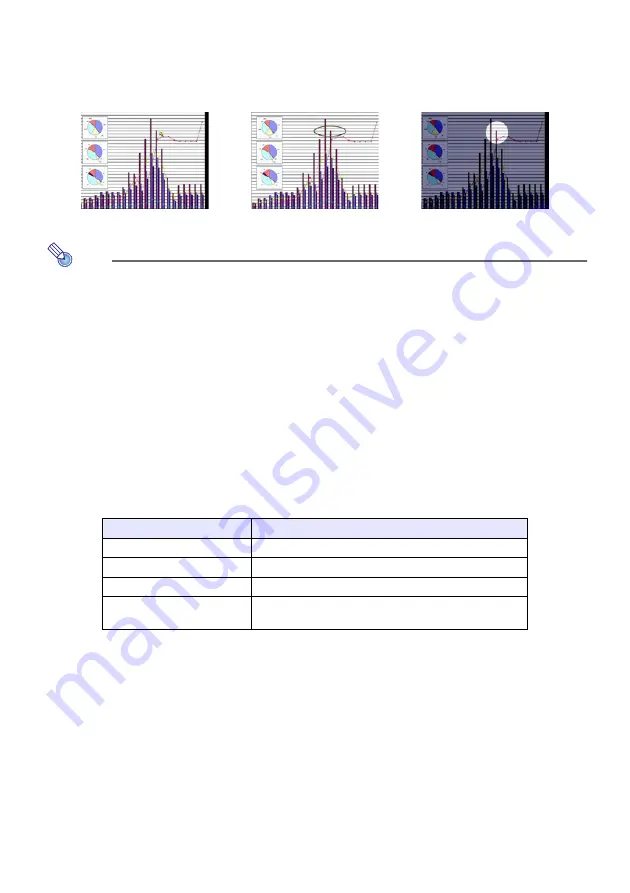
Displaying a Pointer in the Projected Image

You can select from among eight different pointer styles, including various arrow styles, for 
display in the projected image. Pointers can be used during a presentation to indicate or 
highlight a specific part of the image.

Note

Depending on the pointer style you are using, the pointer may not display properly 
when you are using keystone correction. If this happens, use the [KE] and 
[KEYSTONE –] keys to change the keystone correction value to zero.

To display a pointer in the image

1

Press the [POINTER] key.

z

This will cause a pointer to appear in the image.

z

You also can use the setup menu to specify the pointer type that appears first when you 
press the [POINTER] key. For details, see “Pointer” under “Option Settings 2 Main Menu” 
on page 26.

2

Use the cursor keys to move the pointer to the location you want.

z

Holding down a cursor key moves the cursor at high speed.

3

To modify the pointer as described below, press the [STYLE] key.

To select the pointer type

1

Press the [POINTER] key to display the pointer.

2

Keep pressing the [POINTER] key until the pointer you want is displayed.

z

Each press of the [POINTER] key cycles through the available pointer types.

To clear the pointer from the image

Press the [ESC] key.

Arrow 1

Oval 1

Spot 2

For this pointer type:

Pressing [STYLE] will do this:

Arrow 1 / Arrow 2

Rotate the arrow by 90 degrees

Bar 1 / Bar 2

Toggle between flashing and not flashing

Oval 1 / Oval 2

Toggle between flashing and not flashing

Spot 1 / Spot 2

Cycle the darkness (transparency) of the area not 
covered by the spot among two levels

Содержание XJ-S30 - XGA DLP Projector

Страница 1: ...sure to read the precautions in the separate User s Guide Basic Operation For details about setting up the projector and lamp replacement see the User s Guide Basic Operation z Be sure to keep all us...

Страница 2: ...in part or its entirety is forbidden You are allowed to use this manual for your own personal use Any other use is forbidden without the permission of CASIO COMPUTER CO LTD CASIO COMPUTER CO LTD shal...

Страница 3: ...Settings 11 Basic Setup Menu Operations 11 Displaying the Setup Menu 11 Configuring Setup Menu Settings 11 Basic Setup Menu Example 12 Password Protecting the Projector 13 Inputting a Password 13 Usi...

Страница 4: ...ed on the projector instead of the remote controller MENU S T X W ENTER ESC INPUT AUTO ZOOM ZOOM FOCUS S FOCUS T XJ S35 Users This manual does not include information about using the XJ S35 model proj...

Страница 5: ...lack or blue screen or a logo z Image freeze z Pointer display in the projected image z Aspect ratio switching between 4 3 and 16 9 Adjusting Image Brightness Note for XJ S35 model users Use the setup...

Страница 6: ...e button next to the highlighted color mode name z For details on what each color mode does see Color Mode under Image Adjustment Main Menu on page 18 3 To hide the window press the ESC key Zooming an...

Страница 7: ...or blue screen or a logo For details see Blank Screen under Screen Settings Main Menu on page 22 Freezing an Image Pressing the FREEZE key freezes the projected image To freeze the projected image 1 W...

Страница 8: ...you press the POINTER key For details see Pointer under Option Settings 2 Main Menu on page 26 2 Use the cursor keys to move the pointer to the location you want z Holding down a cursor key moves the...

Страница 9: ...the size of an image using the ASPECT key for commercial purposes or public presentation may infringe on the legally protected copyright of the copyright holder of the original material Turning on th...

Страница 10: ...d then press the ENTER key This performs the same operation as pressing the ECO key U key described on page 9 z Select the aspect ratio of the projected image Highlight Aspect Ratio and then press the...

Страница 11: ...ghlighting it 3 Press the ENTER key 4 Use the T T T T and S S S S keys to select the sub menu item you want by highlighting it 5 Perform the required operation on the selected sub menu item screen z T...

Страница 12: ...iled information see Setup Menu Contents on page 17 To configure the Image Adjustment J J J J Contrast setting 1 Press the MENU key to display the setup menu 2 Image Adjustment is initially selected o...

Страница 13: ...remote controller key inputs The following is the 8 key sequence that represents the initial factory default password Using the Password Feature Note the following precautions whenever you use the pa...

Страница 14: ...Keep a written record of your password You will not be able to use the projector if you forget its password We strongly suggest that you keep a written or other type of record of the password so you...

Страница 15: ...ting screen by performing steps 1 through 5 of the procedure under To change the password on page 14 z At this time make sure that Power On Password is selected on the Power On Password setting screen...

Страница 16: ...R key 4 Use the T T T T key to select Restore Menu Defaults 5 Press the ENTER key z This will display a confirmation screen like the screen shown below 6 Use the S S S S key to select Yes 7 To restore...

Страница 17: ...scribes the type of information that appears in each of the columns of the tables Setting Name This column shows the names of the settings as they appear on the sub menu Input This column shows the in...

Страница 18: ...ected image in accordance with image contents and projection conditions Presentation Use this setting for standard presentations in a well lit area This is the initial default setting when the input s...

Страница 19: ...ed image while RGB is selected as the input source it means that the phase setting is not correct When this happens use this setting to adjust the phase manually Video Mode RCV Source Specific This se...

Страница 20: ...d image 4 3 This setting specifies a 4 3 aspect ratio which is the same as a standard television 16 9 This setting specifies a 16 9 aspect ratio which is the same as a movie screen high definition TV...

Страница 21: ...his sub menu to specify whether or not a startup screen should be projected whenever the projector is turned on Logo Select this option to project the projector s built in logo screen at startup None...

Страница 22: ...CVUN Source Specific Use this sub menu to return all of the sub menu items on the Screen Settings main menu to their initial default settings z Restoring menu defaults when there is no input signal wi...

Страница 23: ...lect this setting to have the projector switch the video signal system automatically in accordance with the input signal from the video device that is connected to the VIDEO input terminal NTSC NTSC4...

Страница 24: ...d be performed when RGB is selected as the input source On Select this option to turn on auto adjust Off Select this option to turn off auto adjust Eco Mode RCVUN Single Use this sub menu to turn the...

Страница 25: ...RCVUN Single Use this sub menu to specify the language to use for messages setup menus etc English French German Italian Spanish Swedish Chinese Simplified Chinese Traditional Korean Japanese Restore...

Страница 26: ...on On Select this option when you want to restore the zoom setting that was in effect when the projector was last turned off whenever it is turned on Off Select this option when you want the image to...

Страница 27: ...al Name RCV Source Specific This sub menu item shows the signal name of the signal being input to the projector For details about signal names see Signal Name under Supported Signals on page 34 Index...

Страница 28: ...This operation can be performed regardless of the currently selected input source and regardless of whether or not a signal is currently being input For details about this procedure see To restore all...

Страница 29: ...etween the remote controller and the projector is less when there is a sharp angle between the remote controller and the remote control signal receiver Important To avoid running down the battery stor...

Страница 30: ...ce m Maximum Distance m Minimum Distance feet Maximum Distance feet 40 102 1 1 2 2 3 61 7 22 60 152 1 7 3 4 5 58 11 15 80 203 2 3 4 5 7 55 14 76 100 254 2 8 5 6 9 19 18 37 150 381 4 3 8 5 14 11 27 89...

Страница 31: ...the colors of the plugs on the optional YK 3 component video cable with the colors of the terminals Green Y Blue Cb Pb Red Cr Pr z You can use the optional YK 3 component video cable to connect to pi...

Страница 32: ...rojector s video resolution and fills the entire screen The following shows how different input signals from a computer are adjusted during projection Input Signal Example Projected Image When the inp...

Страница 33: ...ees in relation to the front of the Data Projector 2 Keeping the left nub 3 in the left depression 1 gently press the lens cover towards the right as you insert the nub 4 of the right lens cover tab i...

Страница 34: ...60 800 600 72 800 600 48 1 72 800 600 75 800 600 46 9 75 800 600 85 800 600 53 7 85 1024 768 60 1024 768 48 4 60 1024 768 70 1024 768 56 5 70 1024 768 75 1024 768 60 0 75 1024 768 85 1024 768 68 7 85...

Страница 35: ...above table does not guarantee that you will be able to display its images correctly Signal Name Horizontal Frequency kHz Vertical Frequency Hz NTSC 15 7 60 NTSC4 43 15 7 60 PAL 15 6 50 PAL M 15 7 60...

Страница 36: ...MA0608 A...

Отзывы: