


— 4 —
While the w
Press
Deleting Calorie Meter Mode Records
You can use the procedure below to delete today’s daily record only, or to delete all
records.
•
You cannot delete records while a Calorie Meter Mode measurement operation is in
progress.
To delete today’s daily record
1. In the Recall Mode, use
E
and
A
to display the today’s daily record.
•
Display the initial screen (alternating between the date, and the cumulative time
and calories burned). You cannot delete the today’s daily record if one of the
activity record screens is displayed.
2. Hold down
B
until the watch beeps and
stops flashing on the display.
To delete all records
1. In the Recall Mode, use
E
and
A
to display the cumulative record.
2. Hold down
B
until the watch beeps and
stops flashing on the display.
Inputting Basic Data
Note that before you can use the Calorie Meter Mode to
perform calorie measurements, you need to input your
basic data.
•
All of the operations in this section are performed in the
Basic Data Input Mode, which you enter by pressing
C
.
Basic Data
The term “basic data” refers to information about your
current weight and your calorie target setting.
•
Be sure to update basic data values whenever the
person using the watch changes.
Weight
You can specify either kilograms (kg) or pounds (lb) as the weight unit. The range and
increment for each unit are shown below.
Daily Calorie Target
Kilograms: 30 to 150kg in 1kg units
Pounds: 66 to 330 lb in 2lb units
•
If your weight is less than the minimum setting range value shown above, use the
minimum setting. If your weight is greater than the maximum value, use the
maximum setting.
Calorie Display Unit
You can select either kilocalories (kcal) or kilojoules (kJ) as the calorie display unit.
Calorie Targets
You can specify a calorie target value for each day and each week. After you set a
calorie target, the watch beeps for five seconds whenever your total calories burned
reaches the target value. The target graph on the display shows your progress to the
calorie target. You can set a calorie target in the ranges described below.
Daily Calorie Target
kcal: 100 to 2,000kcal, in 20kcal units
kJ: 400 to 8,000kJ, in 100kJ units
Weekly Calorie Target
kcal: 100 to 9,950 kcal, in 50kcal units
kJ: 400 to 40,000kJ, in 200kJ units
Basic Data Setting Precautions
•
Note that you cannot change basic data settings when the following conditions exist.
Weight: While a Calorie Meter Mode measurement is in progress
Weight unit: Any time there is Calorie Meter Mode data in memory and when the
Calorie Meter Mode screen is not cleared to all zeroes
Calorie unit: Any time there is Calorie Meter Mode data in memory and when the
Calorie Meter Mode screen is not cleared to all zeroes
Calorie target: Following a measurement in the Calorie Meter Mode
•
Changing the weekly calorie target during a week resets the weekly calorie
countdown and the target graph. Normal weekly calorie measurement will resume
starting from the next Monday following the day you changed the weekly calorie
target.
•
Whenever you change the weight unit or the calorie unit, the weight setting or the
daily and weekly calorie targets change to the values shown below.
Weight: 50kg or 110lb
Daily calorie target: 200kcal or 800kJ
Weekly calorie target: 1,000kcal or 4,000kJ
•
Note that the Basic Data Input Mode has four screens. When inputting basic data,
first display the screen for the setting you want to change. For details, see “To view
current basic data settings” below.
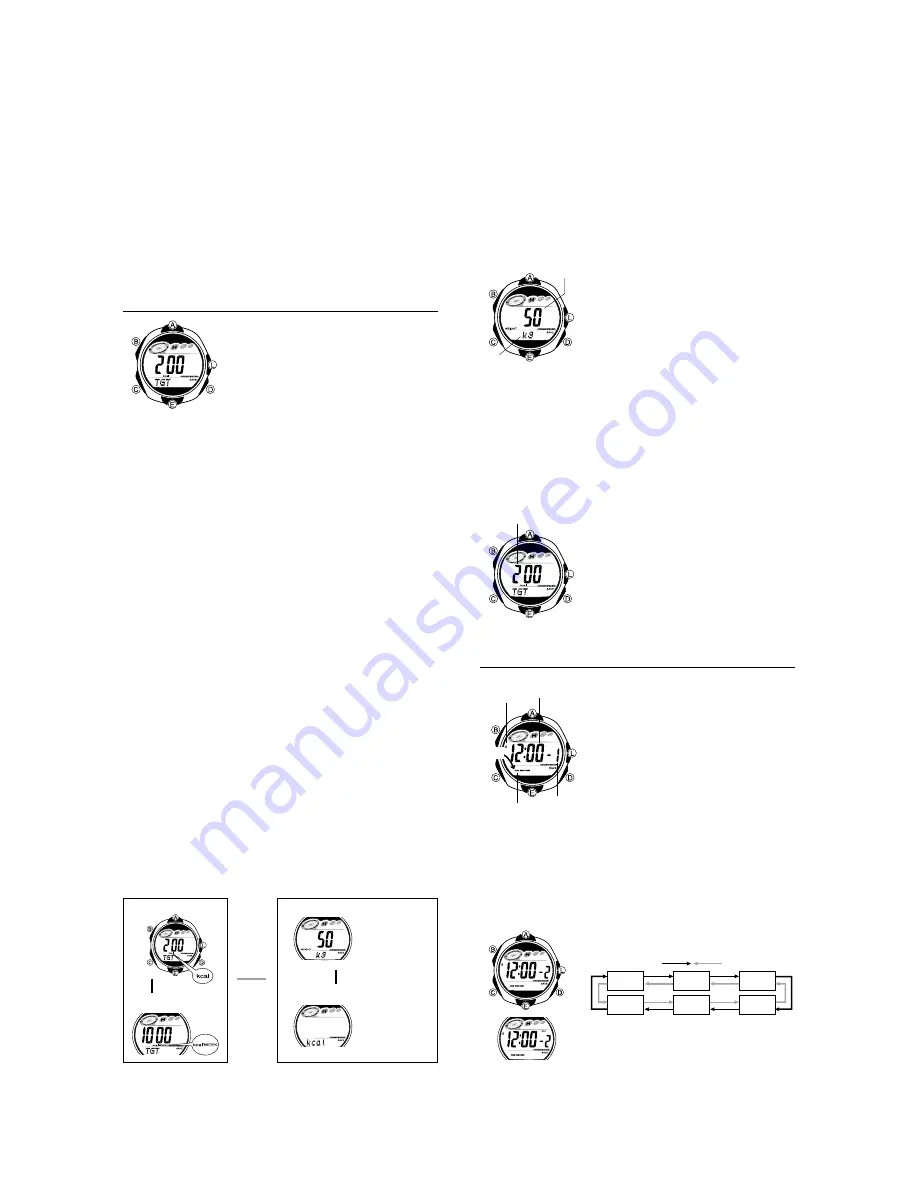
To view current basic data settings
In the Basic Data Input Mode, use
D
and
E
to display the screen for the basic data
setting you want to view (see illustration below).
•
When you press
D
to change from the calorie target screens to the weight or
calorie unit screen,
appears at the bottom of the display for about one
second.
does not appear when you press
E
to toggle between the weight
and calorie unit screens.
Daily Calorie Target
Weight
Weekly Calorie Target
Calorie Unit
Press
E
.
Press
E
.
lb
is shown when
the unit is pounds.
is shown when
the unit is kilojoules.
Press
D
.
To specify the calorie unit
1. In the Basic Data Input Mode, use
D
and
E
to display the calorie unit screen.
2. Hold down
B
until the calorie unit setting (
kcal
kcal
or
kJ
) starts to flash, which
indicates the setting screen.
•
If the calorie unit setting does not flash when you hold down
, perform the
following two operations and then perform this entire procedure again from the
beginning.
Change to the Calorie Meter Mode and clear the measurement to all zeroes.
Change to the Recall Mode and delete all records.
3. Press
E
to toggle the calorie unit between kilocalories (
) and kilojoules
(
kJ
).
4.
B
to exit the setting screen.
To specify your weight
1. In the Basic Data Input Mode, use
D
and
E
to display
the weight screen.
2. Hold down
B
until the weight setting starts to flash,
which indicates the setting screen.
•
If the weight setting does not start to flash when you
hold down
B
, change to the Calorie Meter Mode and
stop the ongoing calorie measurement operation.
3. Press
C
to move the flashing between the weight and
weight unit settings.
•
If the weight unit setting does not flash when you
press
C
, perform the following three operations and
then perform this entire procedure again from the
beginning.
Press
B
to exit the setting screen.
Change to the Calorie Meter Mode and clear the
measurement to all zeroes.
Change to the Recall Mode and delete all records.
| | |
|
|
|
|
||
||
||
|
|
|
|
|
| |
|
Weight
Weight unit
•
Changing the weight unit automatically resets the weight to its initial default
setting. Because of this, you should always specify the weight unit you want to
use before inputting a weight value.
4. Specify the weight unit and your weight.
•
While the weight unit setting is selected, press
E
to toggle it between kilograms
(
kg
) and pounds (
lb
).
•
eight setting is selected, use
E
(+) and
A
(–) to change it.
5. Press
B
to exit the setting screen.
To set the daily and weekly calorie targets
1. While in the Basic Data Input Mode, use
D
and
E
to
display either the daily calorie target or the weekly
calorie target screen.
2. Hold down
B
until the calorie target setting starts to
flash, which indicates the setting screen.
•
If the calorie target setting does not flash when you
hold down
B
, perform the following operations and
then perform this entire procedure again from the
beginning.
Change to the Calorie Meter Mode and clear the
measurement to all zeroes.
Change to the Recall Mode and delete the today’s
daily record.
3. Use
E
(+) and
A
(–) to change it.
4. Press
to exit the setting screen.
| | |
|
|
|
|
||
||
||
||
|
|
|
| |
| |
Target calorie
Alarms
You can set up to five independent alarms with hour,
minutes, and day of the week. When an alarm is turned
on, the alarm tone sounds when the alarm time is
reached.
You can also turn on an Hourly Time Signal, which will
cause the watch to beep twice every hour on the hour.
•
The alarm number (
1
through
5
) indicates an alarm
screen.
is shown for the alarm time when the Hourly
Time Signal screen is on the display.
•
When you enter the Alarm Mode, the data you were
viewing when you last exited the mode appears first.
•
All of the operations in this section are performed in the
Alarm Mode, which you enter by pressing
C
.
AM indicator
Alarm time
(Hour : Minutes)
Day of week
Alarm
number
Alarm Types
The alarm type is determined by the settings you configure, as described below.
•
Daily alarm
Set the hour and minutes for the alarm time. This type of setting causes the alarm to
sound everyday at the time you set.
•
Weekly alarm
Set the hour, minutes, and the day of the week for the alarm time. This type of setting
causes the alarm to sound every week at the time you set, on the day of the week you
set.
To set an alarm time
1. In the Alarm Mode, use
E
and
A
to scroll through the
alarm screens until the one whose time you want to set
is displayed.
-1
-3
:00
-5
-4
2. After you select an alarm, hold down
B
until the hour
setting of the alarm time starts to flash, which indicates
the setting screen.
•
This operation automatically turns on the alarm.
3. Press
C
to move the flashing between the hour,
minute, and day of the week settings.
Press
E
.
Press
A
.
CLR
CLR
DATA
DATA
▲
▲
▲
▲
▲
▲
B
:00
ALM
-2
| |
|
|
|
|
||
||
|
|
|
|
|
| |
kJ
B