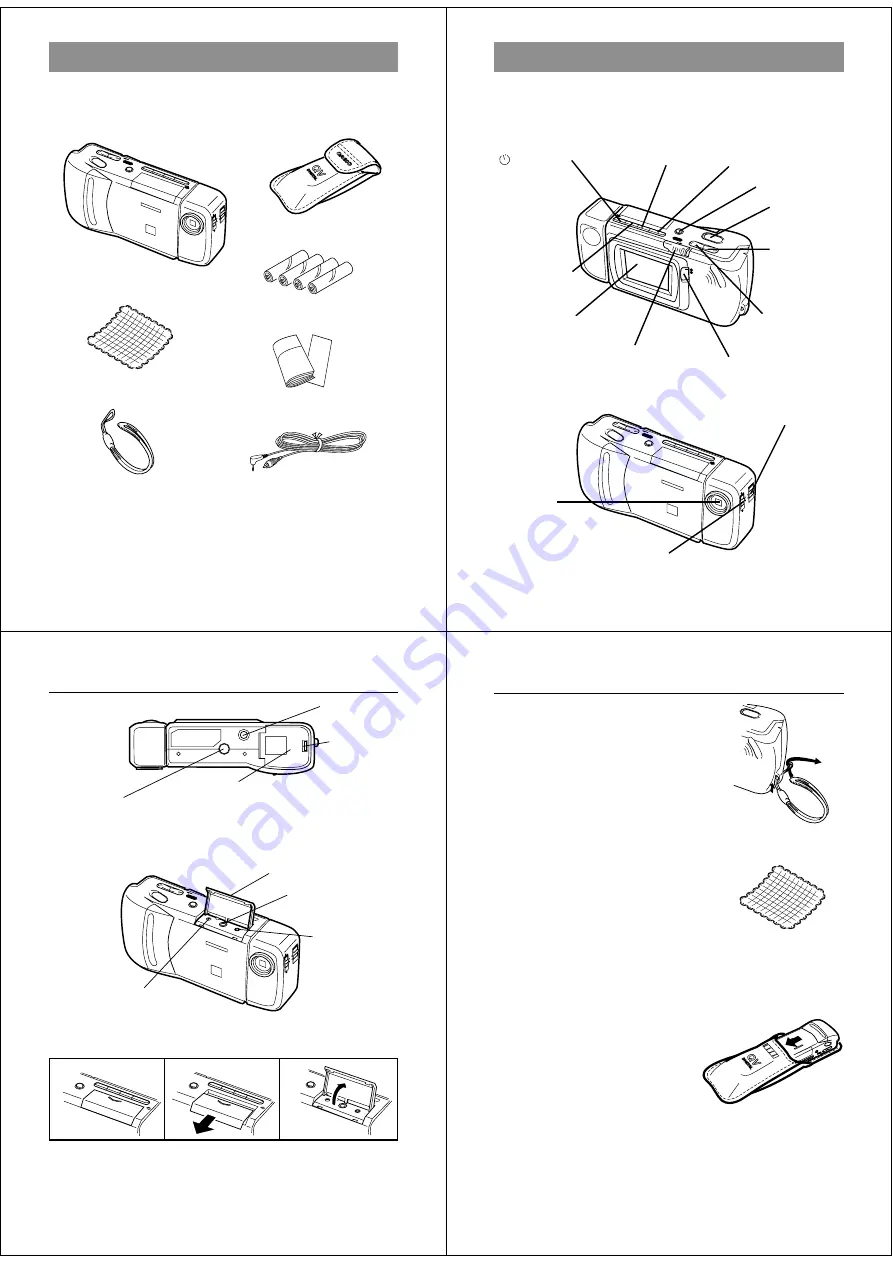
Casio QV-120 Скачать руководство пользователя страница 3

9

Unpacking

Check to make sure that all of the items shown below are included
with your camera. If something is missing, contact your dealer as
soon as possible.

 Soft case

Alkaline batteries (AA-size 

×

 4)

Camera

Cleaning Cloth

Wrist Strap

Manual

DE

L

ON

/OF

F

MO

DE

DIS

P

EF

FE

CT

PR

OT

EC

T

PO

WE

R

NO

M

AL

M

AC

RO

Video cable

Getting Acquainted

10

General Guide

The following illustrations show the names of each component, but-
ton and switch on the camera.

Top and Display

/PROTECT

(Timer/Protect)

button

DISP (Display) button

MODE button

DEL (Delete) button

Shutter button

[+] (Forward)

button

Function switch

POWER switch

Lens

EFFECT button

LCD

[–] (Reverse)

button

Lens

Aperture switch

NORMAL/MACRO switch

11

DE

L

MO

DE

DIS

P

EF

FE

CT

PR

OT

EC

T

DE

L

ON

/O

FF

PO

WE

R

NO

M

AL

M

AC

RO

Bottom

Tripod hole

Battery compartment cover

BRIGHT (brightness) control
• BRIGHT control adjusts the brightness of the image on the LCD.

The brightness is set at the factory to the optimum setting, and nor-
mally does not need adjustment.

Opening the Terminal Panel Cover

1

1

1

1

1

2

2

2

2

2

3

3

3

3

3

Terminals

Terminal panel cover

DIGITAL terminal

VIDEO OUT terminal

Important!

Make sure that the terminal panel cover is slid fully away as shown in
step 

2

 above before trying to raise it. Forcing the cover up can seri-

ously damage it.

General Guide

Battery
compartment
lock

AC Power terminal

DE

L

DEL

MO

DE

DIS

P

EFF

ECT

PR

OTE

CT

Getting Acquainted

12

Connecting the Wrist Strap

Pass the wrist strap through the hole on
the side of the camera as shown in the
illustration.

Using the Cleaning Cloth

Use the cleaning cloth to wipe finger-
prints and smudges from the LCD and
lens.

• Be sure to avoid applying too much

pressure when wiping the LCD. Too
much pressure can cause permanent
discoloration, abnormal images, and
cracks.

Using the Soft Case

Keep the camera in its soft case to pro-
tect it when not in use.

DE

L

ON

/O

FF

MO

DE

DIS

P

PO

WE

R

2

2

2

2

2

1

1

1

1

1

Содержание QV-120

Страница 1: ...Record Mode Displays 27 Using the Self Timer 30 Playing Back Images 31 Displaying Images on the Camera s LCD 31 Displaying Images on a TV Screen 32 Page Status Indicators 33 Producing a Multi Page Di...

Страница 2: ...ears and further operation of the camera will become impossible If this should happen contact your dealer or the nearest CASIO service provider as soon as possible 7 Operating conditions This camera i...

Страница 3: ...brightness of the image on the LCD The brightness is set at the factory to the optimum setting and nor mally does not need adjustment Opening the Terminal Panel Cover 1 1 1 1 1 2 2 2 2 2 3 3 3 3 3 Te...

Страница 4: ...f explosion Never mix batteries of different types 15 Power Supply Dead batteries are susceptible to leakage which can cause serious damage to your camera Remove batteries from the camera as soon as y...

Страница 5: ...tion 2 Turn on the camera Slide the POWER switch in the di rection indicated by the arrow The POWER switch automatically slides back to its original position when you release it When power comes on th...

Страница 6: ...the aperture to F8 Changing the Lens Orientation The lens of the camera is built into a lens body that is designed to rotate This means you can change the angle of the lens without mov ing the rest o...

Страница 7: ...rding Images Record Mode Displays The following provides details on the images indicators and mes sages that appear on the LCD in the Record Mode Image Display An image of the object that is picked up...

Страница 8: ...ortant If battery power is low camera power may turn off while a count down is in progress If this happens replace the batteries with new ones 31 Playing Back Images Playing Back Images This section d...

Страница 9: ...page 45 3 Specify the screen size Use the and buttons to specify the screen size To clear the selection screen and quit this procedure select the EXIT icon 4 Press the shutter button 35 Playing Back I...

Страница 10: ...ion Hold down the and buttons until the message AUTO PLAY START appears 39 Playing Back Images Auto play continues to loop through the memory pages This means that when it reaches the last page it sta...

Страница 11: ...4 Specify all page protection Use and to select ALL and then press the shutter button A protect indicator appears in the upper left corner of all memory pages when you display the page status indicat...

Страница 12: ...ory Note that you cannot delete images if they are protected See page 43 for details on how to unprotect images You cannot delete images from a multi page display a display of an enlarged image or whi...

Страница 13: ...minal of a TV video tape deck video printer or other similar devices Use the special video cable that comes with the camera for such connections Connecting to Other Devices The type of connecting cabl...

Страница 14: ...both cameras to PLAY 2 Use the and buttons of this camera to find the image you want to send You cannot send images between two cameras while either of their function switches is set to REC You canno...

Страница 15: ...e connected directly to a personal computer or video capture board that is equipped with a VIDEO IN terminal RCA pin jack It cannot be connected directly to an S VIDEO ter minal 59 Troubleshooting No...

Страница 16: ...le con nection 2 Camera connected to is not turned on 3 Function switch sets to REC Delete opera tion does not start when DEL is pressed All buttons and switches do not operate Very bright or very dar...

Страница 17: ...the camera s backlight The camera is equipped with a fluorescent light source to provide the back lighting for its LCD The normal service life of the backlight is approximately six years when the cam...

Отзывы: