background image

GETTING READY

30

E

F

D

D

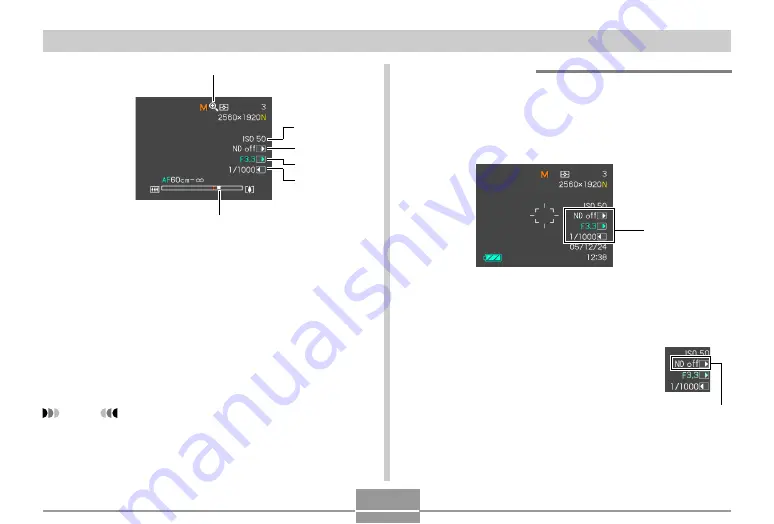
Digital zoom indicator (page 67)

E

ISO sensitivity (page 119)

F

ND filter (page 90)

G

Aperture value (pages 63, 94)

H

Shutter speed value (pages 63, 96)

I

Zoom indicator (page 67)

• Left side indicates optical zoom.
• Right side indicates digital zoom.

 Exposure Panel

The exposure panel is an area in the lower right corner of
the REC modes monitor screen that shows various
adjustable parameters. You can also use the exposure
panel to adjust exposure settings.

Exposure Panel

• The following explains the items that appear on the

exposure panel. Note that the current REC mode
determines which items appear.

1

ND filter (page 90)
Turns the ND filter on and off.
• The exposure panel appears on the

monitor screen when “A” (Aperture
Priority AE) or “M” (Manual Exposure)
is selected with the mode dial.

ND filter

H

G

I

 NOTE 

• An out of range ISO sensitivity, aperture, or shutter

speed setting causes the corresponding monitor
screen value to turn amber.

Содержание Exilim EX-P505

Страница 1: ...ng this CASIO product Before using it be sure to read the precautions contained in this User s Guide Keep the User s Guide in a safe place for future reference For the most up to date information abou...

Страница 2: ...uded with your camera If something is missing contact your dealer as soon as possible Rapid Charger BC 30L Power Cord Type AC Power Cord The shape of the AC power cord plug varies according to country...

Страница 3: ...General Guide 23 Using the Monitor Screen 26 Monitor Screen Contents 28 REC Modes 28 PLAY Mode 33 Changing the Contents of the Monitor Screen 34 Attaching the Strap 36 Using the Lens Cap 37 Power Req...

Страница 4: ...ual Focus 86 Using Focus Lock 87 Exposure Compensation EV Shift 88 Using the Built in ND Filter 90 To turn the ND filter on and off 90 Adjusting White Balance 91 Configuring the White Balance Setting...

Страница 5: ...Keys 125 Specifying Power On Default Settings 125 Resetting the Camera 127 Using the Shortcut Menu EX Menu 128 Installing the Lens Hood and a Lens Filter 129 130 PLAYBACK Basic Playback Operation 130...

Страница 6: ...Time screen 162 To configure World Time settings 162 Changing the Display Language 163 Changing the USB Port Protocol 164 Formatting Built in Memory 165 166 USING A MEMORY CARD Using a Memory Card 167...

Страница 7: ...ing and Printing a Snapshot 207 Playing a Movie 209 Editing a Movie 212 Viewing User Documentation PDF Files 213 User Registration 214 Exiting the Menu Application 214 Using the Camera with a Macintos...

Страница 8: ...he example screens and product illustrations shown in this User s Guide may differ somewhat by the screens and configuration of the actual camera The SD logo is a registered trademark Windows Internet...

Страница 9: ...ode instant camera setup based on MOVIE BEST SHOT sample scenes MOTION PRINT page 141 Capture frames from a movie and create still images that are suitable for printing 7 5MB flash memory Images can b...

Страница 10: ...esome setups automatically for beautiful pictures every time Triple Self timer page 75 The self timer can be set up to repeat three times automatically Real time RGB histogram page 116 An on screen hi...

Страница 11: ...omputer simply by connecting the camera with a USB cable pages 183 200 USB 2 0 Hi Speed protocol support pages 184 192 This camera supports USB 2 0 Hi Speed protocol Though it can be used with a compu...

Страница 12: ...AC adaptor power cord from the power outlet and contact your dealer or nearest CASIO authorized service center Using the camera under these conditions creates the risk of fire and electric shock Afte...

Страница 13: ...iately turn it off Next remove the camera s battery and or unplug the AC adaptor power cord from the power outlet and contact your dealer or nearest CASIO authorized service center Never use the camer...

Страница 14: ...ubject to strong vibration Test for proper operation before using the camera Before using the camera to record important images make sure you first record a number of test images and check the results...

Страница 15: ...or otherwise expose it to a sudden change of temperature there is the possibility that condensation can form on the exterior or on interior components Condensation can cause malfunction of the camera...

Страница 16: ...ights red during charging CHARGE lamp turns green when charging is complete 1 2 2 1 Power Cord Type 1 Charge the rechargeable lithium ion battery NP 40 that comes with the camera page 37 Note that the...

Страница 17: ...QUICK START GUIDE 17 2 Load the battery into the camera page 42 2 3 Stopper 1...

Страница 18: ...T 5 Use and to select the city you want and then press SET 6 Use and to select the summer time DST setting you want and then press SET 7 Use and to select the date format setting you want and then pre...

Страница 19: ...ses Snapshot mode to appear on the monitor screen 4 Point the camera at the subject use the monitor screen to compose the image and then press the shutter button half way When the camera finishes its...

Страница 20: ...e and to select Delete To exit the image delete operation without deleting anything select Cancel 6 Press SET to delete the image To delete an image See page 152 or details 1 Open the monitor screen t...

Страница 21: ...QUICK START GUIDE 21 1 Position the monitor screen inwards to turn off the camera You can also turn off the camera by pressing the power button To turn off the camera See page 51 or details 1 1...

Страница 22: ...enclosed by double quotation marks This term as used in this manual camera file memory battery rapid charger Means this The CASIO EX P505 Digital Camera The location where the camera is currently sto...

Страница 23: ...s currently storing the images you record File memory can be any one of the following three locations The camera s built in flash memory An SD memory card loaded in the camera A MultiMediaCard loaded...

Страница 24: ...n lamp 9 Mode dial PLAY mode Snapshot mode BEST SHOT mode Aperture Priority AE mode Shutter Speed Priority AE mode Manual Exposure mode Past Movie mode Short Movie mode MOVIE BEST SHOT mode Movie mode...

Страница 25: ...hole when attaching to a tripod Bottom O Stopper P Battery compartment Q Memory card slot O P Q N M F Focus button G EX button H Flash button J K L I O N O FF I Flash J DC IN 4 5V AC adaptor connecto...

Страница 26: ...s on the camera IMPORTANT When changing the position of the monitor screen grasp the screen on its top and bottom edges Take care you do not touch the liquid crystal panel Also make sure you never try...

Страница 27: ...panel Leaving the monitor screen facing open exposes the LCD panel to accidental impact which creates the risk of breaking cracking etc Positioning the monitor screen so it is facing the same directio...

Страница 28: ...cted the flash on indicator will appear when the shutter button is pressed half way 2 Focus mode indicator page 80 None Auto Focus Macro Pan Focus Infinity Manual Focus appears only during movie recor...

Страница 29: ...e 106 9 Image quality Snapshots page 79 F Fine N Normal E Economy Movies page 105 HQ High Quality NORMAL Normal LP Long Play 0 Date and time page 159 A Battery capacity page 45 B Histogram page 116 C...

Страница 30: ...ows various adjustable parameters You can also use the exposure panel to adjust exposure settings Exposure Panel The following explains the items that appear on the exposure panel Note that the curren...

Страница 31: ...MF setting page 86 Use this item for adjust focus manually The manual focus setting item is displayed in the exposure panel when manual focus is selected indicated by on the monitor screen using 2 Ape...

Страница 32: ...MF Manual Focus is selected as the focus mode If you use and to move the cursor to and then press or the Ex Finder view will disappear and the manual focus position indicator page 86 will appear After...

Страница 33: ...speed value pages 63 96 9 Date and time page 159 0 White balance indicator page 91 AWB Auto Daylight Cloudy Shade 1 Fluorescent 1 2 Fluorescent 2 Tungsten Flash Manual A Flash mode indicator page 69...

Страница 34: ...the monitor screen as shown below REC Modes B Recording mode page 59 Snapshot BEST SHOT Aperture Priority AE Shutter Speed Priority AE Manual Exposure C Battery capacity page 45 D Metering mode indica...

Страница 35: ...in the following modes PLAY Movie Past Movie Short Movie MOVIE BEST SHOT Pressing DISP will not change monitor screen contents during movie recording or during standby or recording of an audio snapsh...

Страница 36: ...dropping the camera while operating it be sure to wear the strap around your wrist Use the buckle to ensure that the strap is fastened snugly around your wrist The supplied strap is intended for use...

Страница 37: ...rst time after purchasing it You need to charge the battery before using the camera for the first time Household AC Power AC Adaptor AD C40 Option Using the Rapid Charger Contacts CHARGE lamp Attach t...

Страница 38: ...battery into the rapid charger Plug in Type Power Cord Type Loading the Battery into the Rapid Charger Making sure that the positive and negative contacts are aligned correctly load the battery into...

Страница 39: ...wer receptacle shape is different from that in your area replace the AC power cord with one of the other ones that come with the camera or purchase a commercially available AC power cord that is compa...

Страница 40: ...e the battery whenever you are not charging CHARGE lamp Plug Rapid Charger NOTE The plug in type rapid charger is designed for operation on power ranging from 100V AC to 240V AC Note however that the...

Страница 41: ...it is recommended that you charge the battery immediately before you need to use it The battery used with this camera is specifically designed for use with digital cameras If you want to try to use it...

Страница 42: ...rrow and then swing it open 2 Aligning the marks on the camera and battery as shown in the illustration press down on the stopper in the direction indicated by the arrow and slide the battery into the...

Страница 43: ...40 rechargeable lithium ion battery to power this camera Use of any other type of battery is not supported If the camera does not work normally This can mean there is a problem with how the battery is...

Страница 44: ...ording 2 Operating Time Continuous Snapshot Playback 3 Continuous Movie Recording 4 Supported Battery NP 40 Storage Medium SD Memory Card 1 Number of Shots CIPA Standard Temperature 23 C 73 F Monitor...

Страница 45: ...le the Auto Power Off and the Sleep features page 52 to protect against wasting battery power when you forget to turn off the camera Using Manual Focus page 86 or Pan Focus page 85 during movie record...

Страница 46: ...into the camera page 42 Power Supply Precautions Note the following precautions when handling or using the battery and the rapid charger Battery Handling Precautions SAFETY PRECAUTIONS Be sure to read...

Страница 47: ...high temperatures Should you ever notice any of the following conditions while using charging or storing a battery immediately remove it from the camera or rapid charger and keep it away from open fla...

Страница 48: ...latile agents or chemically treated rags Doing so can cause deformation of the battery and lead to malfunction Always make sure that the rapid charger is on a level surface when using it for charging...

Страница 49: ...fire malfunction and electric shock The rapid charger becomes slightly warm during charging This is normal and does not indicate malfunction Unplug the rapid charger from the power outlet whenever you...

Страница 50: ...ectrical outlet Using AC Adaptor In Another Geographic Area The AC adaptor can be used with any power source rated from 100V to 240V AC If you plan to use the AC adaptor in another country it is up to...

Страница 51: ...unplug the AC adaptor from the AC outlet The camera automatically switches over to AC adaptor powered operation whenever the AC adaptor is plugged into the camera Use of the AC adaptor to power the c...

Страница 52: ...Press MENU 3 Use and to select the Set Up tab 4 Use and to select the feature whose setting you want to configure and then press To configure this feature Select this setting Sleep Sleep Auto Power O...

Страница 53: ...ocedure in the Snapshot mode 1 Turn on the camera and then align the mode dial with If you want to enter the PLAY mode instead you would align the mode dial with Mode dial The Auto Power Off and Sleep...

Страница 54: ...ettings Display the options available for a setting Select an option Apply the setting and exit the menu screen Apply the setting and return to tab selection Exit the menu screen Do this Press and Pre...

Страница 55: ...is key operation Press SET Press 1 Press 2 Use to move back up to tab selection See Menu Reference on page 219 for more information about menus 3 Press or to select the tab you want and then press SET...

Страница 56: ...e you will need to use the camera s menu to individually change the language page 163 or clock page 159 settings You will not be able to edit time data stored with images that are recorded while the c...

Страница 57: ...time using summer time Daylight Saving Time Keep time using standard time Select this setting On Off To configure display language and clock settings 1 Open the monitor screen to turn on the camera Y...

Страница 58: ...he cursor between settings Toggle between 12 hour and 24 hour timekeeping Do this Press and Press and Press DISP 7 Set the current date and the time 6 Use and to select the date format setting you wan...

Страница 59: ...normally use for image recording BEST SHOT mode This mode makes camera setup as easy as selecting the applicable sample scene Simply select one of 22 sample scenes and the camera will automatically b...

Страница 60: ...ore the button is pressed and ends after the button is pressed page 108 MOVIE BEST SHOT mode This mode makes camera setup as easy as selecting the applicable sample scene Select one of the MOVIE BEST...

Страница 61: ...ur images IMPORTANT Make sure your fingers and the strap do not block the flash stereo microphones or lens NOTE Moving the camera as you press the shutter button or while the Auto Focus operation is b...

Страница 62: ...shutter speed in accordance with the brightness of the subject Images you record are stored in the camera s built in memory or to a memory card if you have one loaded in the camera When an optionally...

Страница 63: ...used by observing the focus frame and the operation lamp 1920N 1920N 2560 2560 3 05 05 12 12 24 24 12 12 38 38 0 0 0 0 Focus frame Operation lamp It means this The image is in focus The image is not i...

Страница 64: ...ile memory and even lead to malfunction of the camera Never remove the memory card while an image is being recorded to the memory card Fluorescent lighting actually flickers at a frequency that cannot...

Страница 65: ...al focus page 86 About the REC Mode Monitor Screen The image shown on the monitor screen in a REC mode is a simplified image for composing purposes The actual image is recorded in accordance with the...

Страница 66: ...5X 1 In a REC mode move the zoom controller left or right to zoom Moving the zoom controller as far as it goes in either direction will zoom at high speed Zoom controller Move the zoom controller in t...

Страница 67: ...nge is not displayed when digital zoom is turned off Digital Zoom Digital zoom digitally enlarges the part of the image at the center of the image screen The range of digital zoom is 5X to 40X in comb...

Страница 68: ...and then slide it towards wide angle side again to move into the optical zoom range 4 Compose the image and then press the shutter button Select this setting On Off To do this Turn on digital zoom Tur...

Страница 69: ...ress of cycles through the flash mode settings described below on the monitor screen To do this Have the flash fire automatically when required Auto Flash Turn off the flash Flash Off Always fire the...

Страница 70: ...The initial flashes are pre flashes which the camera uses to obtain information that it uses for exposure settings The final flash is for recording Make sure that you keep the camera still until the...

Страница 71: ...dimly lit room can cause red spots inside the eyes of people who are in the image This happens because the light from the flash reflects off of the retina of the eye IMPORTANT Note the following impo...

Страница 72: ...p The indicator is also shown on the monitor screen when the flash unit is ready to fire Changing the Flash Intensity Setting Perform the following steps to change the flash intensity setting 1 In a R...

Страница 73: ...2 Use and to select the REC tab 3 Use and to select Flash Assist and then press disp Flash assist used Flash assist not used 4 Use and to select Auto and then press SET Selecting Off disables flash a...

Страница 74: ...w The Flash Off icon on the monitor screen indicates that flash is turned off Movie mode Past Movie mode Short Movie mode MOVIE BEST SHOT mode Flash The flash unit may not be able to charge when camer...

Страница 75: ...er you press the shutter button A Triple Self timer feature lets you perform three consecutive self timer operations to record three images 1 In a REC mode press MENU 2 Use and to select the REC tab 3...

Страница 76: ...restarts the countdown from the beginning 1 The camera performs a 10 second countdown and then records the first image 2 The camera prepares to record the next image The amount of time required for pr...

Страница 77: ...ode MOVIE BEST SHOT mode Specifying Image Size Image size is the size of the image expressed as the number of vertical and horizontal pixels A pixel is one of the many tiny dots that make up the image...

Страница 78: ...age size value pixels will alternate on the display with a corresponding print size The print size indicates the optimum paper size when you print an image that is the image size you select The above...

Страница 79: ...s valid for snapshots only For information about movie image quality see page 105 1 In a REC mode press MENU 2 Use and to select the REC tab 3 Use and to select Quality and then press 4 Use and to sel...

Страница 80: ...the focus mode settings in the sequence shown below To set up the camera to do this Focus automatically Auto Focus 1 Perform close up focus Macro Fix the focal distance Pan Focus 2 Perform infinity f...

Страница 81: ...ode settings until there is no focus mode indicator on the display When using Icon Help page 124 select Auto Focus 2 Compose the image so the main subject is within the focus frame and then press the...

Страница 82: ...will appear on the monitor screen as shown below to tell you the focusing range Example AF 40cm Specifying the Auto Focus Area You can use the following procedure to change the Auto Focus area used i...

Страница 83: ...shutter button half way the camera automatically selects the focus point where the subject closest to the camera is located and a focus frame appears at that point This setting works well for group ph...

Страница 84: ...us and image recording operations are identical to those in the Auto Focus mode NOTE When the Macro mode cannot focus properly because the subject is too far away the camera automatically switches to...

Страница 85: ...OT mode 2 Press to scroll through settings until is displayed 3 Press the shutter button to record the movie with Pan Focus IMPORTANT Pan Focus can be used in a movie mode Movie Past Movie Short Movie...

Страница 86: ...icating the part of the image that will be used for manual focus Boundary 2 While watching the image on the monitor screen use and to focus Pressing or causes the area inside of the boundary displayed...

Страница 87: ...you can use to focus on a subject that is not located within the focus frame when you record an image You can use focus lock in the Auto Focus mode and the Macro mode 1 Using the monitor screen compo...

Страница 88: ...o Focus mode NOTE Locking the focus also locks the exposure Main subject Exposure Compensation EV Shift Exposure compensation lets you change the exposure setting EV value manually to adjust for the l...

Страница 89: ...ng under very dark or very bright conditions you may not be able to obtain satisfactory results even after performing exposure compensation NOTE Performing an EV shift operation while using multi patt...

Страница 90: ...Mode Manual Exposure page 97 Using the ND filter in this mode results in exposure that is 2 0 EV darker than the unfiltered setting Because of this you should readjust aperture and shutter speed to ob...

Страница 91: ...then press SET When shooting under these conditions Normal conditions Outdoor daylight on a clear day Outdoor daylight on an overcast or rainy day in the shade of a tree etc In the shade of a building...

Страница 92: ...while in a REC mode If you have key customization configured to control white balance and you have Icon Help turned on page 124 select AWB Auto WB to change the white balance mode to auto Configuring...

Страница 93: ...paper or similar object under the lighting conditions for which you want to set the white balance and then press the shutter button White paper This starts the white balance adjustment procedure The...

Страница 94: ...E When A mode aperture priority AE is selected as the exposure mode the camera adjusts the shutter speed automatically in accordance with a fixed aperture value specified by you A wider aperture a low...

Страница 95: ...V Shift here and then use and to specify an exposure compensation value pages 31 88 If you are using manual focus pages 31 86 you can also use and to select FOCUS manual focus adjustment and then use...

Страница 96: ...oving 1 Align the mode dial with S Shutter Speed Priority 2 Use and to select the shutter speed value page 31 in the exposure panel and then use and to change the setting Shutter speed Movement Slow F...

Страница 97: ...ill turn amber when you press the shutter button half way if the image is over exposed or under exposed 4 When the image is focused press the shutter button all the way down to record Setting Exposure...

Страница 98: ...ct the shutter speed value page 31 in the exposure panel and then use and to change the setting If you are using manual focus pages 31 86 you can also use and to select FOCUS manual focus adjustment a...

Страница 99: ...you can use and to change the shutter speed setting Pressing a button causes the Guidance images to disappear from the display In the M mode you can use and to switch the Guidance images between the a...

Страница 100: ...ery slow shutter speeds try using a shutter speed setting that is faster than four seconds Also note that the digital noise reduction process can cause it to take longer about double the shutter speed...

Страница 101: ...xactly the results you expect You can change the camera settings that are made when you select a BEST SHOT scene Note however that the BEST SHOT settings revert to their defaults when you select anoth...

Страница 102: ...BEST SHOT Setup You can use the procedure below to save the setup of an image you recorded as a BEST SHOT scene After that you can recall the setup whenever you want to use it 1 Align the mode dial wi...

Страница 103: ...T SHOT user setup focus mode EV shift value filter metering mode white balance mode flash intensity sharpness saturation contrast flash mode ISO sensitivity Flash Assist aperture shutter speed and ND...

Страница 104: ...e the file 6 Press MENU Recording a Movie You can record high resolution movies with stereo sound Movie length is limited only by the amount of memory available for storage You can select a resolution...

Страница 105: ...ting the applicable sample scene Select one of the MOVIE BEST SHOT scenes and the camera automatically configures itself with the setup for that scene page 111 NOTE You can play movie files on your co...

Страница 106: ...e 30 frames second 30 frames second 15 frames second Recording a Standard Movie Movie Mode Use the Movie Mode when you want to record a standard movie 1 Align the mode dial with This enters the Movie...

Страница 107: ...updated Pressing the shutter button starts recording from five seconds prior to the point the button is pressed Use this mode when you want to make sure you do not miss fast moving action Record Stor...

Страница 108: ...reset length each time you press the shutter button A Short Movie Mode movie consists basically of two parts as shown in the illustration below When 4 second past part and 4 second future part is spec...

Страница 109: ...of the past part or the future part The length of the past part can be from 0 to five seconds Past part Future part MOTION PRINT 4 Use and to specify the length of the future part the part after the...

Страница 110: ...hed Movie Recording Precautions The flash does not fire in the Movie mode This camera also records audio Note the following points when recording a movie Take care that you do not block the stereo mic...

Страница 111: ...pronounced when you record close ups or recording with a large zoom factor Because of this use of a tripod is recommended when recording close ups or recording with a large zoom factor Images may be...

Страница 112: ...page 111 to select your user setup for recording IMPORTANT MOVIE BEST SHOT scenes were not recorded using this camera They are provided as samples only Images recorded using a MOVIE BEST SHOT scene ma...

Страница 113: ...the setup of a movie recorded with this camera can be saved as a MOVIE BEST SHOT setup You can register up to 999 MOVIE BEST SHOT user setups You can check the settings of the currently selected MOVI...

Страница 114: ...y 120KB 30 second recording of approximately 4KB per second NOTE You can play back an audio file recorded in the Audio Snapshot mode on your computer using Windows Media Player 1 In a REC mode press M...

Страница 115: ...riple Self timer Audio Recording Precautions Take care that you do not block the stereo microphones with your fingers Good recording results are not possible when the camera is too far from the subjec...

Страница 116: ...ft exposure compensation to move it left or right in order to achieve better balance Optimum exposure can be achieved by correcting exposure so the graph is as close to the center as possible An RGB h...

Страница 117: ...not be able to achieve exactly the same shapes for particular subjects A centered histogram does not necessarily guarantee optimum exposure The recorded image may be over exposed or under exposed eve...

Страница 118: ...Contrast Grid on off Image Review on off Icon Help on off L R key setting Power on default settings Resetting the camera NOTE You can also configure the settings listed below See the referenced pages...

Страница 119: ...ting you want and then press SET Select this setting Auto ISO 50 ISO 100 ISO 200 ISO 400 To get this Automatic sensitivity selection Lower sensitivity Higher sensitivity IMPORTANT Under certain condit...

Страница 120: ...e exposure settings for a wide range of shooting conditions Center Weighted Center weighted metering measures light concentrating on the center of the focus area Use this metering method when you want...

Страница 121: ...ttings are Off B W Sepia Red Green Blue Yellow Pink Purple IMPORTANT Using the camera s filter feature produces the same effect as attaching a color filter to the lens Specifying Outline Sharpness Use...

Страница 122: ...High color saturation intensity Normal color saturation intensity Low color saturation intensity Select this setting 2 1 0 1 2 Specifying Contrast Use this procedure to adjust the relative difference...

Страница 123: ...ect the setting you want and then press SET To do this Display images on the monitor screen for about one second immediately after they are recorded Do not display images immediately after they are re...

Страница 124: ...is assigned to the and keys with the key customization feature page 125 1 In a REC mode press MENU 2 Select the REC tab select Icon Help and then press 3 Use and to select the setting you want and th...

Страница 125: ...ge 91 ISO page 119 Metering page 120 Self timer page 75 Off No function assigned Specifying Power On Default Settings The camera s mode memory feature lets you specify the power on default settings in...

Страница 126: ...Auto Spot Multi Off 0 On Last Auto Focus position that was in effect before you switched to manual focus Wide 1 In a REC mode press MENU 2 Use and to select the Memory tab 3 Use and to select the ite...

Страница 127: ...mory on off settings In the following modes Flash Off is always selected as the flash mode regardless of mode memory on off setting Movie Mode Past Movie Mode Short Movie Mode MOVIE BEST SHOT Mode Res...

Страница 128: ...de press EX 2 Use and to select the item you want and then use and to scroll through the available settings Refer to the following pages for details about each of the settings Adjusting the White Bala...

Страница 129: ...nd the edges of images Use of a filter may interfere with proper operation of Auto Focus and flash Filters may not deliver the same results as those obtained with a film camera Do not use multiple fil...

Страница 130: ...them Basic Playback Operation Use the following procedure to scroll through files stored in the camera s memory 1 Open the monitor screen or press the power button to turn on the camera This causes a...

Страница 131: ...ter the preview image This does not apply to images copied from another digital camera Playing an Audio Snapshot Perform the steps below to display an audio snapshot indicated by and play its audio 1...

Страница 132: ...his zooms the images A graphic indicator appears in the lower right corner indicating the area of the original image that is zoomed on the monitor screen You can toggle display of the zoom factor on a...

Страница 133: ...ee following sizes 1600 1200 pixels UXGA Best for print sizes 3 5 5 or smaller More detail than 1280 960 1280 960 pixels SXGA Best for print sizes 3 5 5 or smaller 640 480 pixels VGA Best for attachme...

Страница 134: ...so remains in memory Note that you cannot resize the following types of images 640 480 pixel and smaller images 2560 1712 pixel 3 2 images Movie images Images created with MOTION PRINT Images recorded...

Страница 135: ...that this operation is possible only when a snapshot image is on the monitor screen 4 Use the zoom controller to make the cropping boundary larger or smaller The smaller the image the more limited is...

Страница 136: ...he cropped image When you display a cropped image on the camera s monitor screen the date and time that appear when the image is displayed indicate when the image was originally recorded not when the...

Страница 137: ...oll paused playback one frame Stop movie playback Adjust the movie audio volume level Toggle monitor screen indicators on and off Zoom the movie image Scroll a zoomed movie image on the monitor screen...

Страница 138: ...ovie into multiple parts are not supported by camera operations However you can splice movies and cut movies into multiple parts on your computer using the bundled Ulead Movie Wizard SE VCD applicatio...

Страница 139: ...Press or Press MENU Press or 4 Display the frame where you want the cut to be located The red portion of the indicator bar shows what part will be cut 5 When the frame you want is displayed press 6 U...

Страница 140: ...s You can also display the same screen while in the PLAY mode by pressing MENU selecting the PLAY tab selecting Movie Editing and then pressing 3 Use and to select Cut and then press SET Select Cancel...

Страница 141: ...g is complete when the message disappears Select No to exit the cut mode Capturing a Still Image from a Movie MOTION PRINT The MOTION PRINT feature lets you capture a frame from an existing movie and...

Страница 142: ...e Select Cancel to exit the MOTION PRINT mode 5 Use and to display the frame that you want to use as the main image Holding down either button scrolls at high speed 6 After selecting the frame you wan...

Страница 143: ...left corner The selection boundary is located at the image that was on the display before you switched to the 9 image view 3 Pressing any button besides or displays the full size version of the image...

Страница 144: ...terval All Images Displays all images in camera memory OnIy This icon appears only in the case of snapshots and audio snapshots OnIy This icon appears only in the case of movies One Image Displays a p...

Страница 145: ...e while scrolls to the next image When the slideshow comes to a movie file it plays the movie and its audio once When the slideshow comes to an audio snapshot it plays the audio once The audio of movi...

Страница 146: ...he image 90 degrees and register the rotation information along with the image After you do this the image is always displayed in its rotated orientation 1 In the PLAY mode press MENU 2 Select the PLA...

Страница 147: ...ng types of images Movie images Images created with MOTION PRINT Image rotation is supported for single image only You cannot rotate a 9 image screen Adding Audio to a Snapshot The after recording fea...

Страница 148: ...d audio 1 In the PLAY mode use and to scroll through snapshots until the one whose audio you want to re record is displayed 2 Press MENU 3 Select the PLAY tab select Dubbing and then press 4 Use and t...

Страница 149: ...reo microphones Displaying Camera Images on a TV Screen You can display recorded images on a TV screen and even use a TV screen to compose images before you record them To display camera images on a T...

Страница 150: ...n also appear on the TV screen Stereo output is possible if you connect to a TV that supports stereo input Depending on the size of the TV screen recorded images and images during recording may not fi...

Страница 151: ...e setting you want and then press SET If you are using a TV designed for use in this area U S Japan and other areas that use the NTSC system Europe and other areas that use the PAL system Select this...

Страница 152: ...cannot be deleted To delete a protected file unprotect it first page 155 Delete cannot be performed when all files in memory are protected page 156 Deleting an audio snapshot deletes both the image fi...

Страница 153: ...and to select All Files Delete and then press SET 3 Use and to select Yes To exit the file delete operation without deleting anything select No 4 Press SET to delete all the files The message There a...

Страница 154: ...s shown below Example Name of the 100th folder Each folder can hold files numbered up to 9 999 Trying to store the 10 000th file in a folder causes the next serially numbered folder to be created File...

Страница 155: ...MENU to exit the menu screen Protecting Files Once you protect a file it cannot be deleted page 152 You can protect files individually or you can protect all files in memory with a single operation T...

Страница 156: ...1 In the PLAY mode press MENU 2 Select the PLAY tab select Protect and then press 3 Use and to select All Files On and then press SET To unprotect all files press SET in step 3 so the setting shows A...

Страница 157: ...or all the way or perform a key operation To configure sound settings 1 Press MENU 2 Select the Set Up tab select Sounds and then press 3 Use and to select the sound whose setting you want to configur...

Страница 158: ...ANT The volume setting you make here also affects the video output volume level page 149 To set the audio volume level for movie and audio snapshot playback 1 Press MENU 2 Select the Set Up tab select...

Страница 159: ...are deleted or whether the memory card is replaced with a new one Find the highest file number in the current folder and increment it Setting the Clock Use the procedures in this section to select a...

Страница 160: ...one 3 Use and to select Home and then press 4 Use and to select City and then press 5 Use and to select the geographical area that contains location you want to select as your Home Time zone and then...

Страница 161: ...e between 12 hour and 24 hour timekeeping 4 When all the settings are the way you want press SET to register them and exit the setting screen Changing the Date Format You can select from among three d...

Страница 162: ...this Display the time in your home time zone Display the time in the zone currently selected on the World Time screen 4 Press SET to exit the setting screen To configure World Time settings 1 Press ME...

Страница 163: ...ress SET 7 When the setting is the way you want press SET to apply it and exit the setting screen Changing the Display Language You can use the following procedure to select one of ten languages as th...

Страница 164: ...d then press 3 Use and to select the setting you want and then press SET Select this setting Mass Storage PTP PictBridge When connecting to this type of device Computer PictBridge compatible printer p...

Страница 165: ...ollowing Protected images BEST SHOT mode user setups MOVIE BEST SHOT mode user setups 1 Check to make sure there is no memory card loaded in the camera If there is a memory card loaded in the camera r...

Страница 166: ...t how to use it Certain types of cards can slow down processing speeds If you are using a slow memory card you may not be able to record a movie using the HQ image quality setting Because of this you...

Страница 167: ...ery cover closed and then slide it in the direction indicated by the arrow Using a Memory Card IMPORTANT Make sure you turn off the camera before inserting or removing a memory card Be sure to orient...

Страница 168: ...other object besides a memory card into the camera s card slot Doing so creates the risk of damage to the camera and card Should water or any foreign object ever get into the card slot immediately tur...

Страница 169: ...e that data deleted by a memory card format operation cannot be recovered Check to make sure you do not need any of the data on the memory card before you format it Formatting a memory card that conta...

Страница 170: ...lete data from an SD memory card a number of times it loses its ability to retain data Because of this periodic re formatting of an SD memory card is recommended Before starting a format operation che...

Страница 171: ...complete the monitor screen shows the last file in the folder To copy a specific file from a memory card to built in memory 1 Perform steps 1 through 3 of the procedure under To copy all the files in...

Страница 172: ...USING A MEMORY CARD 172 5 Press MENU to exit the copy operation NOTE Files are copied to the folder in built in memory whose name has the largest number...

Страница 173: ...print service providers may not support DPOF or may support different printing protocols In this case use the protocol supported by your print service to specify the images you want to have printed Pr...

Страница 174: ...or printing with a Macintosh For more information see Using the Camera with a Macintosh Computer pages 191 215 DPOF The letters DPOF stand for Digital Print Order Format which is a format for recordin...

Страница 175: ...f copies You can specify up to 99 for the number of copies Specify 00 if you do not want to have the image printed 6 To turn on date stamping for the prints press DISP so 12 12 1 is displayed 12 12 1...

Страница 176: ...fy the number of copies You can specify up to 99 for the number of copies Specify 00 if you do not want to have the image printed 5 To turn on date stamping for the prints press DISP so 12 12 1 is dis...

Страница 177: ...e number of copies If you don t the printing service may print all images without regard to your DPOF settings or date printing may not be performed Note that some professional print services do not s...

Страница 178: ...TP PictBridge simplifies the transfer of image data to the connected device 4 Check the battery level indicator to make sure that the battery is charged sufficiently and then press the power button to...

Страница 179: ...elect Paper Size and then press 10 Use and to select the paper size you want to use for printing and then press SET The following are the print sizes that are available 3 5 5 5 7 4 6 A4 8 5 11 By Prin...

Страница 180: ...hat date stamping is turned on 12 On the camera s monitor screen use and to select Print and then press SET This starts printing and displays the message Busy Please wait on the monitor screen The mes...

Страница 181: ...ordering prints Specifying date printing with the Photohands software that comes with the camera See page 23 of the Photohands User s Guide for details The Photohands User s Guide is provided as a PD...

Страница 182: ...tion holds the copyright for PRINT Image Matching and PRINT Image Matching III Exif Print Exif Print is an internationally supported open standard file format that makes it possible to capture and dis...

Страница 183: ...Macintosh see page 191 Using the Camera with a Windows Computer The following are the general steps for viewing and copying files from a computer running under Windows You can find details about each...

Страница 184: ...u connect the USB cable This camera supports USB 2 0 Hi Speed protocol Though it can be used with a computer that supports only USB 1 1 protocol higher speed data transfer becomes possible when USB 2...

Страница 185: ...n the camera and then press MENU It makes no difference whether the camera is in a REC mode or the PLAY mode 3 Select the Set Up tab select USB and then press 4 Use and to select Mass Storage and then...

Страница 186: ...r With some computer operating systems a message prompting you to restart your computer may appear If this happens restart your computer The CD ROM menu will appear again after your computer restarts...

Страница 187: ...tinue Anyway to proceed with installation If your computer is running Windows XP SP2 the Found New Hardware Wizard dialog box will appear Select No not this time and then click Next Select Install the...

Страница 188: ...s the image you want 15 Double click the file that contains the image you want to view For information about file names see Memory Folder Structure on page 197 NOTE If you open a rotated image on your...

Страница 189: ...the shortcut menu that appears click Copy 3 Click Start and then My Documents 4 On the My Documents Edit menu click Paste This copies the Dcim folder which contains the image files to your My Document...

Страница 190: ...ta to become corrupted 17 Depending on the version of Windows you are running use one of the following procedures to terminate the USB connection Windows 98 XP Users Press the camera s power button Af...

Страница 191: ...bout USB connections etc IMPORTANT Movie files cannot be played back on a Macintosh This camera does not support operation on a computer running Mac OS 8 6 or lower or Mac OS X 10 0 If you have a Maci...

Страница 192: ...to power the camera during data communication with a computer If you want to transfer files from the camera s built in memory to a computer make sure there is no memory card loaded in the camera befor...

Страница 193: ...cable to the camera make sure the symbol on the camera s USB AV port is aligned with the symbol on the USB cable plug 2 Turn on the camera and then press MENU It makes no difference whether the camera...

Страница 194: ...hich you want to copy it Take care when connecting the USB cable to the camera or your computer USB ports and cable plugs are shaped for proper positioning Plug the USB cable plugs into the ports secu...

Страница 195: ...computer to edit delete move or rename images stored in the camera s file memory Doing so can cause problems with the image management data used by the camera which may make it impossible to display...

Страница 196: ...reader writer and PC card adaptor for details about how to use them Using a Memory Card to Transfer Images to a Computer The procedures in this section describe how to transfer images from the camera...

Страница 197: ...UP505001 JPE MOVIE BEST SHOT user setup file UP505002 JPE MOVIE BEST SHOT user setup file These folders are created in built in memory only Memory Data Images recorded with this camera and other data...

Страница 198: ...y Files that contain MOVIE BEST SHOT user setups Folder and File Contents DCIM folder Folder that stores all of the digital camera files Storage folder Folder for storing files created by the digital...

Страница 199: ...of multiple DCIM folders However if you even want to copy the folders back to the camera s file memory be sure you change the name of the DCIM folder back to DCIM first The camera does not recognize a...

Страница 200: ...your computer About the bundled CD ROM The CD ROM that comes bundled with the camera contains the applications described below Installation of these applications is optional and you should install on...

Страница 201: ...ll Windows Media Player 9 page 210 If you are running Windows 2000 or 98SE with a DirectX version that is lower than 9 0c install DirectX 9 0c page 206 If you can connect to the Internet Connect to th...

Страница 202: ...er Type C OS XP 2000 Me 98SE 98 In the case of Windows 2000 XP or Me you install a data file that enables use of the operating system s standard USB driver You do not install a special USB driver Prop...

Страница 203: ...er Windows Media Player 9 OS XP 2000 Me 98SE CPU 233 MHz Intel Pentium II AMD etc Memory 64MB HD 100MB Other Sound card 800 600 or greater display resolution Internet Explorer 5 01 or higher If you ar...

Страница 204: ...ware and user documentation for various languages Check the CD ROM menu screen to see if applications and user documentation are available for a particular language Getting Started Start up your compu...

Страница 205: ...r before installing it onto another computer be sure to read the Read me file for information about retaining existing libraries Installing Photo Loader 1 Click the Install button for Photo Loader 2 F...

Страница 206: ...rams Accessories System Tools and then System Information 2 On the Tools menu of the window that appears select DirectX Diagnostic Tool 3 On the System tab check to make sure that the version shown fo...

Страница 207: ...OM includes the software and user documentation for various languages Check the CD ROM menu screen to see if applications and user documentation are available for a particular language Getting Started...

Страница 208: ...Read me file for Photohands before installing it The Read me file contains information you need to know when installing the application 1 Click the Read me button for Photohands Installing Photohands...

Страница 209: ...odec 4 Install the downloaded MPEG 4 codec 5 This will cause the movie file recorded with the camera to start playing NOTE If your PC already has MPEG 4 codec installed it will start playing the movie...

Страница 210: ...ns navigate to the CD ROM and double click menu exe to launch the menu application Selecting a Language First select a language Note that some software is not available in all languages 1 On the menu...

Страница 211: ...is running Windows 98 install the Windows 98 WMP6 4 codec instead of Windows Media Player 9 In the case of Windows 2000 or 98SE you need to install DirectX 9 0c For information about determining the...

Страница 212: ...d to upgrade to the commercial version See the Readme file on the CD ROM for information about Ulead Movie Wizard SE VCD and what you need to do to upgrade to the commercial version Getting Started St...

Страница 213: ...Wizard SE VCD Installing Ulead Movie Wizard SE VCD 1 Click the Install button for Ulead Movie Wizard SE VCD 2 Follow the instructions that appear on your computer screen Viewing User Documentation PDF...

Страница 214: ...e you need to be able to connect to the Internet with your computer 1 Click the Registration button This starts up your Web browser and accesses the user registration website Follow the instructions t...

Страница 215: ...the ones you want to use Purpose USB connection to a Macintosh for image transfer Managing of Images on a Macintosh Viewing of user documentation PDF files For the Macintosh Photo Loader 1 1 Mac OS Ve...

Страница 216: ...images and the sizes of the images being handled Photo Loader 1 1 OS 9 Memory 32MB HD At least 3MB USB connection is supported on a Macintosh running OS 9 or X Operation is supported using the standa...

Страница 217: ...ns in the readme file to install Photo Loader IMPORTANT If you are upgrading to the new version of Photo Loader from a previous version and you want to use library management data and HTML files creat...

Страница 218: ...Manual folder 2 Open the Digital Camera folder and then open the folder for the language whose user s guide you want to view 3 Open the file named camera_xx pdf xx is the language code Example camera...

Страница 219: ...3 0 7 1 0 1 3 1 7 2 0 Auto Daylight Cloudy Shade 1 Fluorescent 1 2 Fluorescent 2 Tungsten Flash Manual Auto ISO 50 ISO 100 ISO 200 ISO 400 Self timer Size Quality Snapshots Quality Movies EV Shift Whi...

Страница 220: ...World Time Date Style Adjust Language Sleep Auto Power Off USB Video Out Format Reset Startup Half Shutter Shutter Operation Operation Play Continue Reset Home World Home Time setup city DST etc Worl...

Страница 221: ...in Cancel Set Up Tab Menu The contents of the PLAY mode set up tab menu are identical to those of the REC mode set up tab menu Indicator Lamp Reference The camera has two indicator lamps an operation...

Страница 222: ...imer countdown 10 to 3 seconds Self timer countdown 3 to 0 seconds Cannot charge flash Meaning IMPORTANT When you are using a memory card never remove the card from the camera while the green operatio...

Страница 223: ...editing Memory card problem Memory card is unformatted Memory card is locked Cannot create folder Memory is full Low battery alert Meaning Rapid Charger The rapid charger has a CHARGE lamp that light...

Страница 224: ...rient the battery correctly page 42 2 Charge the battery page 37 If the battery goes dead soon after being charged it means the battery has reached the end of its life and needs to be replaced Purchas...

Страница 225: ...d as the flash mode 2 The battery is dead 3 The camera is in a movie mode Movie Mode Past Movie Mode Short Movie Mode MOVIE BEST SHOT Mode 4 A scene that selects flash off as the flash mode is selecte...

Страница 226: ...nting the camera at another subject momentarily This may correct the problem Use a light or some other means to illuminate the subject Vertical lines on the monitor screen Noise in audio Out of focus...

Страница 227: ...k image is different from the image on the monitor screen during recording Images are not displayed All buttons and switches are disabled Monitor screen is off Cannot transfer files over a USB connect...

Страница 228: ...stalling the USB driver from the bundled CD ROM or if you have another type of driver installed This will make it impossible for the computer to recognize the digital camera when it is connected If th...

Страница 229: ...ou are attempting to connect the camera to a printer while the camera s USB settings are not compatible with the USB system of the printer page 177 You are attempting to connect to a computer that doe...

Страница 230: ...5 The image or movie whose setup you are trying to save is not supported by BEST SHOT or MOVIE BEST SHOT Record Error Replenish ink SYSTEM ERROR The card is locked There are no files There are no prin...

Страница 231: ...Economy Fine Normal Economy Fine Normal Economy Fine Normal Economy Fine Normal Economy Fine Normal Economy Approximate Image File Size 2 1MB 1 7MB 1 3MB 2 0MB 1 6MB 1 1MB 1 64MB 1 23MB 630KB 1 05MB 7...

Страница 232: ...ectric Industrial Co Ltd products Capacity depends on card manufacturer To determine the number of images that can be stored on a memory card of a different capacity multiply the capacities in the tab...

Страница 233: ...Manual Exposure 60 to 1 2000 second Above shutter speeds do not apply when using a BEST SHOT scene Aperture F3 3 3 7 4 4 5 2 6 2 7 4 Using optical zoom causes the aperture to change White Balance Aut...

Страница 234: ...s CIPA Standard Temperature 23 C 73 F Monitor Screen On Zoom operation between full wide to full telephoto every 30 seconds during which two images are recorded one image with flash power turned off a...

Страница 235: ...Accessories Rechargeable lithium ion battery NP 40 Rapid charger BC 30L AC power cord USB cable AV cable Strap Lens cap Cap holder Lens hood CD ROMs 2 Basic Reference Rechargeable Lithium Ion Battery...

Страница 236: ...A 50 60Hz Output 4 2V DC 900 mA Charging Temperature 5 C to 35 C 41 F to 95 F Chargeable Battery type Rechargeable lithium ion battery NP 40 Full Charge Times Approximately 2 hours Dimensions 80 W 55...

Отзывы: