background image

USING THE CAMERA WITH A COMPUTER

145

 NOTES 

• When printing an album page, you should set up

your Web browser as described below.
— Select the browser frame where the images are

located.

— Set margins to the lowest possible values.
— Set the background color to a printable color.

• See the user documentation that came with your

Web browser application for details about printing
and configuring settings for printing.

5.

After you are finished viewing the album, exit
your Web browser application.

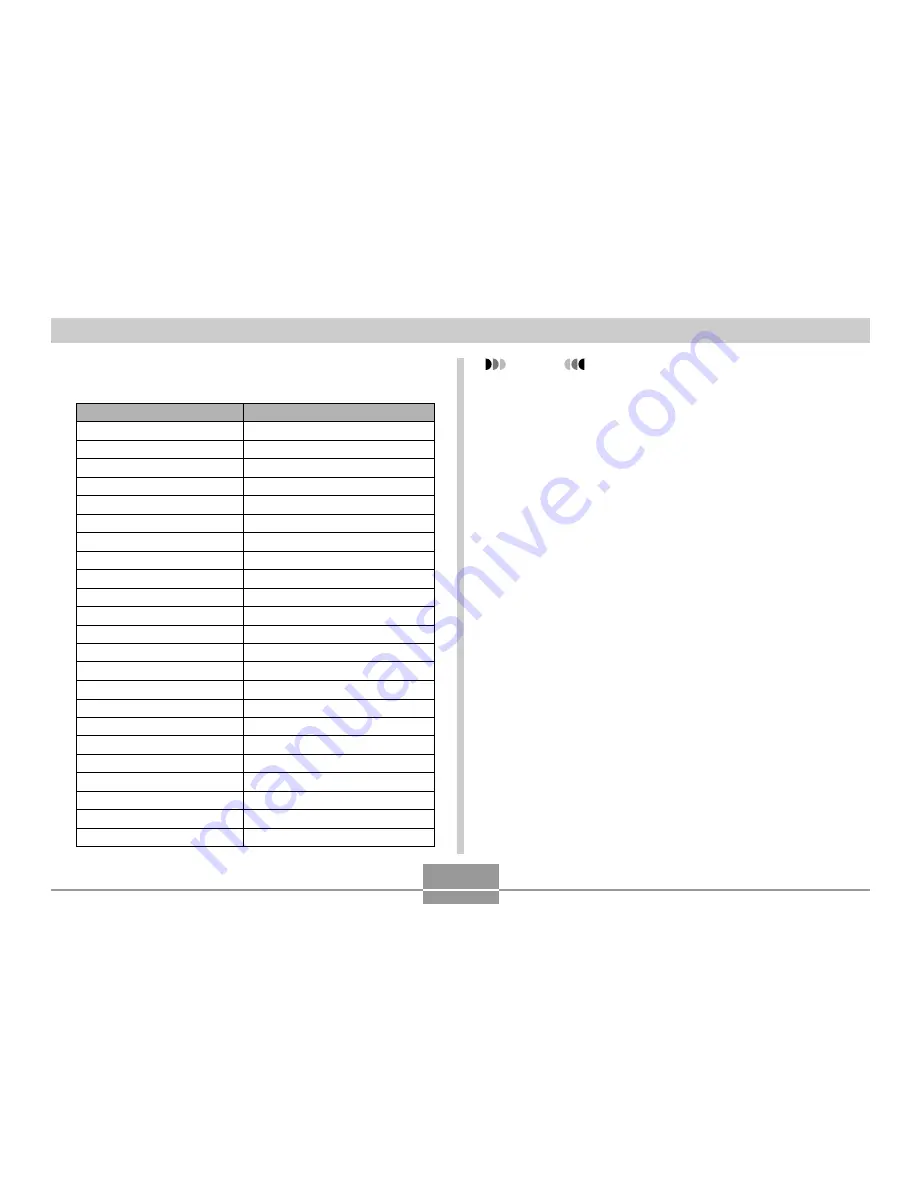
• The following describes the information that appears

on the Info Screen.

This Info Screen item:

Shows this:

File Size

Image file size

Resolution

Resolution

Quality

Quality

Drive mode

Drive mode

AE

Exposure mode

Light metering

Metering mode

Shutter speed

Shutter speed

Aperture stop

Aperture stop

Exposure comp

EV shift

Focusing mode

Focusing mode

Flash mode

Flash mode

Sharpness

Sharpness

Saturation

Saturation

Contrast

Contrast

White balance

White balance

Sensitivity

Sensitivity

Filter

Filter setting

Enhancement

Enhancement setting

Flash intensity

Flash intensity

Digital zoom

Digital zoom setting

World

Location

Date

Recording date and time

Model

Camera model name

Содержание EX-Z3 - 4

Страница 1: ...y while a memory card is installed in the camera IMPORTANT Make sure you turn off the camera before inserting or removing a memory card Be sure to orient the card correctly when inserting it Never try to force a memory card into the slot when you feel resistance See the instructions that come with the memory card for information about how to use it Certain types of cards can slow down processing s...

Страница 2: ...oning the memory card so its front is facing in the same direction as the camera s monitor screen carefully slide it into the card slot To remove a memory card from the camera 1 Press the memory card into the camera and then release it This will cause the card to come part way out of the camera 2 Pull the memory card out of the slot Back Front 3 Swing the battery cover closed and then slide it in ...

Страница 3: ...not be recovered Check to make sure you do not need any of the data on the memory card before you format it Formatting a memory card that contains files deletes all the files even those that are protected page 97 IMPORTANT Never insert any other object besides a memory card into the camera s card slot Doing so creates the risk of damage to the camera and card Should water or any foreign object eve...

Страница 4: ...ne memory card whenever using the camera far away from the home or office We recommend that you format a memory card before using it for the first time after purchasing it or whenever the card you are using seems to be the cause of abnormal images Before starting a format operation check to make sure that the battery is fully charged Power interruption during the format operation can result in imp...

Страница 5: ...le in the folder Copying Files Use the procedures below to copy files between built in memory and a memory card IMPORTANT Only snapshot and movie files recorded with this camera can be copied Other files cannot be copied To copy all the files in built in memory to a memory card 1 Load the memory card into the camera 2 Turn on the camera Next enter the PLAY mode and press MENU 3 Select the PLAY tab...

Страница 6: ...rd Built in and then press SET 3 Use 왗 and 왘 to select the file you want to copy 4 Use 왖 and 왔 to select Copy and then press SET This starts the copy operation and displays the message Busy Please wait The file reappears on the monitor screen after the copy operation is complete Repeat steps 3 through 4 to copy other images if you want 5 Press MENU to exit the copy operation NOTE Files are copied ...

Страница 7: ...or a Macintosh see page 129 Using the Camera with a Windows Computer The following are the general steps for viewing and copying files from a computer running under Windows You can find details about each operation in the procedures that follow below Note that you should also refer to the documentation that comes with your computer for other information about USB connections etc 1 If you are runni...

Страница 8: ... the upper left corner of the display and then select a language from the list that appears 4 Click USB driver and then Install This starts installation The following steps show installation under the English version of Windows 5 On the screen that appears after installation is complete select the Yes I want to restart my computer now check box and then click Finish to restart your computer IMPORT...

Страница 9: ...he AC adaptor depends on the area where you purchased the camera 7 Connect the USB cable that comes bundled with the camera to the USB cradle and your computer s USB port Take care when connecting the USB cable to the USB cradle or your computer USB ports and cable plugs are shaped for proper positioning Plug the USB cable plugs into the ports securely as far as they will go Proper operation is no...

Страница 10: ...e computer screen as the computer automatically detects the camera s file memory After you install the USB driver New Hardware dialog box will no longer appear when you perform the above steps to establish a USB connection Pressing the USB button enters the USB mode which causes the USB cradle s USB lamp to light green page 158 At this point some operating systems will display a Removable Disk dia...

Страница 11: ...emory to your computer s hard disk drag the Dcim folder from Removable Disk to the My Documents folder on your computer 16 Depending on the version of Windows you are running use one of the following procedures to terminate the USB connection WindowsMe 98 Users After pressing the USB cradle USB button and making sure that the USB lamp is not lit remove the camera from the USB cradle Windows2000 XP...

Страница 12: ...you connect to your computer If you are running Mac OS 9 or Mac OS X you do not need to install the USB driver 2 Use the USB cradle to establish a connection between the camera and your Macintosh 3 View and copy the images you want USB Connection Precautions Be sure to read the documentation that comes with your computer for other important information about USB connections Be sure to connect the ...

Страница 13: ...8 6 Mac OS 9 OS X Users Installation of the USB driver is not required so jump directly to step 9 The following steps show installation under the English OS 2 Set the bundled CD ROM into the Macintosh CD ROM drive 3 Double click the hard disk that is specified as your startup disk IMPORTANT If you want to transfer files from the camera s built in memory to a computer make sure there is no memory c...

Страница 14: ... opens drag the CASIO USB StorageDriver file and CASIO USB StorageClassShim file to the Extensions folder window you opened above 8 This completes USB driver installation After checking the Extensions folder to make sure that it contains the CASIO USB StorageDriver and CASIO USB StorageClassShim files restart your Macintosh 9 Connect the bundled AC adaptor to the DC IN 5 3V connector of the USB cr...

Страница 15: ... the USB cradle or your computer USB ports and cable plugs are shaped for proper positioning Plug the USB cable plugs into the ports securely as far as they will go Proper operation is not possible if connections are not correct 11 After making sure the camera is turned off place the camera onto the USB cradle Do not place the camera onto the USB cradle while it is turned on DISP MEN U SET REC PLA...

Страница 16: ...onnection between them 14 Double click the drive icon for the camera s file memory the DCIM folder and then the folder that contains the image you want 15 Double click the file that contains the image you want to view For information about file names see Memory Directory Structure on page 136 16 To copy all the files in file memory to your Macintosh hard disk drag the DCIM folder to the folder to ...

Страница 17: ...USB cradle operation while data communication is in progress Doing so can cause data to become corrupted Operations You Can Perform from Your Computer The following are the operations you can perform while there is a USB connection between your camera and computer See the referenced pages for more information about each operation View images in album format See Using the Album Feature on page 139 ...

Страница 18: ... available PC card adapter for an SD memory card MMC For full details see the user documentation that comes with the PC card adapter and your computer Using a Commercially Available SD Memory Card Reader Writer See the user documentation that comes with the SD memory card reader writer for details about how to use it Using a Commercially Available PC Card Reader Writer and PC Card Adapter for SD M...

Страница 19: ...le data and the directory structure for file memory so images can be viewed using another manufacturer s DCF camera or printed on a DCF printer Memory Directory Structure Directory Structure DCIM DCIM Folder 100CASIO Storage folder CIMG0001 JPG Image file CIMG0002 AVI Movie file 101CASIO Storage folder 102CASIO Storage folder ALBUM Album folder INDEX HTM Album HTML file FAVORITE FAVORITE folder CI...

Страница 20: ...bum HTML file File used by the album function File Name Extension HTM FAVORITE folder Folder that contains Favorites image files Image Size 320 x 240 pixels DPOF file folder Folder that contains DPOF files Best Shot folder Built in memory only Folder that contains Best Shot user setup files User setup files Built in memory only Files that contain Best Shot user setups Image Files Supported by the ...

Страница 21: ...date is a good way to keep track of multiple DCIM folders However if you even want to copy the folders back to the camera s file memory be sure you change the name of the DCIM folder back to DCIM first The camera does not recognize any folder name other than DCIM We also strongly recommend that after transferring data from file memory to other external storage that you reformat the camera s file m...

Страница 22: ...ges on your computer in a photo album layout You can also use the applications contained on the CD ROM that comes bundled with the camera to automate image transfer and to retouch images Using the Album Feature The album feature creates an HTML photo album layout that displays your images You can use the HTML layout to post your images on a Web page or for printing the images You can use the Web b...

Страница 23: ...terminated Album creation will not be performed properly if the battery goes dead while album creation is in progress You can also configure the camera to create albums automatically page 142 However performing the above procedure creates an album regardless of whether automatic album creation is turned on or off Selecting an Album Layout You can select from among 10 different display layouts for ...

Страница 24: ...se 왖 and 왔 to change the setting and then press SET Background Color You can specify white black or gray as the color of the album background using the procedure under Configuring Detailed Album Settings Album Type There are two album types Normal and Index Info Normal Type This type of album displays images in accordance with the currently selected layout Index Info Type In addition to the normal...

Страница 25: ... you select from among three different image uses as described below Select the image use that best suits the way you plan to use the image Select this setting View WEB Print For this purpose Smaller images for album browsing Website thumbnails or archiving on a CD R or other media with the full size image displayed when a thumbnail is clicked This setting can be used for browsing with the thumbna...

Страница 26: ...older which is located inside the folder named DCIM 3 Use your computer s Web browser to open the file named INDEX HTM This displays a list of folders in built in memory or on the memory card Index Info Album Type File Name Image NOTE Depending on the number of images in memory it can take quite a bit of time to complete auto album creation when you turn off the camera If you do not plan to use th...

Страница 27: ...etailed Album Settings on page 141 you can click one of the following display options Album Displays an album created by the camera Index Displays a list of images stored in a folder Info Displays information about each image If View is selected for Use page 142 you can double click an image on your computer screen to display the full size version Album ...

Страница 28: ...ication The following describes the information that appears on the Info Screen This Info Screen item Shows this File Size Image file size Resolution Resolution Quality Quality Drive mode Drive mode AE Exposure mode Light metering Metering mode Shutter speed Shutter speed Aperture stop Aperture stop Exposure comp EV shift Focusing mode Focusing mode Flash mode Flash mode Sharpness Sharpness Satura...

Страница 29: ...mages can be uploaded to the Internet more quickly Installing the Software from the CD ROM About the bundled CD ROM The CD ROM that comes bundled with the camera contains the applications described below Installation of these applications is optional and you should install only the ones you want to use USB Driver for Mass Storage for Windows Macintosh This is the software that makes it possible fo...

Страница 30: ...ing Windows XP or Me Acrobat Reader for Windows Macintosh This is an application that lets you read PDF files Use it to read the user documentation for the camera Photo Loader and Photohands all of which is included on the bundled CD ROM NOTE See the user documentation files PDF on the bundled CD ROM for details about using Photo Loader and Photohands See Viewing User Documentation PDF files on pa...

Страница 31: ...some software is not available in all languages 1 On the menu screen click the tab for the language you want Installing Software from the CD ROM in Windows Use the procedures in this section to install the software from the bundled CD ROM to your computer NOTE If you already have one of the bundled applications installed on your computer check its version If the bundled version is newer than the o...

Страница 32: ...e file for information about retaining existing libraries Installing an Application 1 Click the Install button for the application you want to install 2 Follow the instructions that appear on your computer screen IMPORTANT Be sure to follow the instructions carefully and completely If you make a mistake when installing Photo Loader you may not be able to browse your existing library information an...

Страница 33: ...u can install it from the bundled CD ROM User Registration You can perform user registration over the Internet To do so of course you need to be able to connect to the Internet with your computer 1 Click the Register button This starts up your Web browser and accesses the user registration website Follow the instructions that appear on your computer screen to register 2 After registering terminate...

Страница 34: ...bove use the contents of the English folder Installing Software Use the following procedures to install the software We recommend that you install Internet Explorer and Outlook Express first before installing Photo Loader and Acrobat Reader To install Internet Explorer and Outlook Express 1 Open the file named Internet Explorer 2 Open the folder for the language version you want to install and the...

Страница 35: ...To install Acrobat Reader 1 On the bundled CD ROM open the folder named Acrobat Reader 2 Open the folder for the language whose version of Acrobat Reader you want to install and then open the file named readme_casio Follow the instructions in the read me file to install Acrobat Reader Viewing User Documentation PDF Files To perform the following procedures you must have Acrobat Reader installed on...

Страница 36: ...e file named camera_xx pdf 4 xx is the language code English e French f German g Spanish sp Italian i Dutch du Chinese ct To read the Photo Loader user s guide 1 On the CD ROM open the Manual folder 2 Open the Photo Loader folder and then open the English folder 3 Open PhotoLoader_english To register as a user Internet registration only is supported Visit the following CASIO website to register ht...

Страница 37: ...alance ISO Digital Zoom MF Position On Off On Off On Off On Off On Off On Off On Off Snapshot Best Shot Movie 10 sec 2 sec X3 Off 2048 x 1536 1600 x 1200 1280 x 960 640 x 480 Fine Normal Economy 2 0 1 7 1 3 1 0 0 7 0 3 0 0 0 3 0 7 1 0 1 3 1 7 2 0 Auto Sunlight Shade Light Bulb Fluorescent Manual Auto ISO 50 ISO 100 ISO 200 On Off On Off REC Mode EV shift White Balance ISO Self timer Off REC Mode S...

Страница 38: ...0 640 x 480 Cancel Alarm setups Built in Card Card Built in Cancel Set Up tab menu Beep Startup File No World Time Date Style Adjust Language Sleep Auto Power Off Format Reset On Off On Selectable image Off Continue Reset Home World Home time setup city DST etc World Time setup city DST etc YY MM DD DD MM YY MM DD YY Time setting English Français Deutsch Español Italiano Português 30 sec 1 min 2 m...

Страница 39: ...Off 2 min 5 min Format Cancel Reset Cancel Set Up tab menu Indicator Lamp Reference The camera has three indicator lamps a green operation lamp a red operation lamp and a self timer lamp These lamps light and flash to indicate the current operational status of the camera There are three lamp flash patterns Pattern 1 flashes once per second Pattern 2 flashes twice per second and Pattern 3 flashes f...

Страница 40: ...Self timer countdown 10 to 3 seconds Self timer countdown 3 to 0 seconds Cannot charge flash Memory card problem Memory card is unformatted Best Shot setup cannot be registered Memory card is locked Cannot create folder Memory is full Write error Meaning Operation Lamp Self timer Lamp Green Red Red Meaning Pattern 3 Pattern 3 Pattern 3 Low battery alert Formatting card Powering down IMPORTANT When...

Страница 41: ...shing Charging Charging complete Charge standby Charge error USB connection Accessing memory Meaning PHOTO CHARGE USB CHARGE lamp USB lamp PLAY mode Operation Lamp Self timer Lamp Green Lit Pattern 3 Red Pattern 2 Lit Pattern 3 Red Operational Power on recording enabled One of the following operations is being performed delete DPOF image protect copy album creation format power down Memory card pr...

Страница 42: ... are moving the camera 1 Orient the battery correctly page 25 2 Charge the battery page 27 If the battery goes dead soon after being charged it means the battery has reached the end of its life and needs to be replaced Purchase a separately available NP 20 rechargeable lithium ion battery 1 Turn power back on 2 Charge the battery page 27 1 Align the mode selector with REC 2 Wait until the flash un...

Страница 43: ...use Auto Focus or the Infinity Mode when shooting a close up shot 1 Camera powers down before the save operation is complete 2 Removing the memory card before the save operation is complete Sunlight or light from another source is shining directly into the lens during recording When composing the image make sure the subject on which you want to focus is located inside the focus frame Charge the ba...

Страница 44: ...camera and USB cradle 2 Check all connections 3 Install the USB driver on your computer page 124 4 Press the USB button on the USB cradle Images are not displayed All buttons and switches are disabled Monitor screen is off Cannot transfer files over a USB connection A memory card with non DCF images recorded with another camera is loaded in the camera Circuit problem caused by electrostatic charge...

Страница 45: ...th folder If you want to record more files delete files you no longer need page 94 Memory is full If you want to record more files delete files you no longer need page 94 Printing Error Record Error SYSTEM ERROR The card is locked The card is not formatted The function is not supported for this file There are no files One of the following problems occurred during printing Printer power off Out of ...

Страница 46: ...pecified by the slideshow Images setting Specify another image page 88 There are no printing images Set up DPOF This file cannot be played This function cannot be used Can not find the file Specifications Main Specifications Product Digital Camera Model EX Z3 Camera Functions Image Files Format Snapshots JPEG Exif Ver 2 2 DCF Design rule for Camera File system 1 0 standard DPOF compliant Movies AV...

Страница 47: ...pacities in the table by the appropriate value Data Size Recording Time 130KB second max One Movie 30 seconds maximum Total Movie Time 80 seconds maximum built in memory 500 seconds maximum SD 64MB memory card Delete Single file all files with protection Effective Pixels 3 20 million Imaging Element 1 2 5 inch square pixel color CCD Total pixels 3 34 million Lens Focal Distance F2 6 W to 4 8 T f 5...

Страница 48: ...Summer time 162 cities in 32 time zones Input Output Terminals Cradle connector The values noted above are approximate values until power fails at normal temperature 25 C 77 F The above does not guarantee that you will be able to achieve this level of operation Low temperatures shorten battery life page 30 Power Consumption DC 3 7V Approximately 3 5W Dimensions 87 W x 57 H x 22 9 D mm 3 4 W x 2 2 ...

Страница 49: ...oximately 3 4W Dimensions 106 W x 42 H x 59 5 D mm 4 2 W x 1 7 H x 2 3 D excluding projections Weight Approximately 63 g 2 2 oz Special AC Adaptor Inlet Type Power Requirement 100 to 240V AC 50 60Hz 0 12A Output 5 3V DC 1 0A Dimensions 48 W x 28 H x 66 D mm 1 9 W x 1 1 H x 2 6 D excluding projections and cable Weight Approximately 120 g 4 2 oz Special AC Adaptor Plug in Type Power Requirement 100 ...

Страница 50: ...date and time settings of the camera are cleared whenever power is totally cut off from both the battery and USB cradle Be sure to reconfigure these settings after power is interrupted page 39 LCD Panel The LCD panel is a product of the latest LCD manufacturing technology that provides a pixel yield of 99 99 This means that less than 0 01 of the total pixels are defective they do not turn on or al...

Отзывы: