background image

71

Viewing Snapshots and Movies

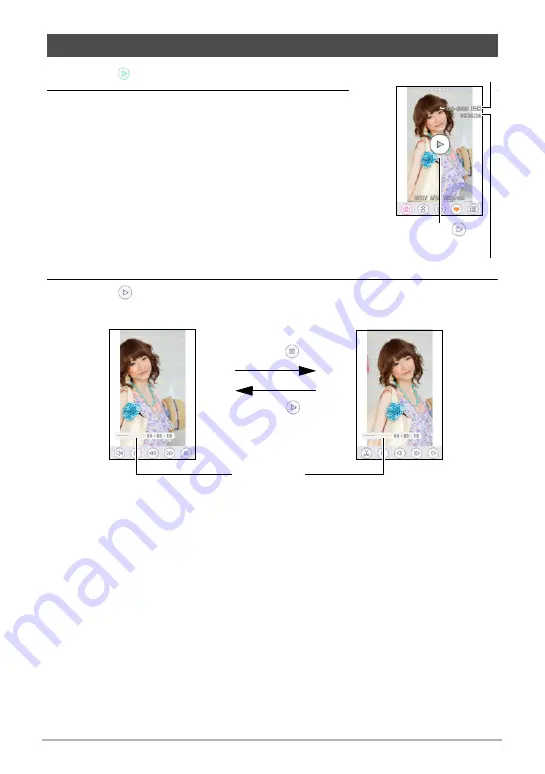
1.

Touch “

” (PLAY) to enter the PLAY mode.

2.

Drag left or right across the screen image to 
scroll through the movies until the one you 
want is displayed.

3.

Touch “

” (Movie) to start playback.

Viewing a Movie

Movie icon: 

Movie recording time

Image quality

Playback in progress

Playback paused

Touch “

”.

Touch “

”.

Progress bar

Содержание EX-TR80

Страница 1: ...CASIO product Before using it be sure to read the precautions contained in this User s Guide Keep the User s Guide in a safe place for future reference For the most up to date information about this product visit the official EXILIM Website at http www exilim com ...

Страница 2: ...s shown below are included If anything is missing contact your original retailer The shape of the power cord plug varies according to the country or geographic area where the camera is sold Accessories USB AC adaptor AD C53U Power cord Micro USB cable Basic Reference ...

Страница 3: ...held liable for any damages lost profits or claims by third parties arising out of the use of EXILIM Connect CASIO COMPUTER CO LTD shall not be held liable for any damages or lost profits caused by loss of memory contents due to malfunction repair or any other reason Note that the example screens and product illustrations shown in this User s Guide may differ somewhat from the screens and configur...

Страница 4: ...mory card 29 Turning Power On and Off 30 To Shoot a Snapshot 31 Selecting an Auto Recording Mode 31 To shoot a snapshot 32 Viewing Snapshots 35 Deleting Snapshots and Movies 36 Snapshot Shooting Precautions 38 Recording Images 39 Selecting a Recording Mode 40 Recording Beautiful Portraits Make up 41 Shooting with Artistic Effects Art Shot 42 Shooting with Posing Shot Posing Shot 44 Shooting a Self...

Страница 5: ... Settings Movie Quality 65 Correcting Image Brightness Brightness 65 Adjusting White Balance White Balance 66 Specifying ISO Sensitivity ISO 67 Selecting a Focus Mode Focus 68 Turning on Image Review Review 69 Viewing Snapshots and Movies 70 Viewing Snapshots 70 Adding Images to Your Favorites 70 Displaying the Make up Level 70 Viewing a Movie 71 Editing a Movie on the Camera Movie Editing 73 View...

Страница 6: ...the Camera s Airplane Mode Airplane Mode 99 Sending Images from the Camera to a Smartphone as They are Recorded Auto Send 100 Specifying Images to be Sent by Auto Send Auto Send File Settings 100 Resizing Snapshots before Sending Them to a Smartphone Resize before send 100 Add Location Info to Snapshots Location info 101 Changing the Camera Password for Wireless LAN Connection WLAN password 102 Un...

Страница 7: ...up Screen at Power On Startup 119 Formatting Built in Memory or a Memory Card Format 119 Resetting the Camera to Factory Defaults Reset 120 Checking the Current Camera Firmware Version Version 120 Appendix 121 Safety Precautions 121 Precautions During Use 129 Power Supply 143 Charging 143 Battery Precautions 144 Using the Camera in another Country 144 Using a Memory Card 145 Reset Initial Default ...

Страница 8: ...hone pages 17 52 LED lights page 48 p Power page 30 Lens Strap hole page 8 Monitor screen pages 9 17 113 USB port pages 19 22 CARD cover Memory card slot page 28 Speaker Operation lamp pages 20 23 30 33 5 6 4 4 2 1 3 bm 7 89 bl bk bn 1 2 To attach the strap to the camera commercially available or separately available Attach strap here ...

Страница 9: ...pacity page 153 Snapshot image size page 64 Movie quality pages 50 65 White Balance page 66 ISO sensitivity page 67 Brightness page 65 Focus mode page 68 Digital zoom page 46 Timestamp page 115 Date Time pages 25 117 Battery level indicator page 24 Selfie timer page 47 Make up page 41 Movie start icon pages 33 51 LED light page 48 PLAY mode icon page 30 Wireless LAN communication status page 87 Ai...

Страница 10: ...itivity page 67 Brightness page 65 Shutter speed Battery level indicator page 24 Image menu icon page 74 Favorites pages 70 78 Delete icon page 36 Confirm first page 95 REC mode icon page 30 Date time pages 25 117 Wireless LAN communication status page 87 Airplane mode page 99 Bluetooth communication status page 87 Location info page 101 Image sent page 95 Auto Send page 100 Menu icon page 78 One ...

Страница 11: ...mage file in the folder named 100CASIO Movie Playback Function On Off Indication Each touch of or toggles to the opposite setting Protect indicator page 80 Show Icons icon Folder name file name page 111 Movie quality pages 50 65 Movie recording time page 71 Date time pages 25 117 Image menu icon page 74 Movie play icon page 71 5 4 7 6 8 2 1 3 Off On ...

Страница 12: ...f Make up provides bright images even in dark locations Simple self portrait shooting The monitor screen can be rotated so it faces in the same direction as the camera s lens making self shooting much easier Comparison View View two snapshots at the same time to compare them You can also use this view to send images to a smartphone and to apply the make up settings of an existing image to subseque...

Страница 13: ... camera to a smartphone or a social networking service automatically You can also turn your smartphone into a camera remote controller and send images recorded with your camera to your smartphone One Time Share Share selected snapshots for viewing on smartphones that are not paired with the camera The Scene app needs to be installed on the smartphone in order to use One Time Share See page 45 for ...

Страница 14: ...or other means to keep the lens and flash window free of dirt and dust and wipe gently with a soft dry cloth The camera s frame can be rotated 360 degrees as shown in the illustration 1 With the lens facing towards you hold onto the frame 2 Push the monitor screen panel 3 Holding the edges of the monitor screen panel swing the frame open IMPORTANT Do not try to open or close the frame while the mo...

Страница 15: ...1 Hold the camera as shown in the illustration 2 Firmly holding the frame carefully rotate the monitor screen panel NOTE In certain positions the side frame of the rotated monitor screen may be picked up by the lens and be visible within your image If this happens reposition the monitor screen so the side frame is not picked up by the lens Rotating the Monitor Screen 270 degrees counterclockwise ...

Страница 16: ...nitor screen facing the opposite direction of the lens Open the frame 90 degrees and hold the frame You can also shoot with the camera upside down if you like Tabletop Shooting Self portrait Shooting Point the monitor screen and lens in the same direction and open the frame about 30 degrees so the camera can stand up Open the frame point the monitor screen and lens in the same direction ...

Страница 17: ...the camera around by its strap IMPORTANT Take care to ensure that your finger is not blocking or is not too close to the LED light Fingers can cause unwanted shadows when shooting The monitor screen of the camera is a touch panel This means you can perform the following operations by touching the screen with your fingers Touch Momentarily touching the screen with your finger Touch the screen to se...

Страница 18: ...n the desired scroll direction Spread Holding your thumb and forefinger against the screen as you spread them out Use spread to enlarge the screen image Squeeze Holding your thumb and forefinger against the screen as you bring them together Use squeeze to reduce the size of the screen image IMPORTANT Never use a pointed or hard object to perform screen operations Doing so can damage the screen The...

Страница 19: ...pen the frame USB AC adaptor USB connection to a computer Using the included micro USB cable To charge with the USB AC adaptor While the camera is turned off connect in the sequence shown below Charging time Approximately 2 hours 20 minutes When disconnecting the USB AC adaptor from the camera be sure to disconnect from the camera first First charge the battery prior to use 1 4 3 2 USB AC adaptor ...

Страница 20: ...he camera will turn on the camera with power being supplied by the battery Because of this charging will stop The USB AC adaptor will become warm during charging This is normal and does not indicate malfunction The shape of the power plug depends on each country or geographic area Operation Lamp Operation Lamp Status Description Lit Red Charging Flashing Red Abnormal ambient temperature USB AC ada...

Страница 21: ...t in poor communication or malfunction Note that even while the connector is fully inserted you still will be able to see the metal part of the connector as shown in the illustration Make sure that the u mark side of the USB cable connector and the opposite side of the monitor screen are facing in the same direction The opposite side of the monitor screen The operation lamp always initially light ...

Страница 22: ...pens refer to page 143 For faster charging use of the supplied USB AC adaptor is recommended You cannot use the camera to shoot images while it is being charged over a computer USB connection If you want to shoot with the camera disconnect the USB cable If you turn on the camera while charging over a USB connection to a computer is in progress the camera will establish a USB connection with the co...

Страница 23: ...y make it impossible to charge via the USB cable A battery that is still warm immediately after normal use may not charge fully Give the battery time to cool before charging it A battery discharges slightly even when it is not loaded in the camera Because of this it is recommended that you charge the battery immediately before you need to use it Charging the camera s battery may cause interference...

Страница 24: ...y indicator may change when you switch between the REC mode and PLAY mode Leaving the camera for about 20 days with no power supplied while the battery is dead will cause its date and time settings to be cleared A message telling you to configure time and date settings will appear the next time you turn on the camera after restoring power When this happens configure date and time settings page 117...

Страница 25: ...for the Japanese market Camera models sold in certain geographic areas may not support display language selection 1 Press p Power to turn on the camera This displays the startup screen 2 Drag page 18 upwards and downwards until you find the language you want and then touch to select it 3 Touch the date display format you want Example July 10 2017 YY MM DD 17 7 10 DD MM YY 10 7 17 MM DD YY 7 10 17 ...

Страница 26: ...1 Touch OK You will be able to change the complexion setting later if you want See page 49 for details NOTE Each country controls its local time offset and the use of summer time and so they are subject to change If you make a mistake configuring display language date or time settings with the above procedure refer to the following pages for information about how to correct the settings Display la...

Страница 27: ...2GB microSDHC memory cards greater than 2GB up to 32GB microSDXC memory cards greater than 32GB up to 2TB Note that the ability to use any particular card with this camera even if it satisfies the above capacity and type requirements is not guaranteed Memory Card Handling Precautions Certain types of memory cards can slow down processing speeds In particular high quality movies may not be able to ...

Страница 28: ...nto the camera s memory card slot and press until you hear it click into place 4 Close the CARD cover IMPORTANT Never insert anything besides a supported memory card page 27 into the memory card slot Should water or any foreign object ever get into the card slot immediately turn off the camera and contact your retailer or nearest CASIO authorized service center To load a memory card CARD cover Fro...

Страница 29: ...for the first time IMPORTANT Formatting a memory card that already has snapshots or other files on it will delete its contents Normally you do not need to format a memory card again However if storing to a card has slowed down or if you notice any other abnormality re format the card Be sure to use the camera to format a memory card Formatting a card on a computer will result in a non SD standard ...

Страница 30: ... is being charged over a computer USB connection page 22 To enter the REC mode and PLAY mode To turn off the camera Press p Power NOTE To conserve battery power an Auto Power Off function will turn off power automatically if you do not perform any operation for about five minutes Turning Power On and Off To enter the PLAY mode In the REC mode touch PLAY To enter the REC mode In the PLAY mode touch...

Страница 31: ...icon from the top in the case of landscape orientation Recording mode To Shoot a Snapshot Selecting an Auto Recording Mode Setting REC Screen Icon Display Description Auto This is the standard Auto recording mode Premium Auto Pro With Premium Auto Pro recording the camera automatically determines whether you are shooting a subject or scenery and other conditions Premium Auto Pro recording delivers...

Страница 32: ...easy operation of the shutter button 2 Point the camera at the subject If you are using Premium Auto Pro text will appear on the monitor screen describing the type of shot the camera has detected Spread your fingers apart on the screen to change the zoom factor page 46 You can also change the zoom factor using the slider To shoot a snapshot Type of shot Telephoto Wide Angle ...

Страница 33: ...ton the camera automatically adjusts exposure and focuses on the subject it is currently pointed at Mastering how much pressure is required for a half press and a full press of the shutter button is an important technique for good looking images Recording a Movie Touch Movie Start to start movie recording Touch Movie Stop to stop recording See page 50 for details Focus frame Operation lamp Shutter...

Страница 34: ...hile Premium Auto Pro is in use In addition to shutter speed and ISO sensitivity the camera automatically executes the following operation as required when shooting with Premium Auto Pro Auto Focus is normally performed until you half press the shutter button The camera automatically determines the focus point on the screen and focuses there When shooting people the face detection feature detects ...

Страница 35: ...mage tap the monitor screen twice in succession page 74 If you are recording a snapshot that is very important to you it is recommended that you zoom the image and check its details after recording it 2 Drag left or right across the screen image to scroll through the snapshots To scroll forward or back multiple images first drag in the direction opposite the direction you want to scroll and then f...

Страница 36: ... Delete 1 File This will delete the selected image To delete specific files 1 Enter the PLAY mode 2 Touch 3 Touch Delete Files This displays a file selection screen 4 Touch a file you want to delete This will select the check box of the selected file s image To clear deselect a check box touch the applicable file 5 After you are finished selecting files touch OK or 6 Touch Delete This deletes the ...

Страница 37: ...37 Quick Start Basics To delete all files 1 Enter the PLAY mode 2 Touch 3 Touch Delete All Files 4 Touch Delete This will cause the message There are no files to appear ...

Страница 38: ...t to a high value This can cause the camera to take relatively longer to be ready to shoot again after you press the shutter button Do not perform any operation while the image recording operation is in progress Due to the characteristics of the imaging element used by the camera very fast moving objects in an image may appear distorted Auto Focus Restrictions Any of the following can make proper ...

Страница 39: ...ge 1 Press p Power to turn on the camera and enter the REC mode If the camera is in the PLAY mode touch REC to enter the REC mode Menu page 61 Recording mode page 40 Wireless mode page 86 Selfie Art page 45 L R Flip Shot page 45 PLAY mode page 30 LED light page 48 Movie page 50 Make up page 41 Selfie timer page 47 Depending on the recording mode some of the items on the menu that appears may not b...

Страница 40: ...livers higher image quality than standard Auto recording mode page 31 Make up Makes it easier to shoot beautiful portraits Skin tone and texture can be adjusted while shooting page 41 Instant Movie Movie recording can be paused and resumed as required to create a short movie page 53 BEST SHOT With BEST SHOT simply select the sample scene that resembles the type of shot you want and the camera auto...

Страница 41: ...ting you want to change and then adjust it 6 Touch OK 7 Press the shutter button to shoot NOTE Make up can also be used with other recording modes besides Make up Mode The Make up icon will appear on the monitor screen when the current recording mode supports use of the Make up function page 49 Recording Beautiful Portraits Make up Smooth Skin Adjusts skin smoothness Skin Tone Adjusts the complexi...

Страница 42: ...in a bubble floating in midair Sparkling Shot Softens the overall image and adds points of light for a sparkle effect Toy Camera Dark edges and altered hues make images look like they were shot by a toy camera Soft Focus Overall blurring for a soft and romantic effect Light Tone Weakened contrast for a feeling of airy refinement Pop Enhanced saturation makes colors stand out in with rich clarity S...

Страница 43: ...tained if the camera or subject moves during shooting Depending on shooting conditions and image composition this REC mode may not be able to produce the desired result Movie recording is disabled while shooting with Art Shot Sample images shown on Art Shot scene screens were not shot with this camera An image shot with an Art Shot scene cannot be converted to a normal image without the Art Shot e...

Страница 44: ...guidance use the Posing Vol setting under Sounds page 114 To interrupt an ongoing Posing Shot operation press the shutter button or touch the monitor screen Note that preview images are not displayed when shooting with this function Changing the Voice Guidance Type You can use the procedure below to select one of five types for the voice guidance that sounds while you are shooting 1 Touch Pattern ...

Страница 45: ...lecting Square for Selfie Art Image sizes selected with the Image Size setting page 64 are changed as shown below 12M 8M 2976x2976 pixels 3M 2M 1536x1536 pixels Shooting a snapshot while On is selected for this function an image of what is displayed on the monitor screen is saved in memory This function can be used only when the monitor screen and lens are facing in the same direction 1 In the REC...

Страница 46: ...evel surface etc is recommended Zoom operations are disabled during high speed movie recording Perform the zoom operation before you touch Movie Start to start recording Ù is displayed on the monitor screen while digital zoom is being used Shooting with Zoom HD Zoom Allows greater zoom capabilities by cutting out a portion of the original image and enlarging it without deterioration of image quali...

Страница 47: ...ys a bar that shows the countdown time 2 Drag Selfie Timer to specify the selfie timer countdown duration The camera will shoot an image when the countdown reaches zero You can set a selfie timer countdown duration within the range of two to ten seconds The further you drag the longer the duration To cancel an ongoing countdown touch anywhere on the screen except where the selfie timer icon is dis...

Страница 48: ...he image so the main subject is in the center of the image when using the LED light Since the camera is equipped with a wide angle lens the center tends to be brighter while the periphery tends to be darker LED light is disabled while shooting with the following feature Following BEST SHOT scenes Triple Shot HDR HS Night Scene Following Art Shot scene HDR Art Using the LED Light LED Setting REC Sc...

Страница 49: ...le Shot Selfie Art Instant Movie 1 Touch Make up that appears on the monitor screen This displays the Smooth Skin setting screen 2 Touch the item whose setting you want to change and then adjust it 3 Touch OK 4 Press the shutter button to shoot Adjusting Skin Tone and Texture Smooth Skin Adjusts skin smoothness Skin Tone Adjusts the complexion setting Face Brightness Adjusts face brightness Sculpt...

Страница 50: ...select it 4 Touch the item whose setting you want to change 5 To close the menu screen touch MENU or press the shutter button To record a movie Movie Quality REC Screen Icon Display Frame Rate Image Size Pixels Description Full HD 30fps 1920x1080 Select this setting to record full high definition Full HD movies The aspect ratio of movies recorded with this setting is 16 9 HD 30fps 1280x720 Select ...

Страница 51: ...r button before starting recording to focus 7 Touch Movie Stop to stop recording Each movie can be up to 4GB or 29 minutes long Movie recording stops automatically after 29 minutes of recording Movie recording also will stop automatically if memory becomes full before you stop movie recording Minimizing the Effects of Camera Movement during Movie Recording You can configure the camera to minimize ...

Страница 52: ...al noise dots of light to appear in the movie image A rise in the camera s internal temperature also may force movie recording to stop automatically If this happens stop recording and allow the camera to cool down which should cause normal operation to resume Use of the camera s built in memory or certain types of memory cards can slow down processing speeds In particular high quality movies may n...

Страница 53: ...Touch the screen and configure the Movie Quality and Length settings 5 To close the menu screen touch MENU NOTE You may not be able to record up to the specified movie length if remaining memory capacity is too low Shooting a Movie of Short Clips Instant Movie Configuring Recording Settings Movie Quality Select one of the following quality settings Full HD 1920x1080 HD 1280x720 STD 640x480 Length ...

Страница 54: ...til the shooting time you selected under Configuring Recording Settings elapses Releasing Recording pauses movie recording Touching and holding Recording again resumes movie recording To end an ongoing recording operation 1 Remove your finger from Recording to pause recording 2 Touch 3 Follow the instructions that appear on the screen Shooting the Movie Before recording Recording Recording paused ...

Страница 55: ...ght on or off and perform zoom operations If about five minutes elapse after you pause movie recording the part of the movie recorded up to the pause will be saved and the camera will turn off automatically If the camera runs out of available memory the recording operation will be stopped and the movie recorded up to that point will be saved ...

Страница 56: ... the monitor screen after you press the shutter button The camera is in the process of recording an image until the message appears Keep the camera still The image processing operation takes some time to complete after the message appears You will not be able to record another image while the message is displayed BEST SHOT Precautions BEST SHOT scene images were not shot using this camera Images s...

Страница 57: ...he camera move your hand or perform some other movement in the area of the start self timer icon you positioned in step 3 When the camera detects subject movement within the icon it will automatically start a self timer countdown The camera will shoot an image when the countdown reaches zero and then go back into Motion Shutter standby to wait for the next trigger movement NOTE The trigger time of...

Страница 58: ...y to shoot press the shutter button NOTE With this BEST SHOT scene the LED light setting automatically becomes off Movement of the camera while it is placed on a surface may cause erroneous judgment that it is hand held If surroundings are extremely dark when shooting with HS Night Scene the camera may not be able to shoot at proper brightness due to insufficient exposure When shooting with this B...

Страница 59: ...urface may cause erroneous judgment that it is hand held If surroundings are extremely dark when shooting with this BEST SHOT scene the camera may not be able to shoot at proper brightness due to insufficient exposure When shooting with this BEST SHOT scene the ISO sensitivity setting is fixed at Auto 1 Select Food scene page 56 2 When you are ready to shoot press the shutter button 1 Select Nails...

Страница 60: ...ject and then half press the shutter button The camera will start pre recording images at this time If you release the half pressed shutter button before pressing it the rest of the way down all of the images currently in the pre record buffer will be deleted 3 Press the shutter button all the way down to record This will record three images one at the point the shutter button is fully pressed one...

Страница 61: ...5 Configure the setting of the item in accordance with the screen contents To cancel and exit the menu touch MENU or press the shutter button NOTE Depending on the recording mode some of the items on the menu that appears may not be usable While Premium Auto Pro is in use only the menu items whose settings can be configured will be displayed on the menus Menu Operations in This Manual Menu operati...

Страница 62: ...hoot even when On is selected for Touch Shutter NOTE When Auto is selected as the recording mode the camera will automatically focus on the point you touch When Premium Auto Pro is selected as the recording mode the camera will automatically determine the optimum focus point s and focus automatically Procedure Enter the REC Mode MENU Instant Movie You can configure movie quality and recording time...

Страница 63: ... Lightness Priority is disabled while shooting with the following feature Movie recording Instant Movie Following BEST SHOT scenes Triple Shot HDR HS Night Scene Following Art Shot scene HDR Art Switch On Enables shooting with overall brightness Guard against camera movement Switch Off Reduces blur due to camera movement Shooting in a Dark Location Lightness Priority ...

Страница 64: ...h a print service attaching an image to e mail when viewing the image on a computer etc The size of an image indicates how many pixels it contains and is expressed as horizontal pixelsxvertical pixels Note that larger images have more pixels so they take up more memory space For information about image size and number of images that can be stored see page 153 For information about movie image size...

Страница 65: ...just brightness To return brightness to its original level move the slider to the center of the bar 2 Touch OK This applies the exposure compensation value The exposure compensation value you set remains in effect until you change it or turn off the camera which causes it to revert to center 0 NOTE When shooting under very dark or very bright conditions you may not be able to obtain satisfactory r...

Страница 66: ... adjustment impossible If this happens select the white balance setting that matches your shooting conditions Daylight Overcast etc Adjusting White Balance White Balance Setting Description Auto WB Configures the camera to adjust white balance automatically Daylight For shooting outdoors on a clear day Overcast For shooting outdoors on an overcast rainy day in the shade etc Shade For shooting on a...

Страница 67: ...tively longer for the camera to finish recording an image after it is shot You will not be able to perform any operation while image recording is in progress Specifying ISO Sensitivity ISO Setting Description Auto Adjusts sensitivity automatically according to conditions ISO 80 Lower sensitivity Higher sensitivity Slow shutter speed Fast shutter speed Set for shooting in dimly lit areas Less noise...

Страница 68: ...utton to start recording Selecting a Focus Mode Focus Settings REC Screen Icon Display Type of Shot Focus Mode Approximate Focus Range 1 Snapshot Movies Snapshot Movies AF Auto Focus None General recording Automatic Fixed focal point 8 cm to 9 infinity 3 1 to 9 52 cm to 9 infinity 20 5 to 9 Macro Close ups 8 cm to 50 cm 3 1 to 19 7 8 cm to 50 cm 3 1 to 19 7 2 PF Pan Focus Shooting with a relativel...

Страница 69: ... locks exposure AE The focus frame does not appear on the display when the Touch Shutter is enabled On Procedure Enter the REC Mode MENU Review While Review is turned on the camera will display an image immediately after it is recorded When Type 1 is selected the aperture shutter speed and ISO sensitivity will be red if the Auto Exposure is not correct Turning on Image Review Review Type 1 Display...

Страница 70: ...hted icon to remove the image from your favorites NOTE You can also add images to your favorites from the image menu page 74 Use the procedure below to display the current make up level pages 41 49 1 Touch PLAY to enter the PLAY mode 2 On the monitor screen flick leftwards or rightwards to scroll through images until the one whose make up level you want to check is displayed 3 Flick upwards on the...

Страница 71: ...e 2 Drag left or right across the screen image to scroll through the movies until the one you want is displayed 3 Touch Movie to start playback Viewing a Movie Movie icon Movie recording time Image quality Playback in progress Playback paused Touch Touch Progress bar ...

Страница 72: ... fast reverse operation To return to normal playback speed touch Stop playback During playback touch Volume adjustment During playback touch and then drag the volume bar to the desired level Volume can be adjusted only while movie playback is in progress 1 frame forward back While playback is paused touch or Touching and holding this icon advances frames continuously Information display on off Tou...

Страница 73: ...en you edit a movie only the result is saved The original movie is not retained An editing operation cannot be undone NOTE A movie that is shorter than five seconds cannot be edited Editing of movies recorded with a different type of camera is not supported You will not be able to edit a movie if the amount of remaining memory capacity is less than the size of the movie file you want to edit If th...

Страница 74: ...enu Touch the icon of the function you want to use touch an image and then touch OK Delete an image Add to Favorites Snapshots can be zoomed on the monitor screen up to 8X The actual available zoom factors depend on the size of the original image 1 In the PLAY mode drag left or right to display the image you want to view 2 To enlarge the image spread your thumb and forefinger page 18 on the displa...

Страница 75: ...select a total of five snapshots in the sequence you want them to appear Touch a selected snapshot will de select it 6 Touch OK 7 Touch Length Transition and Music and configure settings for each item as required 8 Touch Create This creates a Promotion Movie in accordance with the settings you configured Creating a Promotion Movie Promotion Movie Length Select 15 seconds 10 second or 6 seconds Tra...

Страница 76: ... cannot be used for fewer than five images Use the procedure below to view two snapshots at the same time to compare them 1 Enter the PLAY mode 2 Touch Show Icons 3 Touch Comparison View This splits the screen and displays the current image along with the one immediately before it The operations you can perform on the comparison view screen are described below Interlock 1 Touch This will enable si...

Страница 77: ... To cancel an ongoing send operation touch Applying an Image s Make up Settings You can use the procedure below to apply the make up settings of an existing image the next time you shoot in the Make up Mode 1 Touch the image whose make up settings you want to use 2 Touch Make up 3 Touch Yes NOTE is not displayed for an image that was shot without using the make up effect ...

Страница 78: ... MENU or press the shutter button Menu Operations in This Manual Menu operations are represented in this manual as shown below Touch the indicated icons and items and perform operations as they are indicated from left to right Procedure Enter the PLAY Mode MENU Show Favorites This displays a list of images that you added to your favorites You cannot use this function to remove images from your fav...

Страница 79: ...ages in camera memory NOTE All operations are disabled while the slideshow is transitioning from one image to another The time required for transition from one image to another may be longer in the case of an image that was not recorded with this camera To return to normal single image display touch the screen Playing a Slideshow on the Camera Slideshow ...

Страница 80: ...t operation page 119 Protecting a File Against Deletion Protect All Files On Protects all files All Files Off Unprotects all files Select Protects and unprotects specific files Drag upwards or downwards to display the image you want to protect Touch an image to be protected and will appears on the image You can repeat steps and as many times as necessary to select multiple images Touch OK or To un...

Страница 81: ...annot be rotated Procedure Enter the PLAY Mode MENU Resize You can reduce the size of a snapshot and save the result as a separate snapshot The original snapshot is also retained You can select resize an image to one of two image sizes 3M VGA 1 Drag left or right to display the image you want to resize 2 Touch a size This resizes the image to the selected size and saves the result as a new photogr...

Страница 82: ...ill not appear if the aspect ratio of the original image is 1 1 square Trimming such an image always results in a square image In this case skip step 2 of this procedure and go directly to step 3 3 Drag the image until the part you want to keep is displayed To enlarge the image touch the screen with your thumb and forefinger and then spread them apart To reduce the size of the image touch the scre...

Страница 83: ...ergy technology Controlling Your Camera with a Smartphone With this function You can do this Auto Send Images can be automatically sent as they are shot to a smartphone that has been Bluetooth wireless technology paired with the camera page 100 One Time Share Share selected snapshots for viewing on smartphones that are not paired with the camera page 93 The Scene app needs to be installed on the s...

Страница 84: ...you may not be able to playback movies and or audio Images recorded on another manufacturer s camera cannot be sent using this function NOTE Note that using wireless functions requires more battery power usage than normal Make sure that the camera battery is sufficiently charged before starting a wireless LAN operation The operating range depends on the local communication environment and on the t...

Страница 85: ...ow http www exilim com manual Note that to view the EXILIM Connect User s Guide you will have to install Adobe Reader Consult CASIO authorized service center if you are unable to open to display the PDF format User s Guide Note that EXILIM Connect User s Guides may not be available in all languages If you cannot find a EXILIM Connect User s Guide in your native language please use a version in ano...

Страница 86: ...creen 3 Touch the wireless mode you want Using a Wireless Mode Send to phone Select to view images you shoot with the camera on a smartphone pages 97 98 Pairing Select this mode to establish a Bluetooth wireless technology connection between the camera and a smartphone page 89 Shoot with phone Select this mode for remote control of image recording from a smartphone page 91 Wireless settings Select...

Страница 87: ...ing the ability to operate the EXILIM Connect app on any particular smartphone or tablet IMPORTANT For information about operating system version supported by the app check the information on Google Play or the App Store App functions and the required operating environment are subject to change without notice Semi transparent Pairing is complete but there is no Bluetooth wireless technology connec...

Страница 88: ...ection Android terminal 1 Open Google Play 2 In the search field type EXILIM Connect 3 Install EXILIM Connect iPhone iOS 1 Open App Store 2 In the search field type EXILIM Connect 3 Install EXILIM Connect Installing the EXILIM Connect App on Your Smartphone ...

Страница 89: ... models may not be compatible with this camera If you want to re pair the camera with the smartphone it is already paired with first unpair them and then pair again Re pairing the camera and smartphone will result in all pending unsent images to remain unsent Camera Operation 1 Touch the Wireless icon This will display the wireless mode screen 2 Touch Pairing 3 Touch Start Smartphone Operation 4 S...

Страница 90: ...t of an SSID and password 4 For the smartphone Wi Fi setting input the camera SSID and Password When the message Start up the phone app appears on the camera s monitor screen it means that the smartphone has established a wireless connection with the camera What you need to do to establish a wireless LAN connection depends on the type of smartphone you are using For details about how to establish ...

Страница 91: ...nect User s Guide page 85 Bluetooth Wireless Technology Connection 1 Perform one of the operations below Turn off the camera Display the wireless mode screen Touch Show Icons Touch the Wireless icon 2 On the smartphone start up the EXILIM Connect app 3 On the smartphone tap Remote Capture 4 Compose the image on the smartphone s screen as you shoot For information about how to use Shoot with phone ...

Страница 92: ...rocedure 4 For the smartphone s Wi Fi settings select the SSID displayed on the camera and establish a wireless LAN connection between the camera and smartphone 5 On the smartphone start up the EXILIM Connect app 6 Compose the image on the smartphone s screen as you shoot For information about how to use Shoot with phone refer to the EXILIM Connect manual page 85 For snapshots Premium Auto Pro is ...

Страница 93: ...s you want to share touch OK This will cause the images you selected to be sent to the smartphone which will then upload them to the Scene Server A QR code will appear on the camera monitor screen when image send to the smartphone starts If a send operation is taking a long time the QR code screen will change to a send in progress message To stop the send operation while this message is displayed ...

Страница 94: ...re operation When a large number of images are selected it will take some time to send them to the smartphone and or upload them to the Scene server To discontinue sharing of a set of images use the Scene app to configure the settings required to stop sharing One Time Share cannot be used if there is insufficient free space on the memory card ...

Страница 95: ... sent icon page 10 IMPORTANT To use any Auto Send setting other than Off you will need to pair the camera with a smartphone page 89 Sending Images from the Camera to a Smartphone as They are Recorded Auto Send Setting Description All Automatically sends images to the smartphone after they are shot Confirm first Sends image files selected by you to the smartphone While this setting is selected will...

Страница 96: ...sabled while the camera s Airplane Mode setting is On page 99 Auto Send become re enabled when the camera s Airplane Mode setting is changed to Off Even you change the Auto Sent setting to Off while All or Confirm first image send operation is in progress all of the images will be sent to the smartphone When All is selected for Auto Send a message will appear whenever you try to delete a file or t...

Страница 97: ...e 1 Touch the Wireless icon 2 Touch Send to phone 3 Touch Send Selected Image 4 Touch the image you want to send to the smartphone Selecting the image of a file causes its check box to become selected To exit the Send Selected Image operation touch 5 After selecting the images of all of the files you want to send to the smartphone touch OK or For information about how to use Send Selected Image re...

Страница 98: ...ings so your camera is selected for connection page 90 After about 60 seconds the camera s monitor screen will go blank Touching the monitor screen will cause its image to reappear 4 On the smartphone start up its browser app Accessing the URL displayed by the camera will display an image stored in camera memory To exit the wireless LAN function touch Exit on the camera s monitor screen IMPORTANT ...

Страница 99: ...display the wireless setting screen 3 Touch the item you want to configure 4 Change the setting of the selected item Changing a setting returns causes the wireless mode screen to reappear Procedure Wireless Wireless settings Airplane Mode Wireless connection with the camera is disabled while On is selected for the airplane mode setting Enter the airplane mode to disable generation of radio waves f...

Страница 100: ...e use to resize snapshots before they are sent to a smartphone using Shoot with phone or Send to phone Sending Images from the Camera to a Smartphone as They are Recorded Auto Send Specifying Images to be Sent by Auto Send Auto Send File Settings t Snapshots and movies are sent t Snapshots and Instant Movies are sent t Only Only snapshots are sent Resizing Snapshots before Sending Them to a Smartp...

Страница 101: ...tion your smartphone s location services must be enabled and it must be where location information can be received Location information will not be available to add to images if the smartphone is unable to receive location information You can check whether or not location information was added successfully on the smartphone s image receive screen Up to 10 000 location records can be maintained by ...

Страница 102: ...N password will terminate the connection with the smartphone To reconnect with the smartphone configure wireless connection settings page 89 If your smartphone does not support Bluetooth low energy technology perform the operations below to change your smartphone s Wi Fi settings iPhone Tap the right arrow of the field where the SSID of the camera is displayed in the Wi Fi settings to delete netwo...

Страница 103: ...th a different smartphone first unpair it from the current smartphone NOTE When unpairing be sure also to perform the unpairing operation on the smartphone as well For details refer to the EXILIM Connect User s Guide page 85 Unpairing the camera from a smartphone will result in all pending unsent images to remain unsent Unpairing the Camera from a Smartphone Unpairing ...

Страница 104: ...ter and Saving Files page 109 to store the image you want to print and then display the image on your Macintosh screen 2 Click File and then Print 3 Configure print settings and then click Print This will print the selected image Professional Print Service You can take a memory card that contains the images you want to print to a professional print service and have them printed Printing on a Home ...

Страница 105: ... USB connection pages 106 109 Play back and edit movies You can play back movies pages 108 110 To edit movies use commercially available software as required Windows users should refer to Using the Camera with a Windows Computer on page 105 Macintosh users should refer to Using the Camera with a Macintosh on page 108 Using the Camera with a Windows Computer When you want to do this Operating Syste...

Страница 106: ...ake sure that the color of its operation lamp changes from red to green or amber page 23 Note that in this case the monitor screen will remain blank The first time you connect the camera to your computer with the USB cable an error message may appear on your computer If this happens disconnect and then reconnect the USB cable 3 Windows 10 users Click Start and then Explorer Next in the sidebar cli...

Страница 107: ...indows 7 Windows Vista users On the Documents menu click Organize or Edit and then Paste This will paste the DCIM folder and all the image files it contains into your Documents folder You now have a copy of the files that are in camera memory on your computer After copying images it is recommended that you right click the DCIM folder and change its name to something else 9 After you finish copying...

Страница 108: ...r applications you have running and stop resident applications The above recommended computer system environments do not guarantee proper operation Proper operation depends on the level of performance of the computer you are using Using the Camera with a Macintosh When you want to do this Operating System Version Required Software Save images to your Macintosh and view them there manually OS X Ins...

Страница 109: ...n the camera check to make sure that the color of its operation lamp changes from red to green or amber page 23 In this mode your Macintosh recognizes the memory card loaded in the camera or the camera s built in memory if it does not have a memory card loaded as a drive The appearance of the drive icon depends on the Mac OS version you are using The first time you connect the camera to your Macin...

Страница 110: ...t red disconnect the USB cable To view copied images 1 Double click the camera s drive icon 2 Double click the DCIM folder to open it 3 Double click the folder that contains the images you want to view 4 Double click the image file you want to view For information about file names see Memory Folder Structure on page 112 An image that was rotated on the camera will be displayed on your Macintosh sc...

Страница 111: ...t how file names are displayed on the camera s monitor screen see page 10 The total number of folders and files allowed depends on the image size and quality and capacity of the memory card being used for storage Files and Folders Name and Maximum Number Allowed Example File Each folder can contain up to 9999 files named CIMG0001 through CIMG9999 The extension on the file name depends on the file ...

Страница 112: ...amera may not be able to display an image even if it is DCF compliant When displaying an image recorded on another camera it may take a long time for the image to appear on this camera s monitor screen Built in Memory and Memory Card Data Handling Precautions Whenever copying memory contents to your computer you should copy the DCIM folder and all of its contents A good way to keep track of multip...

Страница 113: ...image s Auto Exposure AE is not correct In the case of images shot with the Makeup Function you can display the current make up level page 70 regardless of this setting For information about menu operations see page 61 Adjusting Monitor Screen Brightness Screen Auto With this setting the camera detects available light levels and automatically adjusts the brightness of the monitor screen accordingl...

Страница 114: ... can select from among two shutter sounds Procedure MENU Setup Sounds Setting a volume level of 0 mutes output Locking the Screen Screen Lock Specify the Shutter Sound Configuring Camera Sound Settings Sounds Startup Toggles the operation tone between on and off Half Shutter Shutter Operation Volume Operation Vol Specifies the sound volume Playback Vol Specifies the volume of movie audio output Po...

Страница 115: ...and time information is stamped into a snapshot it cannot be edited or deleted Even if you do not stamp the date and or time with Timestamp you can do so later using some printing application Stamping is performed in accordance with the date and time settings page 117 and the display style settings page 117 Time Stamping Snapshots Timestamp Date 2017 7 10 Date Time 2017 7 10 1 25pm Off No stamping...

Страница 116: ...uring the summer months 3 Drag upwards and downwards to display the area of the destination city and then touch the area 4 Drag upwards and downwards until you find the city you want and then touch to select it IMPORTANT Before configuring World Time settings make sure that the Home City setting is the place where you live or normally use the camera If it isn t select Home on the screen in step 1 ...

Страница 117: ...le the wrong city is selected for your Home City the times and dates of all of the World Time cities page 116 will be wrong To switch between 12 hour and 24 hour format touch the 12 24 hour switch icon Touching and holding or scrolls at high speed 3 Touch OK Procedure MENU Setup Date Style You can select from among three different styles for the date Example July 10 2017 Setting the Camera s Clock...

Страница 118: ...e you want 1 On the menu screen touch Setup 2 Touch Language 3 Drag upwards and downwards until you find the language you want and then touch to select it Camera models sold in certain geographic areas may not support display language selection Specifying the Display Language Language ...

Страница 119: ...ntents on the memory card or in built in memory It cannot be undone Make sure you do not need any data currently on the card or in built in memory before you format it Formatting built in memory or a memory card will delete all protected images stored there Check the battery level before starting a format operation and make sure it is not too low Formatting may not be performed correctly and the c...

Страница 120: ... Airplane Mode setting page 99 to become Off Procedure MENU Setup Version Selecting this menu item displays the camera model name the version of firmware installed on the camera the camera s MAC address and the camera s serial number Note that the MAC address is fixed number that functions as the camera s network device identifier Check this screen after updating the camera s firmware to confirm t...

Страница 121: ...l are specifically prohibited The example at left indicates that disassembly is prohibited The black dot 0 means that the indicated action must be performed Indications within this symbol are actions that are specifically instructed to be performed The example at left indicates that the power plug must be unplugged from the electrical socket DANGER Built in Rechargeable Battery To charge the batte...

Страница 122: ... on it etc and never apply solder to it Never place the battery into a microwave oven dehumidifier high pressure generating device etc Never remove the outer sticker from the battery Do not use or leave the battery under direct sunlight in an automobile parked in the sun or in any other area subject to high temperatures Doing so can damage the battery and cause deterioration of its performance and...

Страница 123: ... of serious accident LED Light Never use the LED light while it is pointed in the direction of a person operating a motor vehicle Doing so can interfere with the driver s vision and create the risk of accident USB AC Adapter Misuse of USB AC adapter creates the risk of fire and electric shock Be sure to observe the following precautions Use only the specified USB AC adapter Never use the USB AC ad...

Страница 124: ...fore going out be sure to unplug the USB AC adapter from the power outlet and put in a place away from objects used by animals and pets An animal or pet chewing on the power cord can cause it short leading to the risk of fire Water and Foreign Matter Water other liquids or foreign matter especially metal getting inside the camera creates the risk of fire and electric shock Immediately perform the ...

Страница 125: ... the risk of low temperature burns Interference with other digital devices Should you notice radio interference or other problems on other devices is being caused while using this camera stop using the wireless functions Remote Capture image transfer wireless image viewing etc of this camera or turn off the camera Use of wireless functions creates the risk of radio interference and abnormal operat...

Страница 126: ...ity of being in the vicinity of a person wearing a cardiac pacemaker stop using the wireless functions Remote Capture image transfer wireless image viewing etc of this camera or turn off the camera Radio waves emitted by the camera s wireless function may affect pacemaker operation WARNING ...

Страница 127: ...ot end normally within the specified charging time stop charging anyway and contact your local CASIO authorized service center Continued charging creates the risk of battery overheating fire and explosion Be sure to read the user documentation that comes with the camera before using or charging the battery Store batteries in a location that cannot be reached by infants and young children When usin...

Страница 128: ...en ever become cracked never touch any of the liquid inside the monitor screen Doing so creates the risk of skin inflammation Should monitor screen liquid ever get into your mouth immediately rinse your mouth out and contact your physician Should monitor screen liquid ever get into your eyes or onto your skin immediately rinse with clean water for at least 15 minutes and contact your physician Bac...

Страница 129: ...ion Do not place the camera in any of the following locations In an area exposed to direct sunlight or large amounts of moisture dust or sand Near heating or cooling devices or in other areas subjected to extreme changes in temperature or humidity Inside of a motor vehicle on a hot day or in an area subjected to strong vibration Condensation Sudden and extreme temperature changes such as when the ...

Страница 130: ...ould be straight This is due to the characteristics of lenses and does not indicate malfunction of the camera Caring for your camera Never touch the lens with your fingers Finger smudges dirt and other foreign matter on the lens can interfere with proper operation of the camera Use a blower or other means to keep the lens and flash window free of dirt and dust and wipe gently with a soft dry cloth...

Страница 131: ...t near a microwave oven or any other area where magnetism electrostatic charge or radio interference is generated Radio wave reception may be poor in certain environments Also note that other devices using the same 2 4GHz band used by this product may cause reduced processing speeds in both devices Connection to a public LAN This product does not support wireless LAN connection over a public wirel...

Страница 132: ... obtained for free posting them on a website a file sharing site or any other Internet site or otherwise distributing them to third parties without the permission of the copyright holder is strictly prohibited by copyright laws and international treaties For example uploading or distributing on the Internet images of TV programs live concerts music videos etc that were photographed or recorded by ...

Страница 133: ...Apple Inc iOS is a trademark or registered trademark of Cisco Systems Inc of the United States Wi Fi is a registered trademark of the Wi Fi Alliance The Bluetooth word mark and logos are registered trademarks owned by Bluetooth SIG Inc and any use of such marks by CASIO COMPUTER CO LTD is under license Other trademarks and trade names are those of their respective owners The word QR Code is regist...

Страница 134: ...ULAR PURPOSE AND NONINFRINGEMENT IN NO EVENT SHALL THE AUTHORS OR COPYRIGHT HOLDERS BE LIABLE FOR ANY CLAIM DAMAGES OR OTHER LIABILITY WHETHER IN AN ACTION OF CONTRACT TORT OR OTHERWISE ARISING FROM OUT OF OR IN CONNECTION WITH THE MATERIALS OR THE USE OR OTHER DEALINGS IN THE MATERIALS bluedroid 5 0 0_r2 Copyright c 2014 The Android Open Source Project Copyright C 1998 2014 Broadcom Corporation L...

Страница 135: ...ated by a copyright notice that is included in or attached to the work an example is provided in the Appendix below Derivative Works shall mean any work whether in Source or Object form that is based on or derived from the Work and for which the editorial revisions annotations elaborations or other modifications represent as a whole an original work of authorship For the purposes of this License D...

Страница 136: ... a lawsuit alleging that the Work or a Contribution incorporated within the Work constitutes direct or contributory patent infringement then any patent licenses granted to You under this License for that Work shall terminate as of the date such litigation is filed 4 Redistribution You may reproduce and distribute copies of the Work or Derivative Works thereof in any medium with or without modifica...

Страница 137: ...t grant permission to use the trade names trademarks service marks or product names of the Licensor except as required for reasonable and customary use in describing the origin of the Work and reproducing the content of the NOTICE file 7 Disclaimer of Warranty Unless required by applicable law or agreed to in writing Licensor provides the Work and each Contributor provides its Contributions on an ...

Страница 138: ... of fees or royalties provided that 1 source code distributions include the above copyright notice this list of conditions and the following disclaimer 2 binary distributions include the above copyright notice this list of conditions and the following disclaimer in their documentation 3 the name of the copyright holder is not used to endorse products built using this software without specific writ...

Страница 139: ...ssions granted by this License Source form shall mean the preferred form for making modifications including but not limited to software source code documentation source and configuration files Object form shall mean any form resulting from mechanical transformation or translation of a Source form including but not limited to compiled object code generated documentation and conversions to other med...

Страница 140: ... Source or Object form 3 Grant of Patent License Subject to the terms and conditions of this License each Contributor hereby grants to You a perpetual worldwide non exclusive no charge royalty free irrevocable except as stated in this section patent license to make have made use offer to sell sell import and otherwise transfer the Work where such license applies only to those patent claims licensa...

Страница 141: ...Your modifications or for any such Derivative Works as a whole provided Your use reproduction and distribution of the Work otherwise complies with the conditions stated in this License 5 Submission of Contributions Unless You explicitly state otherwise any Contribution intentionally submitted for inclusion in the Work by You to the Licensor shall be under the terms and conditions of this License w...

Страница 142: ... and all other commercial damages or losses even if such Contributor has been advised of the possibility of such damages 9 Accepting Warranty or Additional Liability While redistributing the Work or Derivative Works thereof You may choose to offer and charge a fee for acceptance of support warranty indemnity or other liability obligations and or rights consistent with this License However in accep...

Страница 143: ...nate it automatically even if the battery is not fully charged If the battery has not been used for a very long time charging may terminate automatically after only about 60 minutes 1 Using a battery that has not been used for a long time Disconnect and then reconnect the USB cable to resume charging 2 Insufficient power supply when connected to computer The camera can be charged only via a USB 2 ...

Страница 144: ... have the battery replaced Do not try to replace the battery yourself Store batteries in a cool dry place 20 C or lower In order to prevent over discharge when storing the camera for long periods fully the charge the battery at least once every six months Precautions during Use The bundled USB AC adaptor is designed for operation with any power supply in the range of 100V to 240V AC 50 60Hz Note h...

Страница 145: ...can be guaranteed even if an Ultra High Speed Type memory card is used Certain movie quality settings can result in too much time being required to record data which can result in breaks in the image and or audio during playback If this happens Movie Stop will be Discarding or Transferring Ownership of a Memory Card or the Camera The format and delete functions of the camera do not actually delete...

Страница 146: ... items may not be available depending on the recording mode being use REC Menu Default setting depends on country or geographic region PLAY Menu Reset Initial Default Settings Touch Shutter Off Instant Movie Movie Quality STD Length 10 sec Lightness Priority On Image Size 12M Movie Quality Full HD Brightness 0 0 White Balance Auto WB ISO Auto Focus AF Review Type 2 Setup See below Show Favorites S...

Страница 147: ...WLAN password Unpairing Screen Auto Info Off Screen Lock Off Shutter Sounds 1 Sounds Startup On Half Shutter On Shutter On Operation On Operation Vol 3 Playback Vol 3 Posing Vol 3 Timestamp Off World Time Adjust Date Style Language Startup Off Format Reset Version Smooth Skin 2 Skin Tone Natural Face Brightness 0 Sculpt 0 Dark Circles Remover On Slim Face On ...

Страница 148: ...ast 10 seconds to reset the camera Charging The operation lamp does not light red and the battery won t charge 1 Unplug the USB cable from the camera and then plug it back in again 2 Make sure the camera is turned off when you connect the USB cable Charging may not start if you connect the USB cable while power is turned on Image Recording Image is not recorded when the shutter button is pressed 1...

Страница 149: ...igital noise in the image If digital noise becomes a problem try changing the ISO sensitivity setting to a lower value A recorded image was not saved 1 Camera power may have been turned off before the save operation was complete which will result in the image not being saved If the battery indicator shows charge the battery as soon as possible page 19 2 You may have removed the memory card from th...

Страница 150: ...t displayed on the menu Some menu items may not be available depending on the recording mode in use While Premium Auto Pro is in use only the menu items whose settings can be configured will be displayed on the menus Playback The color of the playback image is different from what appears on the monitor screen when shooting Sunlight or light from another source may be shining directly into the lens...

Страница 151: ...d along with image data The date and time setting is off Set the correct date and time page 117 The messages on the display are in the wrong language The wrong display language is selected Change the display language setting page 118 Images cannot be transferred over a USB connection 1 The USB cable may not be connected securely Check all connections 2 If the camera is not turned on turn it on 3 Y...

Страница 152: ...e other storage device Communication stopped This message appears when the wireless LAN connection is broken for some reason during data communication between the camera and smartphone File could not be saved because battery is low Battery power is low so an image file could not be saved Folder cannot be created You are trying to record a file while there are already 9999 files stored in the 999th...

Страница 153: ...unction Number of Snapshots Movie Recording Time Image Size Pixels Approximate File Size Built in Memory 1 Recording Capacity microSD Memory Card 2 Recording Capacity 12M 4000x3000 4 13 MB 7 2286 3M 2048x1536 1 25 MB 21 6533 8M 2976x2976 3 2 97 MB 9 3048 2M 1536x1536 3 0 99 MB 26 8184 Image Size Pixels Audio Approximate Data Rate Frame Rate Maximum File Size Built in Memory 1 Recording Capacity Ma...

Страница 154: ...ring recording Snapshot and movie recording capacity values are approximate and intended for reference only Actual capacity depends on image contents File size and data rate values are approximate and intended for reference only Actual values depend on the type of image being shot When using a memory card with a different capacity calculate the number of images as a percentage of 16GB The time it ...

Страница 155: ...ens Focal Distance F2 8 f 4 58 mm equivalent to 21 mm in 35 mm format Zoom Up to 4 0X when SR zoom and Digital zoom are used in combination Up to 7 8X when SR Zoom HD Zoom and Digital zoom are used in combination 3M size Focusing Contrast Detection Auto Focus Focus Modes Auto Focus Macro Focus Pan Focus Infinity AF Area Spot Intelligent AF area used when Premium Auto Pro is selected Approximate Fo...

Страница 156: ...LED Light Auto On Off Communication function Bluetooth Communication standard Bluetooth Ver 4 0 Wireless LAN Standard IEEE 802 11b g n Operation frequency range 1 to 11ch Encryption WPA2 Monitor Screen 3 5 inch TFT color LCD 1 036 800 dots Capacitive type touch panel External connection terminal Micro USB port Hi Speed USB compliance USB charging Microphones Monaural Speaker Monaural Power Require...

Страница 157: ...not guarantee that the specified battery life will be attained under actual operating conditions Frequency of Auto Focus and High Speed CS usage configured settings the amount of time the camera is left turned on and ambient temperature in the area where the camera is used all greatly affect recording time and number of shots values Number of snapshots Operating Time 1 255 shots Actual movie recor...

Страница 158: ...d The power cord used must comply with relevant national and or international standards Input 100 to 240 V AC 50 60 Hz 100 mA Output 5 0 V DC 650 mA Operating Temperature Requirements 5 to 35 C 41 to 95 F Dimensions 53 W x 21 H x 45 D mm 2 1 W x 0 83 H x 1 8 D excluding projections Weight Approximately 37 g 1 3 oz ...

Страница 159: ...2017 CASIO COMPUTER CO LTD 6 2 Hon machi 1 chome Shibuya ku Tokyo 151 8543 Japan MA1612 A M29 ...

Отзывы: