background image

Using Built-in Songs to Master Keyboard Play

EN-32

The following are the messages that appear on the display 
during Step Lessons.

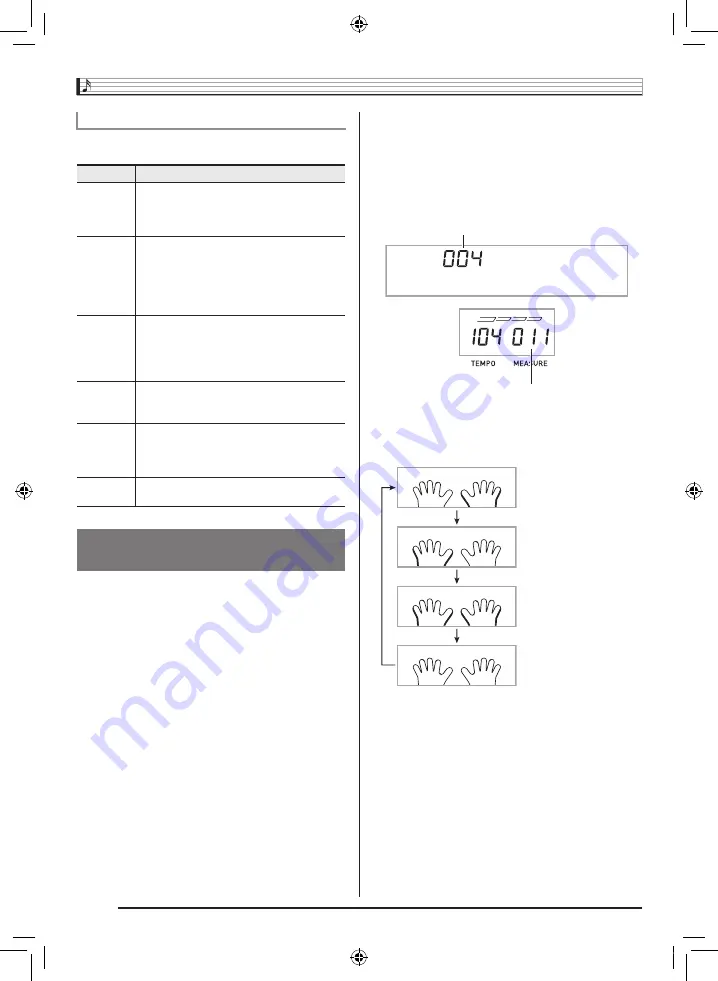
First, select the song, phrase, and part you want to practice.

1.

Select the song you want to practice (page 
EN-28).

This will select the first phrase of the song.

2.

Press 

cl

 (or 

8

) to move forward one phrase, 

or 

7

 to move back one phrase.

• Holding down 

8

 or 

7

 scrolls through phrases at high 

speed.

• The Digital Keyboard remembers the last phrase you 

practiced for up to 20 songs. To recall the last practice 
phrase for the current song (if it is available), hold down 

cl

.

3.

Press 

bl

 to select the part you want to practice.

Each press of 

bl

 cycles through the settings shown 

below.

4.

Hold down 

bp

 (SONG BANK) for about two 

seconds.

The same tone used for song playback will be assigned to 
the keyboard (page EN-30).

Messages that Appear during Lessons

Message

Description

<Phrase>

Appears when you select a phrase, when a 
lesson starts, etc.

• Note that certain phrases will cause 

“<Wait>” to appear instead of “<Phrase>”.

<Wait>

Appears when the lesson starts with an intro 
or fill-in phrase that is not included in the 
phrases to be practiced. Play toll advance 
automatically to the next phrase after the un-
included phrase plays, so wait until then to 
start playing on the keyboard.

NextPhrs

Appears when advancing automatically to the 
next phrase. This message appears following 
a phrase for which “<Wait>” (see above) is 
displayed, and during an Auto Step Up Lesson 
(page EN-36).

Listen
Watch
Remember

Appears at the start of Auto Step Up lesson 1, 
2, or 3 (page EN-36).

From top

This message appears during Auto Step Up 
Lesson (page EN-36) immediately before 
practice from Phrase 1 up until the phrase 
currently being practiced.

Complete

Appears at the end of Auto Step Up Lesson 
(page EN-36).

Selecting the Song, Phrase, and 

Part You Want to Practice

< P h r a s e >

Phrase number

First measure of the selected phrase

*

This indicator (setting) is skipped if you press 

bl

 while 

a lesson is in progress.

Right hand practice

Left hand practice

Both hand practice

*

CTK4400_A5_x1a_EN_ES.indd   34

2014/02/19   10:25:17

Содержание CTK-4400

Страница 1: ...ridad separadas Safety Precautions Before trying to use the Digital Keyboard be sure to read the separate Safety Precautions CTK 4400 WK 240 WK 245 English Espa ol This recycle mark indicates that the...

Страница 2: ...ntee that interference will not occur in a particular installation If this equipment does cause harmful interference to radio or television reception which can be determined by turning the equipment o...

Страница 3: ...his mark applies in EU countries only Any reproduction of the contents of this manual either in part or its entirety is prohibited Except for your own personal use any other use of the contents of thi...

Страница 4: ...Drum Sampling EN 22 Other Sampling Functions EN 25 Playing Built in Songs EN 27 Playing the Demo Songs EN 27 Playing Back a Particular Song EN 28 Increasing the Selection of Songs EN 30 Using Built in...

Страница 5: ...64 Troubleshooting EN 64 Specifications EN 66 Operating Precautions EN 67 Error Messages EN 68 Song List EN 69 Fingering Guide EN 70 Chord Example List EN 71 MIDI Implementation Chart Included Access...

Страница 6: ...ow the WK 240 In this manual buttons and other controllers are identified using the numbers shown below 5 5 2 2 1 1 br br bn bn 6 6 7 7 8 8 9 9 bk bk bl bl bs bs bt bt ck ck cl cl cm cm 4 4 3 3 bp bp...

Страница 7: ...T button EN 30 39 bmTEMPO buttons EN 13 bnTONE button EN 14 boRHYTHM ONE TOUCH PRESET button EN 38 42 bpSONG BANK button EN 28 bqMUSIC PRESET button EN 56 brNumber buttons keys EN 7 bsBANK LISTEN butt...

Страница 8: ...ABLE JACK EN 17 ekMIC VOLUME knob WK 240 and WK 245 EN 19 elMIC IN SAMPLING jack WK 240 and WK 245 EN 19 emAUDIO IN jack EN 19 enDC 9 5V terminal EN 9 eoPHONES OUTPUT jack EN 11 ds dt el em eo en ek B...

Страница 9: ...ng You can use the FUNCTION button ct to adjust the reverb effect to delete data and to perform a wide range of other Digital Keyboard operations 1 Press ct FUNCTION to display the function menu 2 Use...

Страница 10: ...nt Volume AcompVol EN 42 3 Song Volume Song Vol EN 30 4 Touch Response Touch EN 12 5 Tuning Tune EN 18 6 Reverb Reverb EN 16 7 Chorus Chorus EN 17 8 Sampling SAMPLING Automatic Sampling Start AutoStrt...

Страница 11: ...the risk of accident Be sure to turn off power before loading batteries It is up to you to prepare six commercially available batteries Do not use oxyride batteries or any other nickel based batterie...

Страница 12: ...Turning off the Digital Keyboard can cause Digital Keyboard data to be deleted or become corrupted Pressing 1 to turn off power actually puts the Digital Keyboard into a standby state Minute amounts...

Страница 13: ...the headphones You can connect a dynamic microphone only to the Digital Keyboard for output through the Digital Keyboard s speakers You can adjust the volume level of microphone input with the ek MIC...

Страница 14: ...TION and then use the br 10 key 4 o and 6 p keys to display OTHER page EN 7 2 Press br 10 key 9 ENTER key 3 Use the br 10 key 4 o and 6 p keys to display Contrast 4 Use the br 10 key and keys to adjus...

Страница 15: ...h measure Use the following procedure to change the tempo of the metronome 1 Press bm Use y slower and t faster to change the tempo setting Holding down either button changes the setting at high speed...

Страница 16: ...selected will sound Pressing cr toggles between the piano and organ modes Each press of cr toggles the tone setting between a piano tone Tone Number 001 and an organ tone Tone Number 079 In addition...

Страница 17: ...ure below to assign different tones to the right range and left range of the keyboard so it sounds like you are playing an ensemble between two instruments 1 Select the tone for the right side range p...

Страница 18: ...ally whenever the VIRTUAL HALL function is turned on When you turn off the VIRTUAL HALL function the reverb setting will return to whatever it was before you turned on the VIRTUAL HALL function Reverb...

Страница 19: ...en use the br 10 key 4 o and 6 p keys to display OTHER page EN 7 2 Press br 10 key 9 ENTER key 3 Use the br 10 key 4 o and 6 p keys to display Jack 4 Use the br 10 key and keys to select the pedal eff...

Страница 20: ...ou do not perform a br 10 key operation to adjust the tuning the current frequency setting will appear automatically after a few seconds Octave Shift lets you raise or lower the pitch of the keyboard...

Страница 21: ...ck Use a commercially available dynamic microphone Connection of an external device requires commercially available connecting cords supplied by you Connecting cords should have a stereo mini plug on...

Страница 22: ...s too low 4 After the sound you want to sample is finished press cs Sampling will stop Even if you do not press cs sampling will stop automatically whenever there is no more sound being input from the...

Страница 23: ...urn to the screen that was displayed before step 2 of this procedure You can use the following procedure to change the volume level of the looped playback of each sampled sound if you want 1 Press the...

Страница 24: ...to change 3 Hold down cs until the display changes to the screen shown below Applying Effects to a Sampled Sound Effect Type Display Description Original Orgnl Normal sampled tone no looping no effec...

Страница 25: ...microphone Sampling also will stop automatically 10 seconds after it is started 7 Press the keyboard key You can repeat steps 3 through 6 to change other sounds that make up the currently selected dr...

Страница 26: ...down the keyboard key whose sound you want to delete press bo RHYTHM In response to the DelSure message that appears press the br 10 key YES key to delete or NO to cancel the delete operation Deleting...

Страница 27: ...ts when you press a keyboard key in step 4 of the sampling procedure to enter sampling standby and then press cs Normally the Digital Keyboard will stop sampling automatically whenever it detects ther...

Страница 28: ...Editing Sampled Drum Set Sounds on page EN 24 You can use the following procedure to protect each sampled sound against accidental deletion 1 Press bn TONE and then use br 10 key to enter the tone nu...

Страница 29: ...the song sequence 2 To change to another song while demo playback is in progress use br 10 key and keys to enter the song number you want page EN 7 This will cause demo playback to jump to the song wh...

Страница 30: ...me playback from the point where you paused it Skip Forward 1 Press 8 This skips song playback forward to the next measure Each press of 8 skips ahead one measure Holding down 8 skips forward at high...

Страница 31: ...urns to normal playback Changing the song number clears the start measure and end measure of the repeat operation You can use the following procedure to change the speed tempo in order to slow down pl...

Страница 32: ...right hand part or the left hand part of a song during playback and practice playing along with the remaining part 1 Press bl to select the part you want to turn off Each press of bl cycles through t...

Страница 33: ...hand part left hand part and both hand parts for each phrase of a song Master all of the phrases and you master the song 6 67 78 8 bk bk bl bl bp bp bs bsbt btck ckcl clcm cm ct ct br br Phrases Song...

Страница 34: ...ts etc Note that certain phrases will cause Wait to appear instead of Phrase Wait Appears when the lesson starts with an intro or fill in phrase that is not included in the phrases to be practiced Pla...

Страница 35: ...ons provided on the display and by voice fingering guide During this lesson the display shows the key you need to press next Voice fingering guide uses a simulate voice to announce which finger you sh...

Страница 36: ...3 1 Press 6 This disables phrase repeat play Use the following procedure to turn off voice fingering guide which tells you which finger to use to play each note in Lesson 2 and Lesson 3 1 Press ct FU...

Страница 37: ...F setting You can use the following procedure to change the length of lesson phrases or to configure the lesson feature so the song is played all the way through without being divided into phrases 1 P...

Страница 38: ...ss cm or bk You can change the step and phrase during Auto Step Up Lesson using 7 8 and bs to cl Starting Auto Step Up Lesson automatically turns on phrase repeat page EN 34 and play evaluation page E...

Страница 39: ...e on screen key lights appears on the display Unit 0 1 sec The shorter the time the higher your score Pressing a keyboard key before the on screen key goes from flashing to lit will not advance to the...

Страница 40: ...in rhythms including 8 beat and waltz Use the following procedure to play the basic rhythm part 1 Press bo RHYTHM 2 Use br 10 key to select the rhythm number you want See the separate Appendix for in...

Страница 41: ...Accompaniment as soon as a chord is played see Using Synchro Start on page EN 42 You can use the split point to change the size of the accompaniment keyboard range page EN 16 You can select from amon...

Страница 42: ...ompaniment keyboard Accompaniment keyboard Chord Type Example Major Chords Letters above the accompaniment keyboard indicate the chord assigned to each key Pressing a single accompaniment area key in...

Страница 43: ...e A fill in is a short phrase played where you want to change the mood of a piece A fill in pattern can be used to create a link between two melodies or an accent Normal and variation patterns have th...

Страница 44: ...key to change it If you do not perform any operation for a few seconds after the tempo setting screen appears the display will return to the screen displayed before you pressed bm Use the following p...

Страница 45: ...re Arpeggiator types page EN 57 Do not select them when using the Auto Harmonize 4 Press cq to turn on Auto Harmonize If you play chords with your left hand and the melody with your right hand harmony...

Страница 46: ...types To display inverted forms of the chord use br 10 key keys 0 through 4 as shown below 4 After you are finished looking up what you want press cr to exit the Chord Book You can also exit the chord...

Страница 47: ...b send Chorus depth chorus send 1 Select the number of the rhythm you want to edit 2 Press 4 If the Err Mem Full message appears on the display see page EN 68 for information about what you should do...

Страница 48: ...f ct FUNCTION will cycle through the settings shown below from 1 through 6 Use the br 10 key and keys to change the currently selected setting You can play the current settings of the editable part by...

Страница 49: ...e assigned to the keyboard while an Auto Accompaniment editing rhythm edit operation is in progress Saving User Rhythm Data on an External Device See page EN 62 for details about how to transfer sampl...

Страница 50: ...1 1 Second melody setup saved to Setup 1 2 Third melody setup saved to Setup 1 3 Registration Memory Data The following is the complete list of data that is saved to a registration memory setup Tone...

Страница 51: ...ecall 2 Use buttons bt to cm to select the area whose setup you want to recall This will recall the registration memory setup and automatically configure the Digital Keyboard settings accordingly Note...

Страница 52: ...ant to use 5 Start playing Recording starts as soon as you play something on the keyboard You can use Auto Accompaniment while playing If you do Auto Accompaniment also will be recorded 6 To stop reco...

Страница 53: ...ess will cause any data in recorder memory to be deleted A new recording replaces deletes previously recorded contents You can divide a song according to various types of parts instrument left and rig...

Страница 54: ...and stops playback 6 Repeat steps 2 through 5 to record the other tracks 7 After you finish recording all of the tracks press bk This will start playback of the recorded tracks Press bk to stop or re...

Страница 55: ...display Press YES to delete the song or NO to cancel the delete operation This section explains how to play along and record along with one of the Digital Keyboard s built in songs The following oper...

Страница 56: ...back of what you recorded Each press of bk starts and stops playback 9 Press cs twice to exit the recorder mode To delete recorded data After step 2 of the above procedure do hold down cs until the me...

Страница 57: ...se as the root key C to B 5 After you are finished press ct FUNCTION to assign the scale to the keyboard cq cq ct ct br br bo bo bq bqbp bp bn bn Changing the Scale of the Keyboard No Scale name Displ...

Страница 58: ...so those songs sound exactly the way you thought they should See the separate Appendix for a complete list of the 305 Music Presets that are available 1 Press bq 2 Use br 10 key to select the preset n...

Страница 59: ...urn off Arpeggiator The tempo setting of the Arpeggiator is the same as that set for the metronome page EN 13 Use the following procedure when you want an arpeggio pattern to keep playing after you re...

Страница 60: ...mory Performing this procedure also will delete protected sampled sound data page EN 26 It is recommended that you save important data to your computer s hard disk page EN 59 This operation does not d...

Страница 61: ...art up your computer Do not start up the music software on your computer yet 2 After starting up your computer use a commercially available USB cable to connect it to the Digital Keyboard 3 Turn on th...

Страница 62: ...to display MIDI page EN 7 2 Press br 10 key 9 ENTER key 3 Use the br 10 key and keys to change the keyboard channel The navigate channels can be used to display only the notes of a particular channel...

Страница 63: ...u play on its keyboard The local control setting lets you do just that 1 Press ct FUNCTION and then use the br 10 key 4 o and 6 p keys to display MIDI page EN 7 2 Press br 10 key 9 ENTER key 3 Use the...

Страница 64: ...r 5 Download Data Manager and its user s guide to your computer 6 Follow the procedure in the user s guide that you downloaded in step 5 to install and use Data Manager You can download accompaniment...

Страница 65: ...e Digital Keyboard s volume setting Connection requires commercially available connecting cords supplied by you The connecting cords should have a stereo mini plug on one end and a plug that matches t...

Страница 66: ...eyboard key Adjust the volume setting page EN 10 Check if something is plugged into eo on the back of the Digital Keyboard If there is no sampled sound in memory nothing will play if you press a keybo...

Страница 67: ...not indicate malfunction The pitch of the notes does not match other accompanying instruments or sounds strange when played long with other instruments Check and adjust the transpose page EN 18 and tu...

Страница 68: ...ation Music Challenge 20 notes Auto Accompaniment Built in Rhythms 180 User Rhythms Up to 10 Accompaniment Edit Chord Book Function Chord guide Registration 32 4 setups 8 banks Recorder Real time reco...

Страница 69: ...en playing late at night to keep the volume at levels that do not disturb others Other steps you can take when playing late at night are closing the window and using headphones Inputs Outputs USB port...

Страница 70: ...er that has less than eight sampled sounds currently assigned to it page EN 22 Err Mem Full There is not enough memory available for sampling or Auto Accompaniment editing Delete some or all of the fo...

Страница 71: ...O CLASSICS 051 MARY HAD A LITTLE LAMB 052 LE CYGNE FROM LE CARNAVAL DES ANIMAUX 053 JE TE VEUX 054 SONATA op 13 PATH TIQUE 2nd Mov 055 HEIDENR SLEIN 056 AIR FROM SUITE no 3 057 SPRING FROM THE FOUR SE...

Страница 72: ...n chord Unlike Fingered 1 2 and 3 Full Range Chord requires pressing of at least three keys to form a chord Fingering Guide Fingered 1 Fingered 2 Chords 1 With Fingered 2 interpreted as Am7 2 With Fin...

Страница 73: ...m7 M7 m7 b 5 7 b 5 7sus4 add9 madd9 mM7 dim7 69 6 m6 A B b B F G b G G A b A F C C D b D D E b E 2 1 Since the chord input range is limited this model may not support some of the chords shown above 1...

Страница 74: ...locity O 9nH v 1 127 X 9nH v 0 8nH v O 9nH v 1 127 X 9nH v 0 Note ON Note OFF Mode Mode 3 X Mode 3 X Default Messages Altered 0 32 1 6 38 7 10 11 64 Bank select Modulation Data entry Volume Pan Expres...

Страница 75: ...ntee that interference will not occur in a particular installation If this equipment does cause harmful interference to radio or television reception which can be determined by turning the equipment o...

Страница 76: ...ridad separadas Safety Precautions Before trying to use the Digital Keyboard be sure to read the separate Safety Precautions CTK 4400 WK 240 WK 245 English Espa ol This recycle mark indicates that the...

Отзывы: