background image

EN-9

1.

Press 

1

P

 (power).

This turns on power.

• To turn off power, hold down 

1

P

 (power) again.

2.

Try playing something on the keyboard. Use 

2

VOLUME

 to adjust volume.

• If you press 

1

P

 (power) only lightly, the display will 

light up momentarily but power will not turn on. This 

does not indicate malfunction. Press 

1

P

 (power) 

firmly and completely to turn on power.

• Turning off the Digital Keyboard causes most current 

settings to be cleared. The Digital Keyboard will revert 

to initial settings the next time you turn it on.

• Never try to perform any operation while the “Wait...” 

or “Bye” message is on the display. These messages 

indicate that an internal data save operation is being 

performed. Turning off the Digital Keyboard can cause 

Digital Keyboard data to be deleted or become 

corrupted.

• Pressing 

1

P

 (power) to turn off power actually puts the 

Digital Keyboard into a standby state. Minute amounts of 

current continue to flow within the Digital Keyboard in the 

standby state. If you do not plan to use the Digital Keyboard 

for a long time or if there is a lightning storm in your area, 

be sure to unplug the AC adaptor from the power outlet.

If you do not perform any operation on the Digital Keyboard 

for about 30 minutes, power will turn off automatically.

Disabling Auto Power Off

You can disable Auto Power Off to ensure that power is not 

turned off automatically during a concert, etc.

See Function No.70 under “

FUNCTION

 Button (

cs

Functions” (page EN-43).

Using headphones cuts off output from the built-in speakers, 

which means you can practice playing even late at night 

without disturbing others.

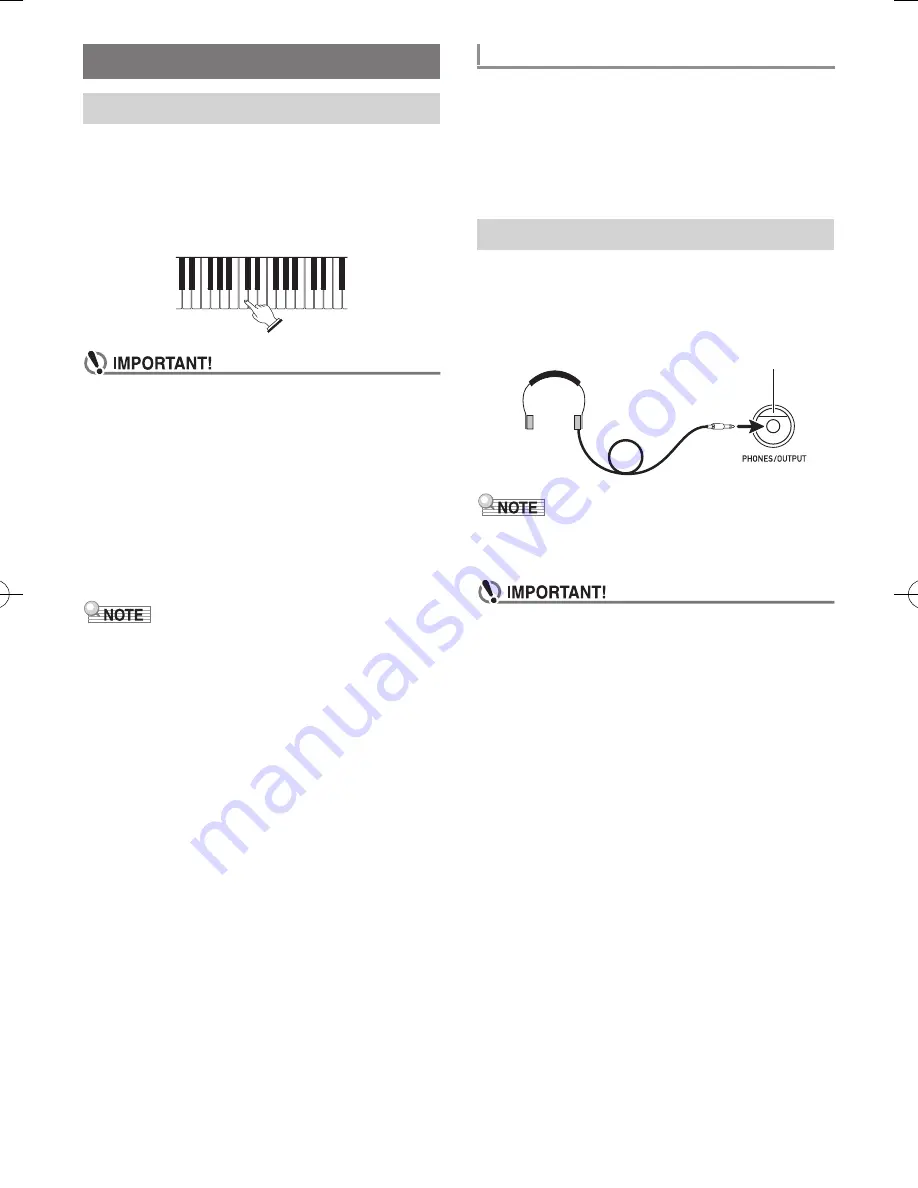
• Be sure to turn down the volume level before connecting 

headphones.

• Headphones do not come with the Digital Keyboard.

• Use commercially available headphones. See page EN-3 

for information about options.

• Do not listen to very high volume output over 

headphones for long period. Doing so creates the risk 

of hearing damage.

• If you are using headphones that require an adaptor 

plug, make sure you do not leave the adaptor plugged 

in when removing the headphones.

Playing the Digital Keyboard

Turning on Power and Playing

Auto Power Off

Using Headphones

ep

PHONES/OUTPUT

 jack

CTX800-ES-1A.indd   11

2017/11/28   10:19:08

Содержание CT-X800

Страница 1: ...l aseg rese de leer las Precauciones de seguridad separadas Guarde toda la informaci n para futuras consultas CT X800 About Music Score data You can use a computer to download music score data from th...

Страница 2: ...receiving antenna Increase the separation between the equipment and receiver Connect the equipment into an outlet on a circuit different from that to which the receiver is connected Consult the dealer...

Страница 3: ...ctice Lesson Phrase EN 24 Lesson Settings EN 25 Using Auto Accompaniment EN 27 Playing the Rhythm Part Only EN 27 Playing All Parts EN 27 Using Auto Accompaniment Effectively EN 30 Using One Touch Pre...

Страница 4: ...ix A 1 Song List A 1 Drum Assignment List A 2 Fingering Guide A 7 Chord Example List A 8 MIDI Implementation Chart Included Accessories Music Stand Leaflets Safety Precautions Appendix Other Warranty...

Страница 5: ...p dl dq dt ds 2 3 bs bt ck cl cm cn co cp cr cs 4 5 6 7 9 8 ct dk dr The following explains the meaning of the symbol that appears on the product console and with the key names below Indicates a funct...

Страница 6: ...EN 22 37 38 bt Area1 LISTEN button EN 23 37 ck Area2 WATCH button EN 23 37 cl Area3 REMEMBER button EN 24 37 cm Area4 PHRASE button EN 24 37 cn STORE button EN 37 co SPLIT POINT button EN 14 cp LAYER...

Страница 7: ...If the NUM indicator is not shown on the display press the 0 number key to display it and then input the value you want Tone rhythm song bank Music Preset indicators Indicators Number setting name st...

Страница 8: ...selected type will be shown on the display You can change the category if you want Tones Rhythms Songs Music Presets 1 Press bo CATEGORY Each press of bo CATEGORY selects the first number of the next...

Страница 9: ...s 9 5V DC terminal Doing so creates the risk of accident Be sure to turn off power before loading batteries It is up to you to prepare six commercially available batteries Do not use oxyride batterie...

Страница 10: ...lan to use the Digital Keyboard for a long time or if there is a lightning storm in your area be sure to unplug the AC adaptor from the power outlet If you do not perform any operation on the Digital...

Страница 11: ...2 o and 3 p keys to display Contrast 4 Use the ct number keys and the dk and keys to adjust display contrast page EN 6 The contrast setting range is 01 to 17 The metronome lets you play and practice...

Страница 12: ...e value 1 Press cr TEMPO TAP to make Tempo appear on the display 2 Use the ct number keys and the dk and keys to change the tempo value Holding down either button changes the value at high speed You c...

Страница 13: ...and organ modes Each press of bk PIANO ORGAN toggles the tone setting between a piano tone Tone Number 001 and an organ tone Tone Number 079 In addition to the tone number you also can configure the s...

Страница 14: ...o move Repeat long pressing of the bl TONE button until the pointer is next to the part you want When you have multiple DSP tones selected the DSP tone effects assigned to the UPPER 2 and LOWER parts...

Страница 15: ...essing co SPLIT again will turn split off If you turn on both layer and split layering will be applied to the right side range of the keyboard only 1 Keep co SPLIT depressed until you finish step 2 of...

Страница 16: ...select the chorus type you want You can select from among chorus types 1 through 11 If you select Setting Number 1 Tone appropriate chorus settings are assigned to each tone The actual effect produce...

Страница 17: ...ances the low range 3 Treble Enhances the high range 4 Loudness Enhances everything 5 Mellow Creates a soft feeling 6 Bright Creates a bright feeling 7 Rock Creates a sound optimized for rock music 8...

Страница 18: ...display Tune 2 Use the ct number keys and the dk and keys to adjust tuning page EN 6 You can use the number keys to input the integer part left of the decimal point of the value only Use the and keys...

Страница 19: ...on No 58 under FUNCTION Button cs Functions page EN 43 With this Digital Keyboard tune data is referred to as songs You can listen to the built in songs for your own enjoyment or you can play along wi...

Страница 20: ...ou can cancel song repeat by pressing 3 REPEAT Use the operations in this section to perform pause skip forward and skip back operations Pause 1 Press 7kPAUSE This pauses song playback 2 Press 7kPAUSE...

Страница 21: ...want to specify as the start measure press 4A B This specifies the measure as the start measure 3 When playback reaches the measure you want to select as the end measure press 4A B again This specifi...

Страница 22: ...e EN 54 directly from a USB flash drive Whenever you copy a file to the USB flash drive that you plan to play on the Digital Keyboard be sure to store the file in the MUSICDAT folder on the USB flash...

Страница 23: ...ong s tone name The same tone used for song playback will be assigned to the keyboard page EN 21 You can repeat specific sections of a song for practice See Repeating Playback of Specific Measures pag...

Страница 24: ...h the instructions provided on the display and by voice fingering guide During this lesson the display shows the key you need to press next Voice fingering guide uses a simulate voice to announce whic...

Страница 25: ...r them The built in songs are pre divided into phrases to help you master keyboard play The Digital Keyboard may not be able to divide a song imported from an external device page EN 21 into phrases t...

Страница 26: ...etting Use the following procedure to turn off note guide which sounds the note to be played next in Lesson 2 and Lesson 3 1 Press cs FUNCTION and then use the ct 2 o and 3 p keys to display Lesson 2...

Страница 27: ...select a phrase length setting Simplifying accompaniment helps to make the lesson sound easier to hear See Function No 42 under FUNCTION Button cs Functions page EN 43 The part channel provides part...

Страница 28: ...individual rhythms Use the number keys to enter the rhythm number Specify three digits for the rhythm number Example To select 001 enter 0 3 0 3 1 To jump to the top rhythm of a category first make s...

Страница 29: ...hords with left hand as you play the melody with your right hand 5 Pressing 9 ACCOMP again returns to rhythm only accompaniment You can select from among the following six chord input modes CASIO CHOR...

Страница 30: ...de will play the major chord whose name is marked above the key All of the accompaniment area keys that are marked with the same chord name play exactly the same chord Example C C Major Minor Chords T...

Страница 31: ...as well as a variation pattern 1 Press 5VAR FILL IN This starts the variation pattern 2 Pressing 4NORMAL FILL IN returns to normal pattern Chord Type Minor Chords To play a minor chord press the acco...

Страница 32: ...link between two melodies or an accent Normal and variation patterns have their own unique fill in patterns Normal Pattern Fill in 1 While a normal pattern is playing press 4NORMAL FILL IN This plays...

Страница 33: ...eyboard and the volume of the Auto Accompaniment See Function No 8 under FUNCTION Button cs Functions page EN 43 With One Touch Preset the Digital Keyboard automatically configures optimal tone tempo...

Страница 34: ...gory you want 4 Play along on the keyboard with the accompaniment To stop Auto Accompaniment press 8 START STOP or 6 ENDING SYNCHRO START To exit Music Preset press 9 ACCOMP However the tone and rhyth...

Страница 35: ...eys to display Arp Type 4 Use the dk and keys to select the Arpeggiator type you want For details about arpeggio types refer to the separate Appendix Type number Type Name Description 01 Duet 1 Adds c...

Страница 36: ...Book to look up chords that you do not know how to play Specifying root chord type and inversion settings causes the chord form to appear on the display and sounds the chord You can also sound Auto A...

Страница 37: ...to specify the root note and chord type When playing a chord form make sure that it fits within the accompaniment keyboard range Use an inverted chord form if necessary This causes the N indicator to...

Страница 38: ...o start Reverb on off type Chorus on off type Accomp on off Arpeggiator hold on off Layer on off Split on off Pedal effect Preset Scales Pitch Bend range tone part on off 1 Press bm RHYTHM 2 Configure...

Страница 39: ...e of the Area buttons 1 to 4 normally causes the applicable Digital Keyboard settings to be overwritten by the recalled settings With the Freeze you can disable overwriting of specific setting items w...

Страница 40: ...0 notes per song 5 To stop recording press bp RECORD STOP 6 To play back what you have recorded press 8 PLAY STOP Each press of 8 PLAY STOP starts and stops playback Turning off the Digital Keyboard w...

Страница 41: ...ck press bp RECORD STOP and then start playing 6 To stop recording press bp RECORD STOP To play back what you have recorded press 8 PLAY STOP Each press of 8 PLAY STOP starts and stops playback 7 Repe...

Страница 42: ...ck of a previously recorded track and record new keyboard play along with it press 8 PLAY STOP and then play along with the playback This section explains how to play along and record along with one o...

Страница 43: ...down bp RECORD STOP 4 Use the ct 2 o and 3 p keys to select Song Clr 5 Press the ct 6 ENTER key This causes Sure to appear on the display 6 Press the dk YES key This deletes the song To cancel press...

Страница 44: ...setting screen This causes the FUNCTION indicator to disappear from the display FUNCTION Button cs Functions To select a function No Function Display Setting Range Default See Page 1 Transpose Trans...

Страница 45: ...f EN 38 37 Lesson Lesson EN 25 38 Voice Fingering Guide Speak On Off On EN 25 39 Next Note Guide NoteGuid On Off On EN 25 40 Performance Evaluation Scoring On Off On EN 26 41 Phrase Length PhraseLn 1...

Страница 46: ...On EN 18 61 Tone Part Upper 2 Pitch Bend U2Enable On Off On EN 18 62 Tone Part Lower Pitch Bend L Enable On Off On EN 18 63 Tap Rhythm Start Tap Rhy On Off Off EN 11 64 Right hand Melody Part Channel...

Страница 47: ...s to display AcompScl 4 Use the dk key to select on You can control the type of on screen keyboard that appears on the display See Function No 68 under FUNCTION Button cs Functions page EN 43 Changing...

Страница 48: ...ey 3 Use the ct 2 o and 3 p keys to display Reset 4 Press the ct 6 ENTER key 5 Use the ct 2 o or 3 p key to display Factory 6 Press the ct 6 ENTER key This displays a delete confirmation message 7 Pre...

Страница 49: ...m your hand or from a USB flash drive can cause malfunction of the Digital Keyboard If this happens turn the Digital Keyboard off and then back on again USB Flash Drive Data Type Display Supported Ope...

Страница 50: ...SB flash drive straight out Be sure to format a USB flash drive on the Digital Keyboard before using it for the first time Before formatting a USB flash drive make sure it does not have any valuable d...

Страница 51: ...while this message is on the display Complete appears on the display after data import is complete To cancel the import operation press the dk NO key Digital Keyboard memory data can be saved to a US...

Страница 52: ...is message is on the display Complete appears on the display after data delete is complete To cancel the delete operation press the dk NO key 1 Insert the USB flash drive into the Digital Keyboard s U...

Страница 53: ...shows the minimum computer system requirements for sending and receiving MIDI data Check to make sure that your computer complies with these requirements before connecting the Digital Keyboard to it...

Страница 54: ...nnel to be used when keyboard performance information is sent from this Digital Keyboard to a computer For details about how to configure this setting see FUNCTION Button cs Functions page EN 43 This...

Страница 55: ...ntroduction page of this product If you cannot find such a link use the search form of the area site where you are located to enter the model name of this product and search for it Note that site cont...

Страница 56: ...on of the external device on the other end Turn off the Digital Keyboard when making connections After connecting turn down the Digital Keyboard and external device volume levels whenever turning powe...

Страница 57: ...s when I press any keyboard key Adjust the volume setting page EN 9 Check if something is plugged into en on the back of the Digital Keyboard Turn power off and then back on to initialize all keyboard...

Страница 58: ...tch other accompanying instruments or sounds strange when played long with other instruments Check and adjust the transpose page EN 17 and tuning settings page EN 17 Turn power off and then back on to...

Страница 59: ...only file with the same name you are trying to use is already stored on USB flash drive Change the name and then save the new data Remove the read only attribute from the existing USB flash drive file...

Страница 60: ...unction Chord guide Registration 32 4 setups 8 banks Recorder Real time recording playback Keyboard Play 5 songs 6 tracks Playing Along with a Built in Songs 1 song L R LR Memory Capacity Approximatel...

Страница 61: ...y 200mV Power Jack DC9 5V Power Supply 2 way Batteries 6 AA size alkaline batteries Battery Life Approximately 3 hours continuous operation on alkaline batteries AC Adaptor AD E95100L Auto Power Off A...

Страница 62: ...n a weak solution of water and a mild neutral detergent Wring all excess moisture from the cloth before wiping Included and Optional Accessories Use only accessories that are specified for use with th...

Страница 63: ...PATH TIQUE 2nd Mov 055 HEIDENR SLEIN 056 AIR FROM SUITE no 3 057 SPRING FROM THE FOUR SEASONS 058 HABANERA FROM CARMEN 059 BRINDISI FROM LA TRAVIATA 060 HUNGARIAN DANCES no 5 061 MINUET IN G MAJOR 06...

Страница 64: ...ick 2 Standard4 Kick 1 Standard2 Side Stick Standard4 Snare 1 Standard4 Snare 2 Standard3 Low Tom 2 Standard4 Closed Hi Hat Standard3 Low Tom 1 Standard4 Pedal Hi Hat Standard3 Mid Tom 2 Standard4 Ope...

Страница 65: ...2 Standard3 Ride Cymbal 2 Dance5 SFX Sound 1 Dance5 SFX Sound 2 Dance5 SFX Sound 3 Dance5 SFX Sound 4 Dance5 SFX Sound 5 Dance5 SFX Sound 6 Dance5 SFX Sound 7 Dance5 SFX Sound 8 Dance5 SFX Sound 9 Dan...

Страница 66: ...Cymbal 1 Standard3 Chinese Cymbal Standard3 Ride Bell Standard3 Splash Cymbal Standard3 Crash Cymbal 2 DM3 Kick 4 DM3 Kick 3 DM3 Hand Clap 2 DM3 Snare 3 DM3 Snare 4 DM3 Snare 5 DM3 Low Tom 4 DM3 Close...

Страница 67: ...om Mridangam Dhi Mridangam Dhin Mridangam Num Bhangra Aha Bhangra Ashke Bhangra Chakde Bhangra Hoye Bhangra Oho Bhangra Oh Balle Bhangra Oh Shava Nagada Rim 1 Nagada Rim 2 Duff Close Duff Open Duffli...

Страница 68: ...Cymbal 2 Standard1 Closed Hi Hat Standard1 Pedal Hi Hat Standard1 Open Hi Hat Standard1 Crash Cymbal 1 Standard1 Ride Cymbal 1 Standard1 Chinese Cymbal Standard1 Ride Bell Standard1 Splash Cymbal Sta...

Страница 69: ...cuentre a cierta distancia de la nota adyacente el acorde se interpreta como un acorde quit ndola A diferencia de FINGERED 1 2 y FINGERED ON BASS FULL RANGE CHORD se requiere la pulsaci n de tres tecl...

Страница 70: ...madd9 mM7 dim7 69 6 m6 A B b B F G b G G A b A F C C D b D D E b E 2 1 You can use the split point to change the size of the accompaniment keyboard range page EN 14 1 Root 2 Chord Type Puede usar el...

Страница 71: ...6 7 7 8 8 9 9 bs bs bt bt ck ck cl cl cm cm cn cn co co cp cp cr cr cs cs dk dk 3 3 Cut this page along the dashed line so you can have it on hand as you read the contents of the manual Recorte esta p...

Страница 72: ...0 O 9nH v 1 127 O 8nH v 0 127 Note ON Note OFF Mode Mode 3 X Mode 3 X Default Messages Altered 0 1 5 6 38 7 10 11 64 65 66 67 71 72 73 Bank select Modulation Portamento Time Data entry LSB MSB Volume...

Страница 73: ...l Delay send level RPN LSB MSB Mode 1 OMNI ON POLY Mode 3 OMNI OFF POLY Mode 2 OMNI ON MONO Mode 4 OMNI OFF MONO O Yes X No X X X X X X X X X X 4 4 4 4 2 4 O O O O O O O O O O 2 2 O 2 1 Depends on ton...

Страница 74: ...s that the packaging conforms to the environmental protection legislation in Germany Esta marca de reciclaje indica que el empaquetado se ajusta a la legislaci n de protecci n ambiental en Alemania MA...

Отзывы: