— 8 —
• Power supplied by memory back up battery while the main power supply batteries are removed for
replacement retains memory contents.
• Do not leave the unit without main power supply batteries loaded for long periods. Doing so can cause
deletion of data stored in memory.
• If the figures on the display appear too light and hard to see after you turn on power, adjust the tint.
• To replace the memory back up battery
* Before replacing the memory back up battery, turn on the unit and check to see if the “Low battery!”
message appears on the display. If it does, replace the main power supply batteries before replacing the
back up power supply battery.
* Never remove the main power supply and the memory back up batteries from the unit at the same time.
* Be sure to replace the back up power supply battery at least once 2 years, regardless of how much you
use the unit during that time. Failure to do so can cause data in memory to be deleted.
1. Press
SHIFT
OFF
to turn the calculator off.
Warning!
* Be sure to turn the unit off before replacing batteries. Replacing batteries with power on will cause data
in memory to be deleted.
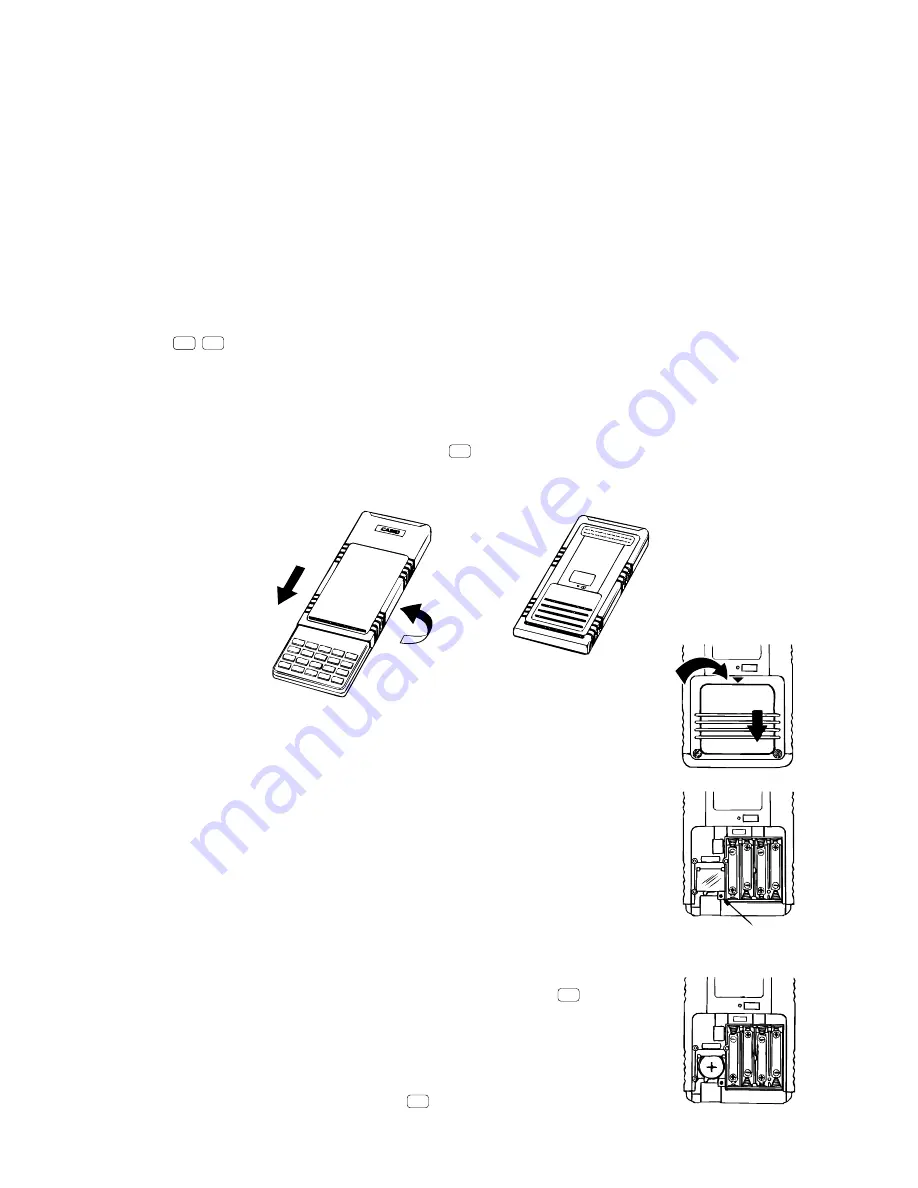
2. Making sure that you do not accidently press the
AC/ON
key, slide the case onto the calculator and then turn
the calculator over.
3. Remove the back cover from the calculator by pressing it in the direction indicated
by arrow
1
, and then sliding it in the direction indicated by arrow
2
.
4. Remove screw
A
on the back of the calculator, and remove the back up battery
compartment cover.
5. Remove the old battery.
6. Wipe off the surfaces of a new battery with a soft, dry cloth. Load it into the
calculator so that its positive
+
side is facing up.
7. Install the memory protection battery cover onto the calculator and secure it in
place with the screw. Next, replace the back cover.
8. Turn the calculator front side up and slide off its case. Next press
AC/ON
to turn on
power.
About the Auto Power Off Function
The calculator turns power off automatically if you do not perform any key operation
for about 6 minutes. To restore power, press
AC/ON
.
P
P
P
MAIN
MAIN
1
2
A
Содержание CFX-9850G PLUS
Страница 1: ...R MAY 1997 CFX 9850G PLUS without price CFX 9850G PLUS ZX 935A ...
Страница 25: ... 25 Main Block 1 11 SCHEMATIC DIAGRAMS ROM ...
Страница 26: ... 26 Main Block 2 ...
Страница 27: ... 27 Key Block To Main Block 1 ...
Страница 30: ...23 25 24 22 20 19 21 18 17 4 6 7 LSI6 LSI5 30 13 EXPLODED VIEW 2 2 ...
Страница 31: ...MA0500671A ...


