


— 3 —
To configure Home Site data
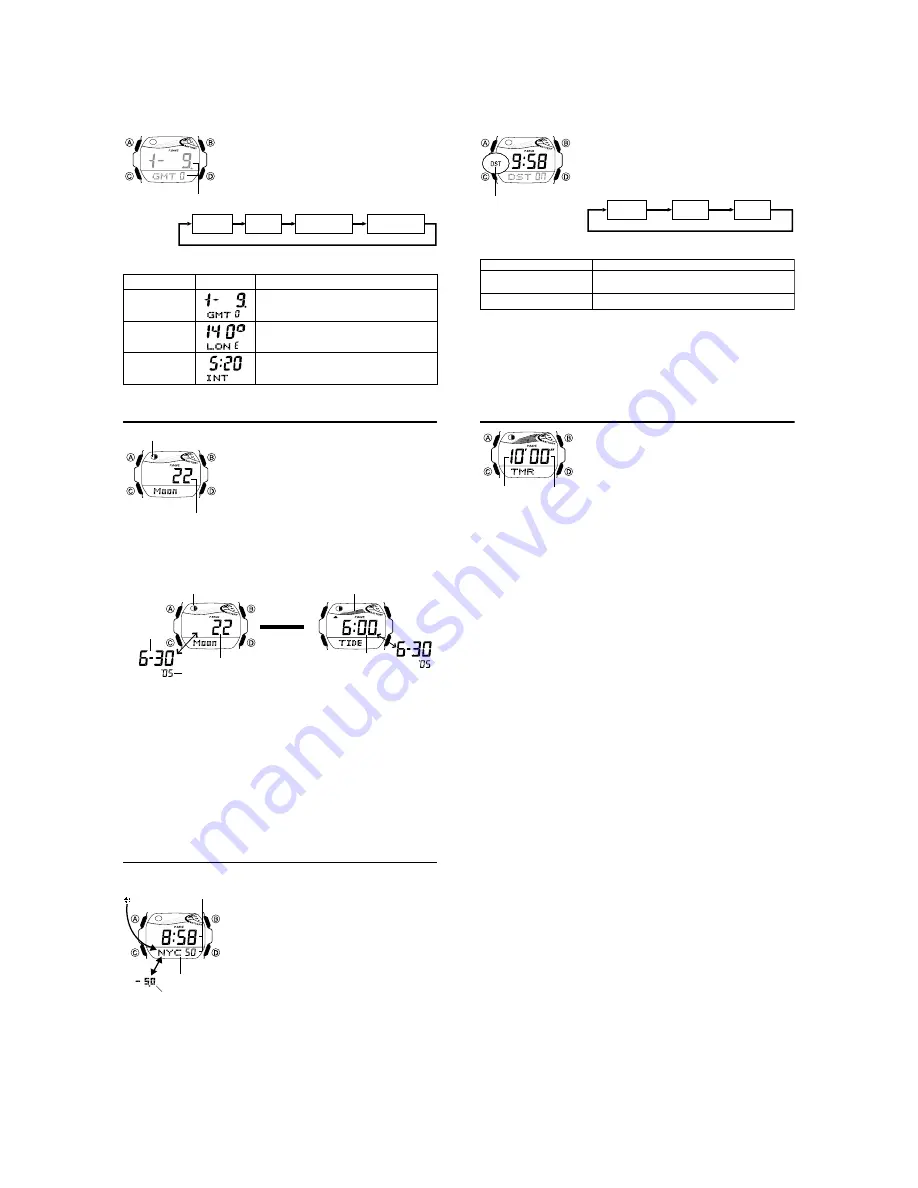
1. In the Timekeeping Mode, hold down
A
until the
seconds start to flash, which indicates the setting
screen.
2. Press
A
again to display the GMT differential setting
screen.
3. Press
C
to move the flashing in the sequence shown
below to select other settings.
Lunitidal Interval
Hours
Lunitidal Interval
Minutes
Longitude
GMT
differential
4. When the setting you want to change is flashing, use
D
and
B
to change it as
described below.
l
l l
l l
l
l
ll
l
ll
ll
ll
ll
l
l
l
l l
l
l l l l l
GMT differential
Setting
GMT differential
Longitude
Lunitidal Interval
Hours, Minutes
Screen
Button Operations
Use
D
(+) and
B
(–) to change the setting.
•
You can specify a value in the range of –11.0
to +14.0, in 0.5-hour unit.
Use
D
(+) and
B
(–) to change the setting.
•
You can specify a value in the range of
179
°
W to 180
°
E, in 1-degree units.
Use
D
(+) and
B
(–) to change the setting.
5. Press
A
to exit the setting screen.
Moon/Tide Data
Moon/tide data lets you view the Moon age and Moon
phase for a particular date, and tidal movements for a
particular date and time for the Home Site.
•
If you suspect that the Moon/tide data is not correct for
some reason, check the Timekeeping Mode data
(current time, date, and Home Site settings), and make
changes as required.
•
See “Moon Phase Indicator” for information about the
Moon phase indicator and “Tide Graph” for information
about the tide graph.
•
All of the operations in this section are performed in the
Moon/Tide Data Mode, which you enter by pressing
C
.
Moon phase indicator
Moon age
Moon/Tide Data Screens
Each press of
A
in the Moon/Tide Data Mode toggles between the Moon Data
screen and the Tide Data screen.
•
When you enter the Moon/Tide Data Mode, the data that appears first is the Moon
data (Moon age and Moon phase indicator) for the current date as kept by the
Timekeeping Mode.
Press
A
.
Tide Data Screen
Moon Data Screen
Tide graph
Time
Moon age
Moon phase indicator
▲
▲
Month – Day
Year
To view the Moon data for a particular date
While the Moon Data screen is displayed in the Moon/Tide Data Mode, use
D
(+) to
display the date whose Moon data you want to view.
•
You can select any date starting from the date currently indicated in the Timekeeping
Mode, up to the year 2039. Display of past Moon data and tide data is not supported.
To view tide data for a particular time
1. While the Moon Data screen is displayed in the Moon/Tide Data Mode, use
D
(+)
to display the date whose tide data you want to view.
2. Press
A
to switch to the Tide Data screen.
•
The initial screen shows the tide graph for 6:00 AM.
3. Specify the time for which you want to display tide data.
•
Use
D
(+) to change the time in one-hour steps.
World Time
The World Time shows the current time in 27 cities (29
time zones) around the world.
•
The time settings of the Timekeeping Mode and the
World Time Mode are independent from each other, so
you must make separate settings for each.
•
Whenever you change the time setting for any city in the
World Time Mode, the settings of all other cities are
changed accordingly.
•
For full information on city codes, see the “City Code
Table”.
•
All of the operations in this section are performed in the
World Time Mode, which you enter by pressing
C
.
Current time in
the selected city
code
City code
WT
GMT differential
To view the time in another city code
In the World Time Mode, press
D
to scroll through city codes (time zones).
To set the current time in the World Time Mode
1. In the World Time Mode, use
D
to select the city code
whose time you want to set.
2. After you select a city code, hold down
A
until the DST
on/off setting of the world time starts to flash, which
indicates the setting screen.
3. Use
C
to move the flashing in the sequence shown
below to select other settings.
l l lll
ll
ll
ll
ll
lll
l l l l l l l
DST indicator
Hour
DST on/off
Minutes
4. When the setting you want to change is flashing, use
B
and
D
to change it as
described below.
•
When setting the world time using the 12-hour format, take care to set the time
correctly as a.m. (no indicator) or p.m. (P indicator).
5. Press
A
to exit the setting screen.
• Note that you cannot switch between Standard Time and Daylight Saving Time while
GM
T
is selected as the city code.
• Note that the DST/Standard Time setting affects only the currently displayed city
code. Other city codes are not affected.
• The DST indicator is on the display whenever you display a city code for which
Daylight Saving Time is turned on.
To change this setting
DST on/off
Hour, Minutes
Perform this button operation
Press
D
to toggle between Daylight Saving Time
(
ON
) and standard time (
OF
).
Use
D
(+) and
B
(–) to change the setting.
Countdown Timer
The countdown timer can be set within a range of one
minute to 60 minutes. An alarm sounds when the
countdown reaches zero. The countdown timer has two
modes: auto-repeat and elapsed time, and a progress
beeper signals the progress of the countdown. All of this
makes the countdown timer a valuable tool for timing the
start of a surfing or a yacht race.
•
All of the operations in this section are performed in the
Countdown Timer Mode, which you enter by pressing
C
.
Configuring the Countdown Timer
The following are the settings you should configure before actually using the
countdown timer.
Countdown start time and reset time
Timer mode (auto-repeat, elapsed time)
Progress beeper on/off
Minutes
Seconds
•
See “To configure the countdown timer” for information about setting up the timer.
Reset Time
You can specify any point between the countdown start time and the end of the
countdown as the “reset time”. Then while a countdown operation is in progress, you
can press a button to jump to the reset time and resume the countdown from there.
Timer Mode
The countdown timer gives you a choice of two modes: auto-repeat and elapsed time.
Auto-repeat
The auto-repeat mode automatically restarts the countdown from the countdown start
time you set whenever zero is reached.
•
The auto-repeat mode is best when timing the starts of match races.
•
Even if you start a countdown operation from the reset time, the countdown
automatically restarts from the countdown start time whenever it reaches zero.
•
Auto repeat timing repeats up to seven times.
Elapsed Time
When the end of the countdown is reached in the elapsed time mode, the timer
automatically switches to an elapsed time measurement operation.
•
The elapsed time mode is best when timing the speed of yachts during ocean races.
•
The elapsed time operation is performed in one-second increments up to 99 hours,
59 minutes, 59 seconds.
Countdown Timer Beeper Operations
The watch beeps at various times during a countdown so you can keep informed
about the countdown status without looking at the display. The following describes the
types of beeper operations the watch performs during a countdown.
Countdown End Beeper
The watch emits a short beep each second of the final 10 seconds at the end of a
countdown, and a long beep when the countdown reaches zero.
•
The countdown end beeper always sounds, regardless of the on/off status of the
progress beeper.
Progress Beeper
The progress beeper actually includes two beepers: a reset time beeper and a reset
period progress beeper.
•
The reset time beeper and reset period progress beeper sound only while the
progress beeper is turned on.
Reset Time Beeper
The reset time beeper is similar to the countdown end beeper. When the progress
beeper is turned on, the watch beeps each second of the final 10 seconds before the
countdown reaches the reset time.
Reset Period Progress Beeper
The reset period is the portion of the countdown between the reset time and zero.
When the progress beeper is turned on, the watch emits four short beeps at the top of
each minute during the reset period, and 30 seconds before the end of the
countdown.