


- 6 -
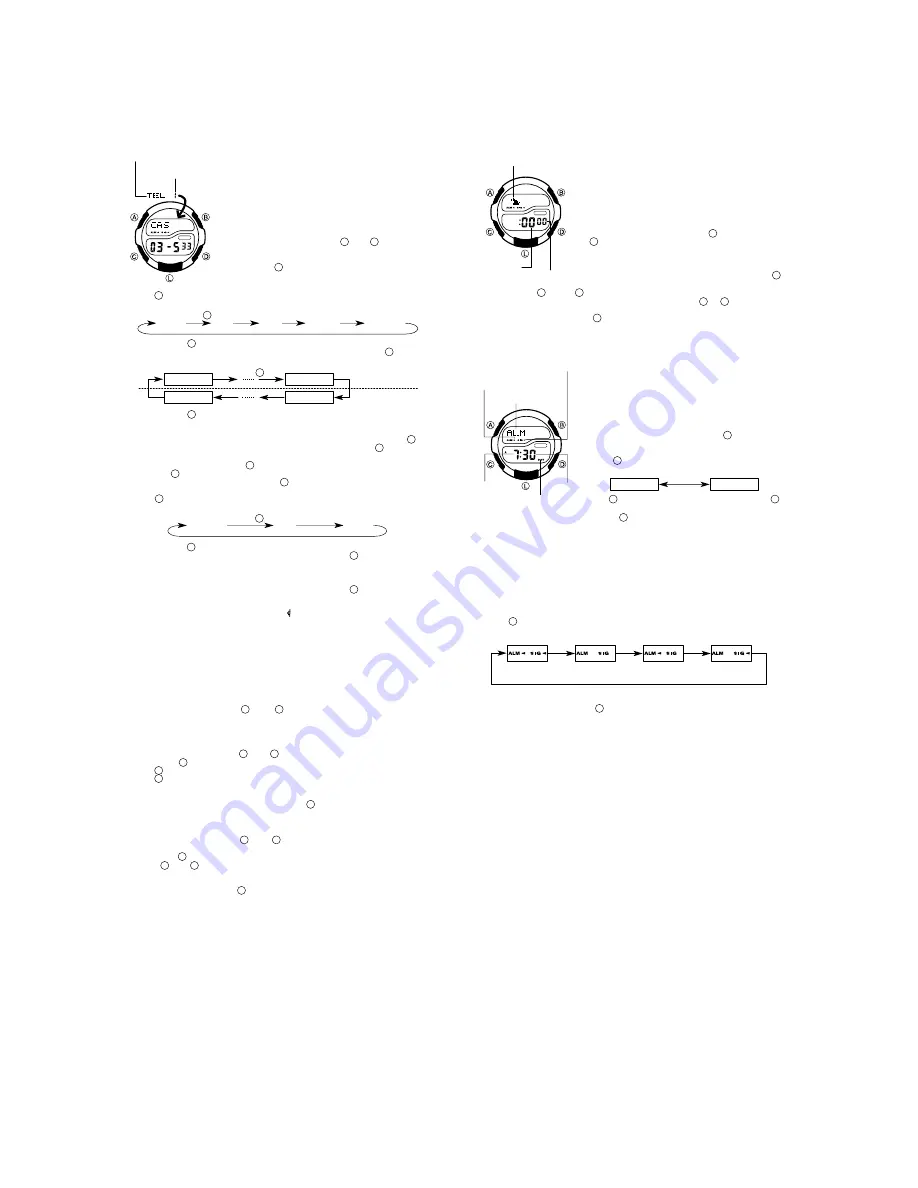
TELEMEMO MODE
The Telememo Mode lets you store up to 10 records, each
with a name (up to eight characters) and a phone number
(up to 12 digits). You can recall records by scrolling through
them on the display.
The page number on the display when you exit the Tele-
memo Mode appears first the next time you enter the
Telememo Mode.
To input a new Telememo record
1. In the Telememo Mode, press
(+) or
(–) to display
the page number of the record where you want to input
data.
2. Hold down
and a cursor appears on the text area.
3. Use
to scroll through characters at the current cursor position. Characters scroll
in the sequence shown below.
Press .
(Space)
A to Z
0 to 9
. (Period)
- (Hyphen)
Holding down
scrolls at high speed.
4. When the character you want is at the current cursor position, press
to move
the cursor to the right.
Press .
1st digit
8th digit
12th digit
1st digit
Text area
Number area
Holding down
to move the cursor at high speed.
5. Repeat the steps 3 and 4 to input the rest of the characters.
You can input up to eight characters for the name, though only three characters are
visible at a time. If the name you input has fewer than eight characters, use
to
move the cursor to the eighth space (which means you would press
three times
after inputting a five-character name).
6. After you input the name, use
to move the cursor to the number area.
Pressing
while the cursor is located at the eighth character of the text area
advances to the number area. Pressing
while the cursor is located at the 12th
digit of the number area returns to the text area.
7. Use
to scroll through characters (hyphen, numbers, space) at the current cur-
sor position on the number area. Characters scroll in the sequence shown below.
Press .
(Space)
0 to 9
- (Hyphen)
Holding down
scrolls characters at high speed.
8. When the character you want is at the cursor position, press
to move the cursor
to the right.
9. Repeat steps 7 and 8 to input the rest of the numbers you want.
You can input up to 12 digits for the number.
10. After inputting the name and number of the record, press
to store it and exit
the setting screen.
The display can show only three name characters at a time. Longer names scrolls
continuously from right to left. The symbol “ ” indicates that the character to the left
is the last, and the character to the right is the first.
The number area can show up to six digits at one time. If a number has more than
six digits, the display automatically switched between the first six digits (counting
forward from the first digit) and the last six digits (counting backward from the last
digit) of the number. This means that if a number is 12 digits long, the number area
switches between the first six digits and the last six digits. If a number is seven
digits long, the number area switches between digits 1 through 6, and digits 2 through
7.
To recall Telememo data
In the Telememo Mode, press
(+) or
(–) to scroll forward through the stored
records.
Holding down either button scrolls at high speed.
To edit Telememo data items
1. In the Telememo Mode, use
(+) or
(–) to display the data you want to edit.
2. Hold down
until the cursor appears in the display.
3. Use
to move the cursor to the character you want to change.
4. Use
to change the character.
See step 3 of “To input a new Telememo record” for information on inputting name
characters, and step 7 for inputting number characters.
5. After making the changes that you want, press
to store them and exit the set-
ting screen.
To delete a Telememo record
1. In the Telememo Mode, use
(+) or
(–) to display the record you want to de-
lete.
2. Hold down
until the cursor appears in the display.
3. Press
and
at the same time. The message “CLR” appears in the display,
indicating that the record was deleted.
After the record is deleted, the cursor appears in the text area, ready for input.
4. Input a new record or press
to exit the setting screen.
Minutes
Seconds
Mode indicator
Mode indicator
Hour
Minutes
DST on indicator
Alarm on indicator
Hourly time signal on
indicator
EASY TIMER MODE
The Easy Timer Mode lets you quickly and easily set a
countdown timer within the range of 1 to 60 minutes. When
the end of the countdown is reached, an alarm sounds for
10 seconds, or until you press any button on the watch.
When the alarm stops, the countdown start time is cleared
automatically.
Using the Easy Timer
1. In the Easy Timer Mode, use
(+1 minute) and
(–1 minute) to change the start time setting. Holding
down either button changes the start time at high speed.
2. Release the button, and the countdown starts automati-
cally in about one second.
If you want to set the starting time to [ :60 00], press
while [ :00 00] is on the display in the Easy Timer Mode.
You can use
(+) and
(–) to change the start time setting while a countdown is
in progress. The seconds count is unchanged by pressing
or
.
3. An alarm sounds for about 10 seconds when the end of the countdown is reached.
To stop a countdown, press
. This also resets the countdown time to [ :00 00].
ALARM MODE
When the Daily Alarm is turned on, the alarm sounds for
20 seconds at the preset time each day. Press any button
to stop the alarm after it starts to sound. When the Hourly
Time Signal is turned on, the watch beeps every hour on
the hour.
To set the alarm time
1. While in the Alarm Mode, hold down
until the hour
digits flash on the display, indicating the setting screen.
At this time, the alarm is turned on automatically.
2. Press
to move the flashing in the sequence shown
below.
Hour
Minutes
3. Use
to increase the setting. Holding down
changes the setting at high speed.
4. After you set the alarm time, press
to exit the setting screen.
The format (12-hour and 24-hour) of the alarm time matches the format you select
in the Timekeeping Mode.
When setting the alarm time using the 12-hour format, take care to set the time
correctly as morning or afternoon.
If the DST on indicator is on the display, that indicate the DST on/off setting of the
Timekeeping Mode is on.
To stop the alarm
Press any button to stop the alarm after it starts to sound.
To turn the Daily Alarm or the Hourly Time Signal on and off
Press
while in the Alarm Mode to change the status of the Daily Alarm and Hourly
Time Signal in the following sequence.
Hourly Time
Signal only
Daily Alarm
only
Both OFF
Both ON
To test the alarm
In the Alarm Mode, hold down
to sound the alarm.
Mode indicator
Page number
C
C
C
C
C
C
C
C
C
C
C
D
D
D
D
D
D
D
D
D
D
D
D
D
D
B
B
B
B
B
B
D
D
B
D
B
D
B
B
A
A
A
A
A
A
A
A
A
•
•
•
•
•
•
•
•
•
•
•
•
•
•
•
•
•
•
•