


Operation Guide 4706
1
MA090
4
-EA
Thank you for purchasing this CASIO watch. To ensure that it can provide you with the years of service for which it is designed, be sure to read this manual carefully and
follow the instructions contained herein. Pay particular attention to the precautions at the end of this manual text.
Your watch may differ somewhat from the one shown in the illustration.
•
Modes and Indicators
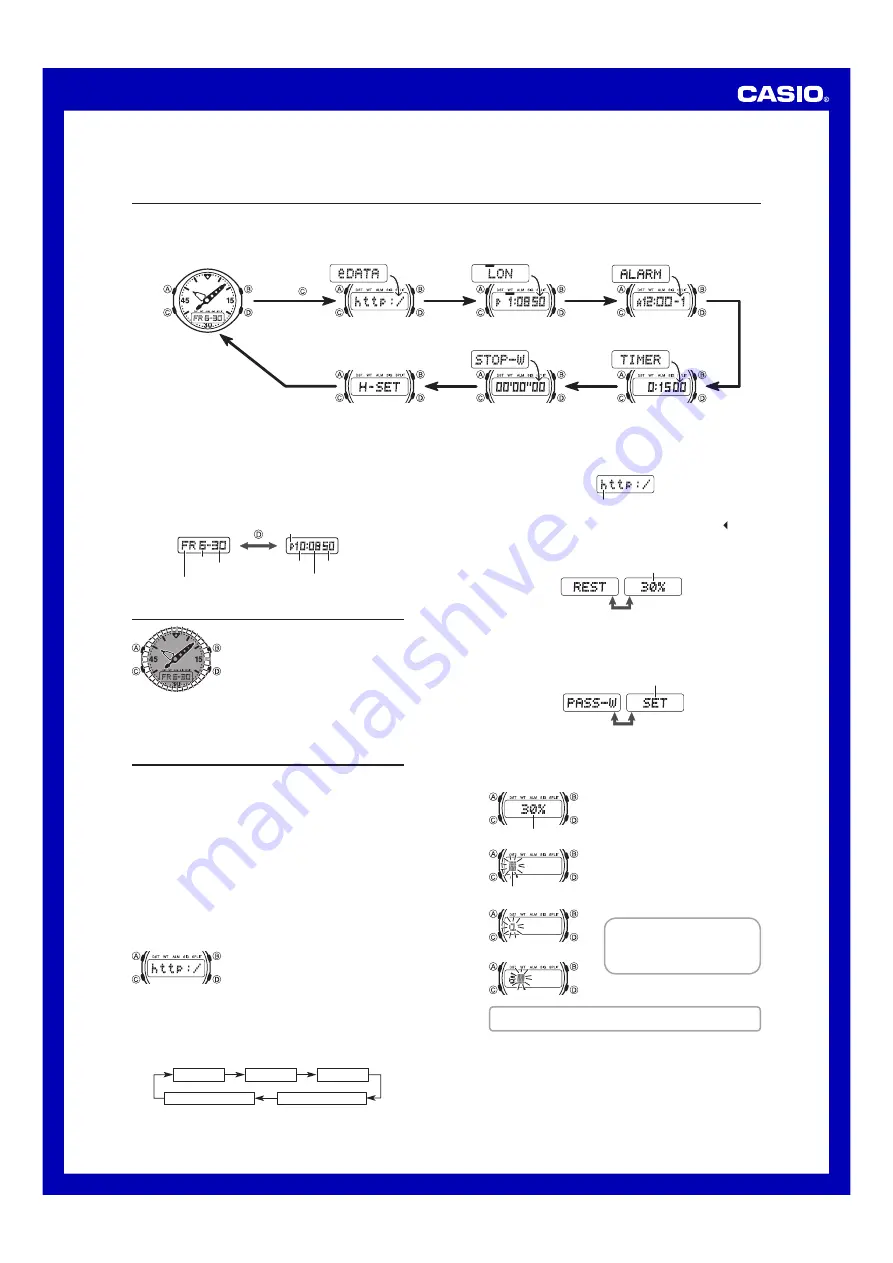
Selecting a Mode
Each press of
C
sounds a confirmation tone and cycles through available modes in the sequence shown below.
The watch will revert to normal timekeeping automatically if you leave it in the e-DATA MEMORY Mode without performing any operation for about two or three minutes.
•
4IMEKEEPING-ODE
E$!4!-%-/29-ODE
7ORLD4IME-ODE
!LARM-ODE
#OUNTDOWN4IMER-ODE
3TOPWATCH-ODE
(AND!DJUSTMENT-ODE
0RESS
,IGHT
$ISPLAY
SWITCHING
-ODE
SWITCHING
Days of the Week
SU: Sunday, MO: Monday, TU: Tuesday, WE: Wednesday, TH: Thursday,
FR: Friday, SA: Saturday
Switching between Display Screens
In the Timekeeping Mode, each press of
D
toggles the digital display
contents as shown below.
#ALENDAR3CREEN
4IMEKEEPING-ODE
'D\RIWKHZHHN
30LQGLFDWRU$IRU$0
0RQWK
'D\
0LQXWH
6HFRQG
+RXU
Illumination
Pressing
B
in any mode (except when a
setting screen with a flashing setting is on
the display) illuminates the face of the watch
for about two seconds for easy reading in
the dark.
Important!
Illumination may be difficult to see under
•
bright sunlight.
If you press any button besides
•
B
, or if an alarm or other beeper
operation starts while the face is illuminated, illumination will turn off.
Using e-DATA MEMORY
Use
C
to enter the e-DATA MEMORY Mode.
You can use the e-DATA MEMORY Mode to store e-mail addresses, Web
site URLs, and other information for instant recall whenever you need it.
The maximum number of records that can be stored depends on the
•
number of characters contained in each record.
If each record contains 63 characters, you can store up to five records.
•
Note that 63 is the maximum number of characters allowed in one
record.
If each record contains seven characters, you can store up to 40
•
records. Note that 40 is the maximum number of records, even if each
record contains fewer than seven characters.
When you enter the e-DATA MEMORY Mode, the record displayed
•
when you last exited the mode appears first.
If you password protect your data, a password input screen will appear
•
first whenever you enter the e-DATA MEMORY Mode. In this case, data
will not be viewable unless the correct password is entered first.
See “Using a Password to Protect Data” for information about password
•
protection of data.
To search for e-DATA MEMORY data
In the e-DATA MEMORY Mode, press
D
to
scroll through the data record-by-record.
Holding down
•
D
will scroll the records at
high speed.
As shown in the example below, a screen
•
showing remaining e-DATA MEMORY and a
password registration screen appear following
the e-DATA MEMORY records. If there is no
data currently in e-DATA MEMORY, only the
remaining memory and password registration
screens appear.
Example: When there are three e-DATA MEMORY records
2ECORD
2ECORD
2ECORD
2EMAINING-EMORY
0ASSWORD2EGISTRATION
,IGHT
3CROLL
Reading the e-DATA MEMORY Mode Digital Display Screens
'DWD
2ECORD3CREENS
If a record contains more than five characters, the characters will scroll
•
from right to left. The end of the record will be indicated by the mark.
Press
•
A
to pause right-left scrolling. Press
A
again to resume
scrolling.
5HPDLQLQJPHPRU\
SECONDINTERVAL
2EMAINING-EMORY3CREEN
This screen will show “100%” when there are no records in memory and
•
“0%” when memory is full.
0ASSWORDNOTREGISTERED
SECONDINTERVAL
0ASSWORD2EGISTRATION3CREEN
This screen will show “SET” to indicate that there is no password
•
currently registered.
If there is a password, this screen will show “CHANGE”.
•
To create a new e-DATA MEMORY record
In the e-DATA MEMORY Mode, use
1.
D
to
display the remaining memory screen.
If memory is full, delete one or more
•
records you no longer need to make room
for the new data. See “To delete record
data” for more information.
2. Hold down
A
for about two seconds until
the display changes to a data input field with
the flashing cursor at the first character
position. This is the data input screen.
3. Use
D
(+) and
B
(
–
) to scroll through
characters at the current input position.
•
Holding down either button scrolls at high
speed.
Supported Characters
Lower Case Alpha: a to z
•
Upper Case Alpha: A to Z
•
Numerals: 0 to 9
•
Symbols: *– _@˜⁄ \?#!% . : ; ’ , &=+()
•
When the character you want is at the
4.
current cursor position, press
C
to move
the cursor one character to the right.
Repeat steps 3 and 4 as many times as necessary to enter all of the
characters for the record you are creating.
When the record data is the way you want, press
5.
A
to exit the data
input screen.
The watch also will exit the input screen automatically if you do not
•
perform any operation for about two or three minutes.
If you want to create another record, repeat steps 1 through 5 above.
•
Records are stored in the same sequence they are input.
•
5HPDLQLQJPHPRU\
)LUVWUHFRUGFKDUDFWHU