Operation Guide 3283
E-10
To measure times with the stopwatch
Note
•
Pressing
D
to perform a lap/split time operation freezes the lap/split time at that
point on the display for about eight seconds. After that, the display returns to normal
stopwatch time measurement.
•
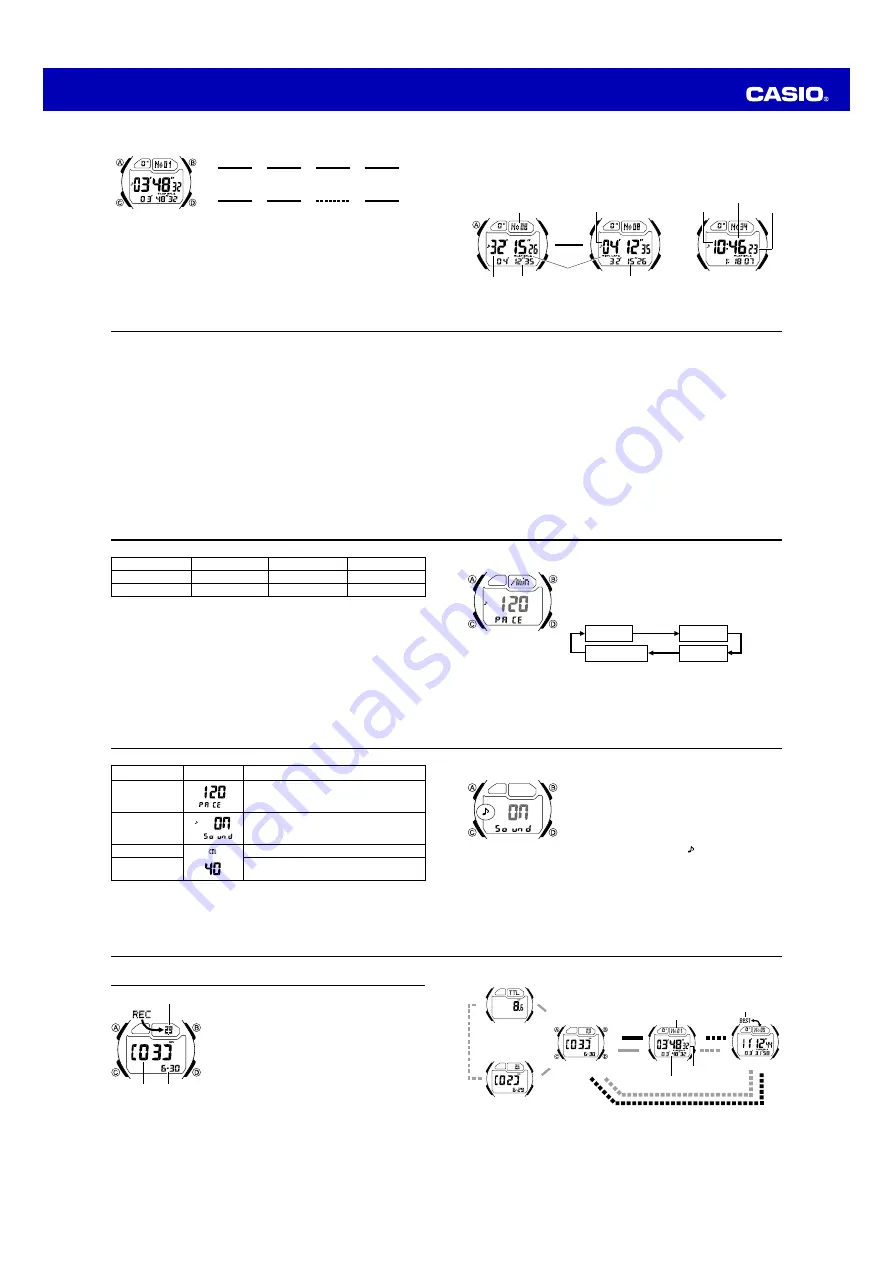
During a stopwatch time measurement operation, the upper part of the display
shows the current lap/split number and the hour digit, the center part shows the
current split time, and the lower part shows the current lap time.
•
When the pacer signal is turned on, it sounds for the first 30 seconds after you start
a stopwatch time measurement operation. After that, the pacer signal sounds for 30
seconds whenever you press
A
.
➤
➤
➤
➤
Clear
Next Lap/
Split
➤
B
Start
Stop
Elapsed Time
Re-start
Clear
B
Stop
B
B
D
Lap/Split Times
B
Start
Lap/Split
D
Stop
D
B
➤
D
➤
➤
E-11
•
If the pacer signal does not sound even though you have it turned on, press
A
to
change the positions of the lap time and split time on the display. This should cause
the pacer signal to sound.
Selecting the Stopwatch Screen Format
The following shows how you can control the position of the lap time and split time on
the stopwatch screen.
•
The Lap/Split indicator uses arrows to indicate the location the lap time and split
(elapsed) time.
Lap/Split number
Split time Lap time
Split time
More than 10 hours
Press
A
.
Lap time
Hours
Minutes
Seconds
Lap/Split
indicator
➤
➤
E-12
•
When you first start a stopwatch operation by pressing
B
, both the center part and
the lower part of the display show minutes, seconds, and 1/100 second. Whenever
the time shown in the lower part of the display is greater than 60 minutes, the
display format changes to show hours, minutes, and seconds. Whenever the time in
the center part of the display is greater than 10 hours, the display format changes to
show hours, minutes, and seconds.
Basic Data
The term “basic data” refers to the pacer signal setup, and information about your
stride length.
Important!
•
You cannot change basic data settings while a Stopwatch Mode time measurement
operation is in progress. Stopwatch operation must be stopped and the Stopwatch
screen must be cleared to all zeros before you can change basic data settings.
•
Whenever you want to change the stride length unit, you must first reset the
Cumulative Total screen to zero. See page E-21 for information about how to do this.
•
Be sure to update basic data values whenever the person using the watch changes.
E-13
Pacer Signal
The pacer signal of this watch beeps in accordance with a pacer value (rate) set by
you. You can use the pacer signal to maintain a constant pace while jogging or
running. You can also turn off the pacer signal when you do not want to use it.
•
The pacer value you set specifies the number of beeps per minute.
•
Turning on the pacer signal causes the watch to beep at the rate specified by the
pacer value.
•
You can set a pacer value in the range of 100 to 200 beats per minute, in units of 5.
•
You can disable the pacer function by setting a pacer value of
xxx
. While the pacer
value is set to
xxx
, the watch does not calculate distance covered.
Stride Length
You can specify either centimeters (
XM
) or inches (
Yn
) as the stride length unit. The
unit you specify for the stride length unit also determines the unit of measurement
used for the distance value in the Stopwatch Mode and Recall Mode, as shown below.
E-14
Setting Range
40 to 190 cm
16 to 76 in
Setting Increment
5 cm
2 in
Distance Unit
Kilometers (
km
)
Miles (
mi
)
•
The following examples illustrate how you can calculate values for this setting.
239 steps required to run around a 300-meter track.
300 (meters)
÷
239 (steps) = 1.255 (approximately 125 cm)
239 steps required to run around a 330-yard track.
330 (yards)
÷
239 (steps)
×
36 = 49.70 (approximately 50 inches)
Stride Length Unit
Centimeters (
XM
)
Inches (
Yn
)
E-15
To configure your basic data
1. While the Stopwatch Mode screen shows all zeros
(
0
H
00
'
00
''
00
), hold down
A
until the pacer value
appears flashing on the display. This indicates the
setting screen.
2. Press
C
to move the flashing in the sequence shown
below to select other settings.
3. When the setting you want to change is flashing, use
D
and
B
to change it as described below.
Stride length unit
Pacer value
Pacer signal
Stride length
l l l
ll
ll
ll
ll
ll
l
l l
l l
E-16
Setting
Pacer value
Pacer signal
Stride length
Stride length unit
Screen
Button Operations
Use
D
(+) and
B
(–) to change the setting.
•
Selecting
xxx
disables the pacer signal.
Press
D
to toggle the pacer signal on (
ON
)
and off (
OFF
).
Use
D
(+) and
B
(–) to change the setting.
Press
D
to toggle between centimeters (
XM
)
and inches (
Yn
).
•
When the pacer signal is turned on, the pacer signal sounds in accordance with the
pacer value while the pacer signal or pacer value setting screen is on the display.
4. Press
A
to exit the setting screen.
•
If you find that the stride length unit won’t change, reset the cumulative total to all
zeros (page E-21).
E-17
To turn the pacer signal on and off
1. While the Stopwatch Mode screen shows all zeros
(
0
H
00
'
00
''
00
), hold down
A
until the pacer value
appears flashing on the display. This indicates the
setting screen.
2. Press
C
once to display the pacer signal setting
screen.
3. Press
D
to toggle the pacer signal on (
ON
) and off
(
OFF
).
•
A pacer signal on indicator ( ) appears when this
setting is turned on.
4. Press
A
to exit the setting screen.
l l l
l
ll
ll
ll
ll
l
l l
l l
E-18
Recall Mode
Use the Recall Mode to recall and delete records stored
by the Stopwatch Mode.
•
Stopwatch records are stored in “logs” that are created
automatically by the watch. See “Memory Management”
(page E-38) for more information.
•
The title screen of the newest log appears first whenever
you enter the Recall Mode.
•
Log numbers are automatically assigned in sequence,
starting from
01
.
•
All of the operations in this section are performed in the
Recall Mode, which you enter by pressing
C
(page E-5).
To recall stopwatch records
In the Recall Mode, use
A
to scroll through the log title
screens, starting from the newest one, as shown below.
When the title screen of the log you want is displayed, use
D
and
B
to cycle through the records contained in the log.
Distance covered
Log number
Creation date
(Month – Day)
Log Title Screen
E-19
•
The cumulative total screen shows the total distance since the last cumulative total
distance reset (page E-21).
Press
B
.
▲
▲
▲
▲
Press
D
.
Split time
Lap/Split number
BEST indicator
▲
▲
Cumulative Total Screen
▲
Press
A
.
Log Title Screen
Stopwatch Record
Screen
Best Lap Time
Screen
Lap time
▲
▲


