USER’S GUIDE 2742
2
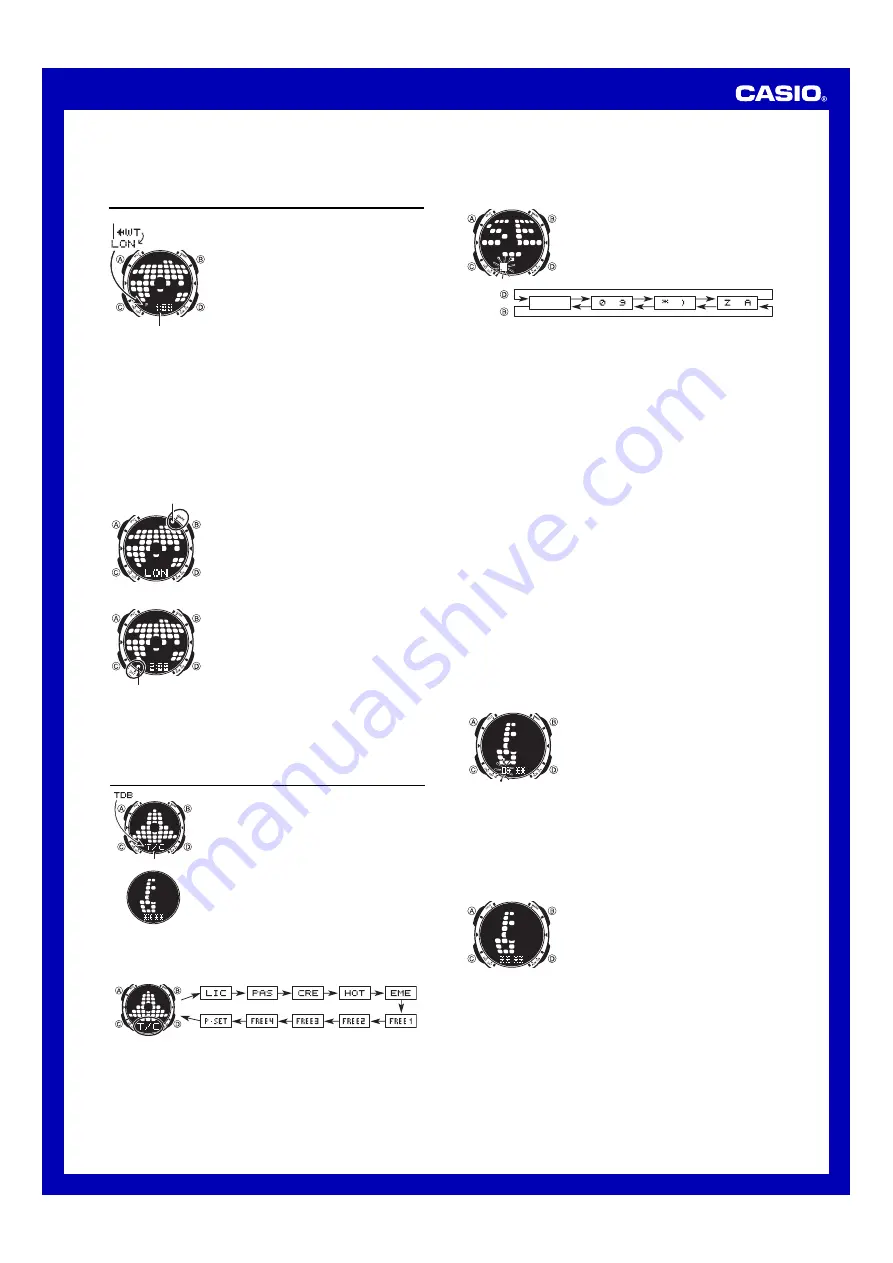
City code
Current time in the zone
of the selected city code
Index mark
DST on indicator
•
The initial factory default animation pattern setting and the default setting after
battery replacement is “Screw”.
•
Animated pattern movement becomes faster while the second count goes from 58 to 00.
World Time
World Time digitally displays the current time in 27 cities
(29 time zones) around the world. You can assign an
index mark to city codes that you often use, to make them
easier to find when you need them.
•
All of the operations in this section are performed in the
World Time Mode, which you enter by pressing
C
.
To view the time in another city
In the World Time Mode, press
D
to scroll eastwardly
through city codes.
•
The city code is displayed for about two seconds, and
then it is replaced with the current time for that city
code.
•
Pressing
D
while the time is displayed in the World Time Mode causes the city
code of the currently selected zone to appear. Pressing
D
while a city code is on
the display advances to the next sequential city code.
•
For full information about city codes, see the “City Code Table”.
•
When the currently selected time zone is one that includes mostly ocean, a value
indicating the zone’s Greenwich Mean Time differential appears in place of a city
code.
•
If there are no city codes currently marked with an index mark, holding down
D
scrolls through city codes at high speed in normal sequence. If there are index
marked city codes, holding down
D
jumps to the next marked city code. See “To
assign index marks to city codes” below for more information.
•
If the current time shown for a city is wrong, it probably means there is a problem
with your Timekeeping Mode digital time and/or Home City code settings. Go to the
Timekeeping Mode and make the necessary adjustments.
To assign index marks to city codes
1. In the World Time Mode, use
D
to display the city code
that you want to mark.
2. Press
A
to toggle the currently displayed city code
between being marked (index mark displayed) and
unmarked (index mark not displayed).
Data label
Password Screen
•
If you add text to a data label, the data label appears first when you perform the
above procedure to select it. After that, the input text scrolls on the display, without
the data label.
•
See “To input data label text” below for information about inputting.
To input data label text
1. In the Travel Data Bank Mode, use
D
to display the
data label where you want to input text.
2. Hold down
A
until the flashing cursor appears on the
display, which indicates the setting screen.
3. Use
D
and
B
to change the character at the cursor
position. The character changes in the sequence shown
below.
Password Input Screen
Password Screen
To toggle a city code time between Standard Time and Daylight Saving Time
1. In the World Time Mode, use
D
to display the city code
whose Standard Time/Daylight Saving Time setting you
want to change.
2. Hold down
A
for about two seconds to toggle between
Daylight Saving Time (DST on indicator displayed) and
Standard Time (DST on indicator not displayed).
•
The DST on indicator is on the display whenever you
display a city code for which Daylight Saving Time is
turned on.
•
Note that the DST/Standard Time setting affects only
the currently displayed city code. Other city codes are
not affected.
•
Note that holding down
A
in step 2 of the above
procedure also turns the city code’s index mark on or
off. After selecting the Daylight Saving Time setting you
want, be sure to press
A
again to turn the index marker
on or off as you desire.
Travel Data Bank
The Travel Data Bank Mode provides you with a secure
place to store traveler’s check information, your passport
number, and other personal data. You can store both
numbers and text in the Travel Data Bank Mode. Travel
Data Bank Mode information can be protected by a
password, which is defined by you.
•
The Travel Data Bank has 10 preset “data labels”, and
you can add text to each data label.
•
All of the operations in this section are performed in the
Travel Data Bank Mode, which you enter by pressing
C
.
•
If
\\
\\
appears when you try to enter the Travel Data
Bank Mode, perform the procedure under “To input the
password”.
To view Travel Data Bank Mode data
Each press of
D
in the Travel Data Bank Mode scrolls through the data labels in the
sequence shown below.
•
The following are the meanings of the data labels.
T/C
(Traveler’s Check),
LICENSE
(License),
PASSPORT
(Passport),
CREDIT
(Credit Card),
HOTEL
(Hotel),
EMERGENCY
(Emergency),
UrTT1
(Free 1),
UrTTC
(Free 2),
UrTTD
(Free 3),
UrTT@
(Free 4),
j|syt
(Password
Setting screen).
•
The Password Setting screen (
j|syt
) is for registering, changing, or deleting the
password that protects Travel Data Bank Mode data. For more information about
the password, see “Using a Password to Protect Travel Data Bank Data”.
•
If the full text of a data label is unable to fit on the display, the label scrolls from right
to left.
(space)
to
to
to
Press .
Press .
•
You can input spaces, numbers, symbols, and alpha characters. For details, see
the “Character List”.
4. When the character you want is at the cursor position, press
C
to move the cursor
to the right.
5. Repeat steps 3 and 4 until you have input all of the text you want.
•
You can input up to 31 characters for each data label.
6. Press
A
to exit the setting screen and display the text you have just input (without
the cursor).
•
Only three characters of data label text can be shown at a time, so longer text
scrolls continuously from right to left. Scrolling pauses for about one second when
the first three characters and the last three characters of the text are on the display.
Press
A
to stop and restart scrolling.
•
Only the input text scrolls on the display, without the data label.
To edit data label text
1. In the Travel Data Bank Mode, use
D
to display the data label whose text you
want to edit.
2. Hold down
A
until the flashing cursor appears on the display.
3. Use
C
to move the flashing to the character you want to change.
4. Use
D
and
B
to change the character.
5. After making the changes you want, press
A
to store them and display the new
text.
To delete data label text
1. In the Travel Data Bank Mode, use
D
to display the data label whose text you
want to delete.
2. Hold down
A
until the flashing cursor appears on the display.
3. Press
B
and
D
at the same time to delete the text.
•
The word
CLR
appears to indicate that the text is being deleted. After the text is
deleted, the cursor appears on the display, ready for input.
4. Input new text or press
A
to return to the data label for the text you have just
deleted.
Using a Password to Protect Travel Data Bank Data
You can register a 4-digit password to keep Travel Data Bank data secure.
Important!
Use a 4-digit password that is easy for you to remember, but difficult for others to
decipher. If you forget the password, you will have to have your watch initialized
(which deletes all Travel Data Bank data in memory) in order to access the Travel
Data Bank Mode again. To have the watch initialized, contact the store or dealer
where you purchased it, and ask to have the AC operation performed.
To register a new password
1. In the Travel Data Bank Mode, use
D
to display the
Password Setting screen.
•
This displays a screen that shows
j|syt
.
2. Hold down
A
for about two seconds until the first
(leftmost) digit of the password starts to flash.
•
This is the Password Input screen.
3. Use
D
(+) and
B
(–) to scroll through numbers at the
first digit.
4. When the first digit is the number you want, press
C
to advance to the next digit.
5. Repeat steps 3 and 4 to input all four digits of the password you want.
6. After all four of the password digits are the way you want, press
C
to register them
and return to the Password Setting screen.
•
This causes
SET
to appear on the display indicating that the password is being
saved, and then the Password Setting screen appears.
•
After registering a password, you can input, recall, edit and delete text, if you want.
After you exit the Travel Data Bank Mode, you will have to input the password every
time you want to enter the Travel Data Bank Mode again.
To input the password
1. Enter the Travel Data Bank Mode.
2. On the Password screen, press
B
or
D
.
•
This causes the first digit of the password to flash,
which indicates the Password Input screen.
3. Input the password.
•
Use
D
(+) and
B
(–) to scroll through numbers at
each digit.
•
Press
C
to advance to the next digit.
4. After the password is the way you want, press
C
.
•
If the input password matches the one registered, the word
OK!
appears, followed
by one of the data label screens.
•
If the password does not match, the word
NG!
appears, followed by the Password
screen. If this happens, perform the above procedure again from step 2.
•
If you make a mistake part way through inputting the password, press
A
to return to
the Password screen.
To change the password
1. Enter the Travel Data Bank Mode by inputting the current password.
2. Use
D
to display the Password Setting (
j|syt
) screen.
3. Perform the procedure starting from step 2 under “To register a new password” to
specify the new password.
To delete the password
1. Enter the Travel Data Bank Mode by inputting the current password.
2. Use
D
to display the Password Setting screen.


