


2332-2
Basic Calculations
The
!
,
@
,
#
, and
$
indicators appear on the display whenever you press the
corresponding operation key.
Constant Calculations
Input the number you want to use as a constant, and then press one of the arithmetic
keys twice. This causes the
K
indicator to appear on the display, indicating constant
calculations.
Switching the Input Tone On and Off
In the Calculator Mode, hold down
A
for about two seconds to switch the input tone
on and off.
•
The input tone on/off setting you make in the Calculator Mode is applied to all other
modes, except the Stopwatch Mode.
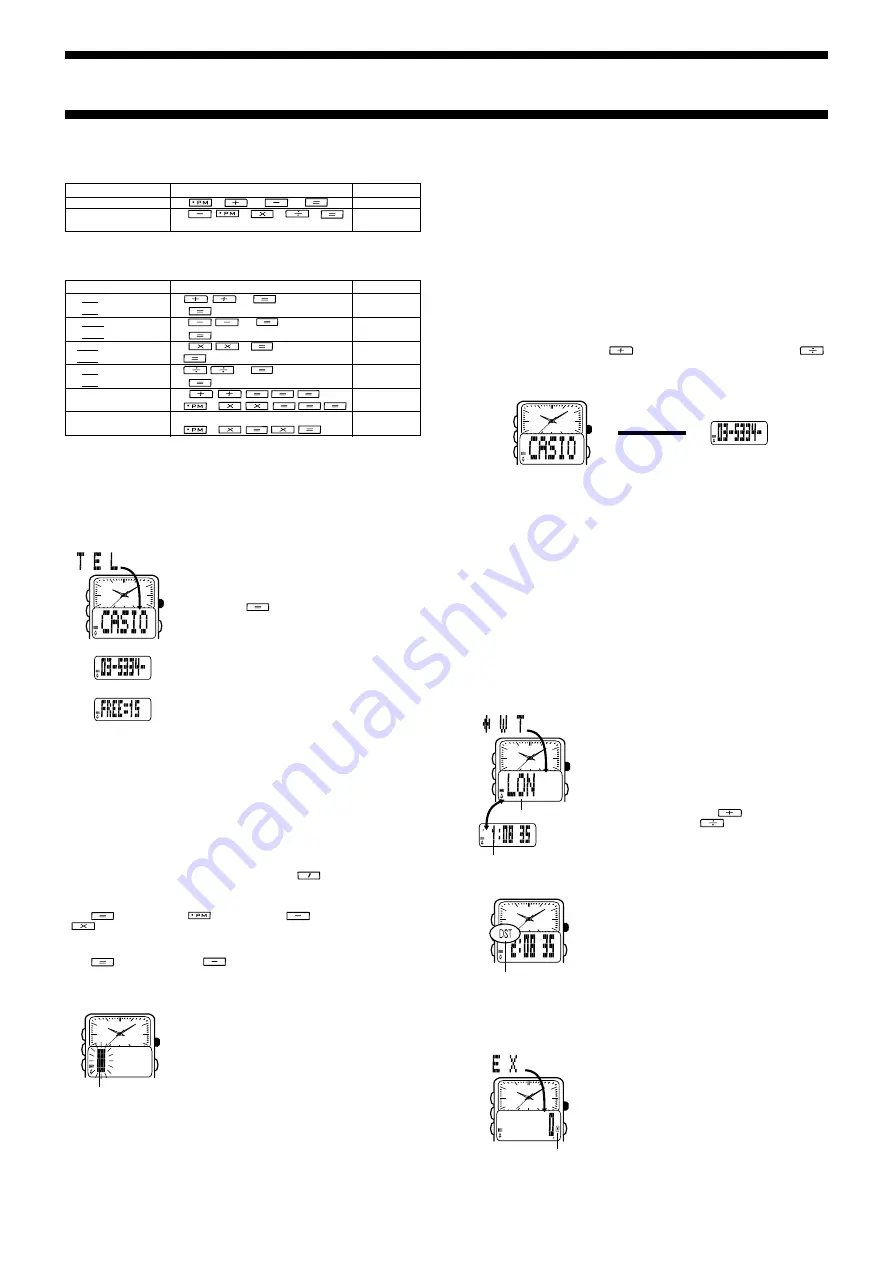
TELEMEMO MODE
The Telememo Mode lets you store up to 30 records,
each containing name and telephone number data.
Records are automatically sorted based on the characters
of the name. You can recall records by scrolling through
them on the display.
•
Holding down
in the Telememo Mode displays the
number of records you can still input.
•
See “CHARACTER LIST” for details on how the watch
sorts records.
•
A Telememo Mode record has a text field and a number
field.
•
Inputting data into the number field without inputting
anything in the text field creates a record with a blank
name screen. Because of this, it is a good idea to
always input both name and number data for each
record.
About Name and Number Input
You can input characters at the flashing cursor position. There are two fields where
you can input characters: a text field and a number field.
•
You tell when you are in the text field because the cursor looks like
#
. In the number
field, the cursor looks like
_
.
•
You can input eight characters for the text field and 14 digits for the number field.
•
While the cursor is in the text or number field (see “Inputting New Telememo Data”),
use the keypad to input characters.
Text Field
Use this field for the name. You can input alpha characters (
A
through
Z
), numbers
(
0
through
9
), hyphens (
-
), periods (
.
), and colons (
:
).
•
Each key is assigned more than one character. Each press of a key sequentially
changes the character at the cursor position. Pressing
, for example, changes
the characters at the cursor position in the sequence:
U
→
V
→
1
→
U
etc. The
letters that a key inputs are printed below the key, while the number it inputs is
printed on the key itself.
•
Use
to input a space,
to input a period,
to input a hyphen, and
to input a colon.
Number Field
You can input numbers (
A
to
J
), hyphens (
/
) and spaces for telephone numbers.
•
Use
to input a space and
to input a hyphen.
•
The number field initially contains all hyphens. You can leave the hyphens or replace
them with numbers or spaces.
Inputting New Telememo Data
1. In the Telememo Mode, press
B
and
L
at the same
time to display the new data screen.
•
The new data screen is the one that is blank (contains
no name).
•
If the message
FULL
appears on the display, it means
that memory is full. To store another record, you will first
have to delete some of the records currently in memory.
2. Hold down
A
until the flashing cursor appears on the
display.
3. Input a name in the text field.
•
See “Text Field” for details on how to input characters in the text field.
•
When the character you want is at the cursor position, press
B
to move the cursor
to the right.
4. After you input a name, use
B
to move the cursor to the number field.
•
The text field can hold up to eight characters. When the cursor is located at the eighth
space of the text field, moving the cursor to the right causes it to jump down to the first
digit in the number field. When the cursor is at the 14th digit of the number field,
moving it to the right causes it to jump back up to the first character of the text field.
•
Pressing
C
moves the cursor the left, while
B
moves it to the right.
5. Input a telephone number in the number field.
•
See “Number Field” for details on how to input characters in the number field.
•
Each time you input a digit, the cursor automatically moves to the right.
•
If you make a mistake while inputting numbers, use
B
and
C
to move the cursor to
the location of the error and input the correct data.
6. After inputting data, press
A
to store it.
•
When you press
A
to store data, the message
SORT
appears on the display for a
few seconds. After the sort operation is complete, the cursor appears in the text
field, ready for input a new Telememo record.
7. Input more records (starting from step 3) or press
A
again to return to the new
data screen.
Recalling Telememo Records
1. In the Telememo Mode, press
to scroll forward through the records or
to scroll in reverse.
•
Holding down either key scrolls through the records at high speed.
•
Only the name screen appears when you scroll through Telememo records.
2. Press
B
to toggle the screen between the name and number.
Editing Telememo Records
1. In the Telememo Mode, scroll through the records and display the one you want to
edit.
2. Hold down
A
until the cursor appears on the display.
3. Use
B
and
C
to move the cursor to the character you want to change.
4. Use the keypad to make any changes you want.
•
For details on inputting characters, see “About Name and Number Input”.
5. After making the changes that you want, press
A
to store them and return to the
name screen.
Deleting Telememo Records
1. In the Telememo Mode, scroll through the records and display the one you want to
delete.
2. Hold down
A
until the cursor appears on the display.
3. Hold down
L
until the message
CLEAR
appears on the display.
•
After the record is deleted, the cursor appears on the display.
4. Input data or press
A
to return to the new data screen.
WORLD TIME MODE
The World Time Mode shows the current time in 27 cities
(29 time zones) around the world.
•
For full information on city codes, see “CITY CODE
TABLE”.
•
In the World Time Mode, the digital display automatically
alternates between the city code and the current time in
that city.
Viewing the Time in Another City
In the World Time Mode, press
to scroll forward
through the city codes and
to scroll back.
•
Holding down either key scrolls the city codes at high
speed.
Toggling World Time between DST and Standard Time
1. In the World Time Mode, display the city code whose
DST/Standard Time setting you want to change.
•
You can make separate settings for each city code.
2. Hold down
B
for about one second to toggle DST
(
DST
displayed) and standard time (
DST
not
displayed).
•
The
DST
indicator appears on the display to indicate
that daylight saving time is turned on.
•
Note that the DST/Standard Time setting affects only the
currently displayed city code. Other city codes are not
affected.
CURRENCY CONVERSION MODE
The Currency Conversion Mode lets you register one
currency exchange rate for quick and easy conversion of
one currency to another.
•
The default Currency Conversion Mode setting is
×
0
(conversion is performed by multiplying the input value
by 0). The
#
is the multiplication operator, and 0 is the
exchange rate. Be sure to change the value to an
up-to-date exchange rate value and the operator
(multiplication or division) you want to use.
Example
Operation
Display
10 + 7 = 17
7
10
K
B*.
!
12 + 7 = 19
12
K
BJ.
!
78 – 12 = 66
12
78
K
GG.
@
45 – 12 = 33
45
K
DD.
@
2
×
12 = 24
12
2
K
CZ.
#
5
×
12 = 60
5
K
GA.
#
45
÷
9 = 5
9
45
K
F.
$
72
÷
9 = 8
72
K
I.
$
17 + 17 + 17 + 17 = 68
17
K
GI.
!
(2.3)
4
= 27.9841
2
3
K
C*.JIZB
#
To perform the above (2.3
2
)
2
2
3
C*.JIZB
Example
Operation
Display
12.3 + 74 – 90 = –3.7
12
3
74
90
/D.*
(12 – 0.5)
×
3
÷
7
12
5
3
7
Z.JCIF*BZ
= 4.9285714
A
B
C
L
[Name]
[Number]
[Remaining Memory]
A
B
C
L
Cursor
[Name]
A
B
C
L
[Number]
▲
▲
Press
B
.
A
B
C
L
City Code
Current time in
the selected city
A
B
C
L
DST indicator
A
B
C
L
Operation symbol