background image

Using Your Bagless Vacuum

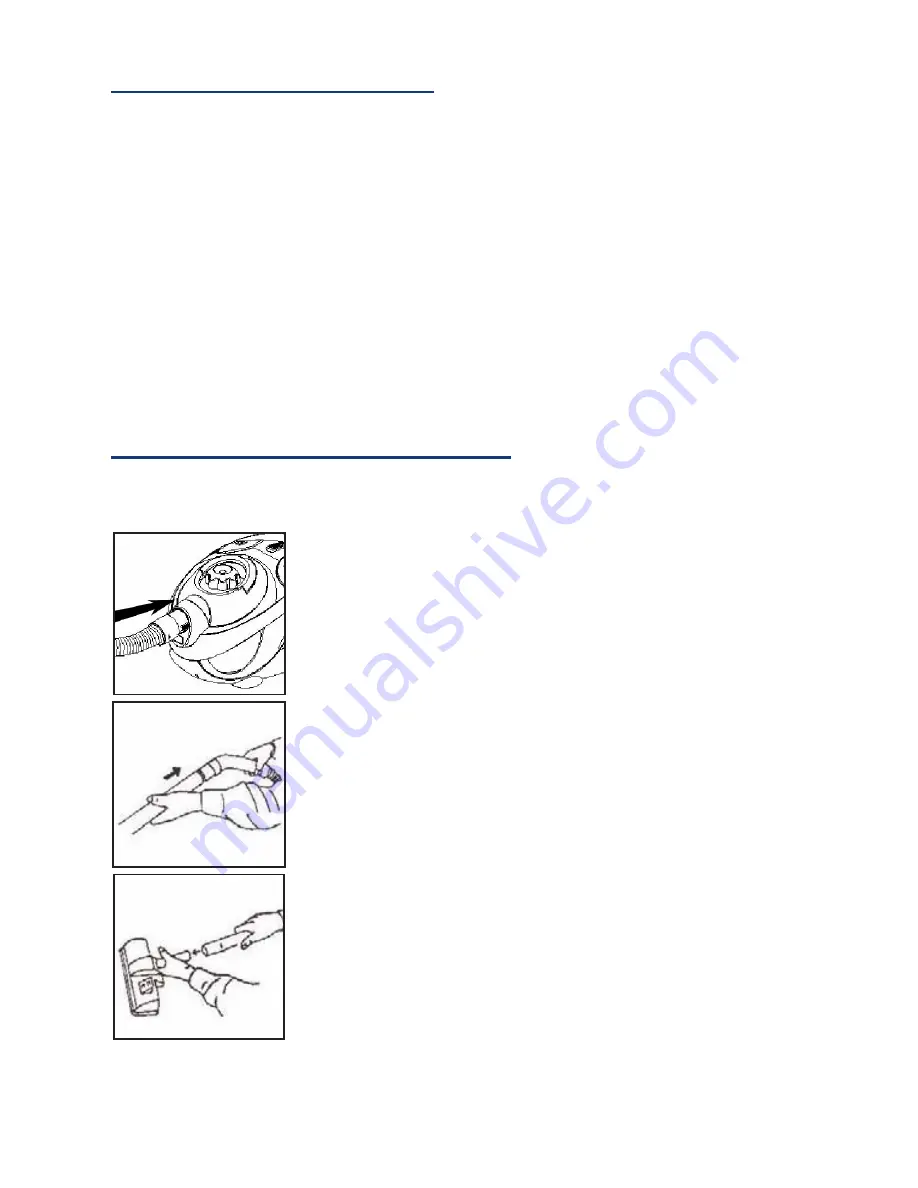
Assembling your Vacuum Cleaner

1.  Before use, please ensure the electrical voltage and frequency of the circuit 

corresponds to those indicated on the appliance.

2.  Pull the power cable from the vacuum cleaner and insert it into the power plug. 

The ‘yellow’ marker on the power cable indicates the ideal cable length. The ‘red’ 

marker indicates the maximum power cable length.  


WARNING: 

Do not extend the cable beyond the red marker.

3.  Switch the power point on.

4.  Press the “ON/OFF” button to turn the vacuum cleaner on. It is advisable to set the 

‘Suction power slide” to minimum before switching the appliance on.

5.  Adjust the “Suction power slide” to the desired level for vacuuming.

6.  Use the different cleaning attachments to suit the surface to be cleaned.

1.  Connect the hose connector to the front cover of the vacuum 

cleaner by pushing it in until it clicks into place. To release the 

hose connector,  push the two buttons located on the top of 

the connector and pull away from the vacuum.

2.  Connect the extension pole to the hose connector by pushing 

it into place. Use reasonable force to push it to ensure there is 

a tight seal. 

3.  Connect the extension pole onto the cleaning accessory by 

pushing it into the corresponding hole. Use reasonable force to 

ensure a tight seal .

Содержание CPCY4201

Страница 1: ...INSTRUCTION MANUAL Model Number CPCY4201 2200W BAGLESS VACUUM CLEANER...

Страница 2: ...r vised to ensure that they do not play with the appliance Do not operate the appliance outdoors Power plug must be removed from power socket before clean ing servicing maintenance or moving the appli...

Страница 3: ...is an inbuilt overheat protector which will turn the unit off if used for too long Switch the unit to OFF and it will resume normal operation within 15 minutes Ensure that all the parts are correctly...

Страница 4: ...d as this will damage the circuitry to the unit Ensure that all parts of the vacuum cleaner are dry before assembling for use Replacement Filters for your Bagless Vacuum Cleaner Replacement filters ca...

Страница 5: ...oor nozzle 2 Tool holder 3 Telescopic tube 4 Manual air inlet valve 5 Handle 6 Suction hose 7 Hepa type filter assembly 8 Cord retraction button 9 Carry Handle 10 Mains cable and plug 11 ON OFF foot s...

Страница 6: ...eaning system out of their anchoring with the aid of the carrier handle on the dust container Now lift out the dust container and carry it to the waste bin 3 A push button is located on the dust conta...

Страница 7: ...Turn the dust container cover carefully until it is released and the HEPA filter will come away easily Now rinse the HEPA filter under running water and allow it to dry CAUTION Only ever clean the fil...

Страница 8: ...rush The brush features a sliding switch to retract or extend the bristles Extend the bristles for shorter carpet piles or hard surfaces Turbo Brush This brush features a rotating brush inside it for...

Страница 9: ...sable to set the Suction power slide to minimum before switching the appliance on 5 Adjust the Suction power slide to the desired level for vacuuming 6 Use the different cleaning attachments to suit t...

Страница 10: ...he chrome plated pole is extendable allowing the user to adjust the height to their own preference 4 Vacuum head The vacuum head has dual functionality allowing it to clean carpets as well as hard sur...

Страница 11: ...Notes...

Страница 12: ...ith features and completely reliable We are so confident in our products we back them up with a full 2 year replacement warranty Now you too can relax knowing that Cascade have you covered Customer He...

Отзывы: