background image

www.CasablancaFanCo.com

1.888.227.2178

11

M8502-01 • 04/16/15 • © 2013–2015 Casablanca Fan Company

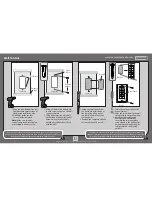
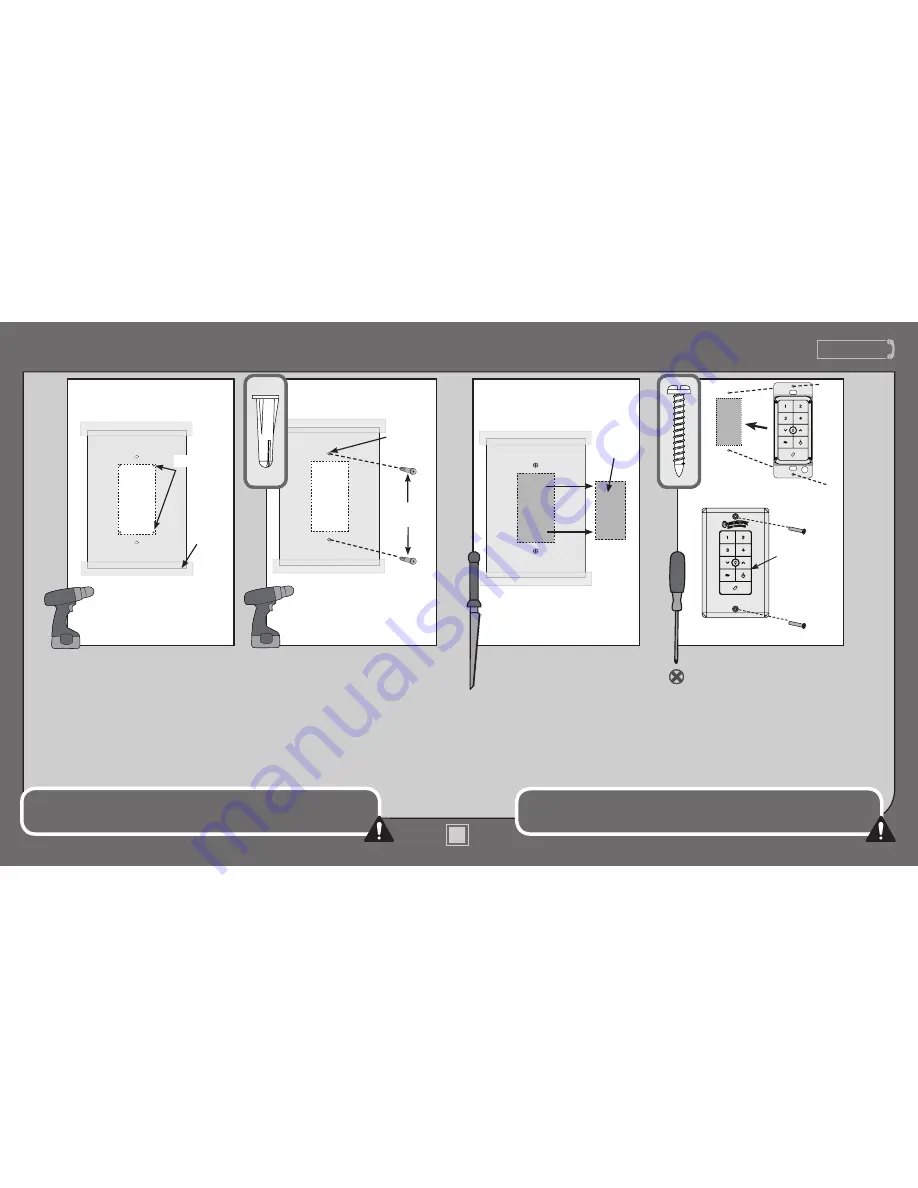
1. Using a 9/64 drill bit, drill a hole 

in each screw cut-out on the wall 

control template. 

2. Using a hammer, tap a drywall 

anchor found in the wall control 

hardware bag into each hole 

until the drywall anchor is flush 

with the wall.

1. Using a drywall punch saw, 

cut out the interior shape of 

the template using one of 

the four drilled corners as a 

starting point.

2. Remove the template and the 

cut-out section of drywall. 

1. Insert the wall control into the 

dry wall cut out.

2. Align the screw holes in the wall 

control with the drywall anchors.

3. Install the cover plate using 

a Phillips Head screwdriver 

to secure the two cover plate 

screws found in the wall control 

hardware bag through the wall 

control and into the drywall 

anchors.  

Wall Control

This device complies with Part 15 of the FCC Rules. Operation is subject to the following 

conditions: (1) this device may not cause harmful interference, and (2) this device must accept 

any interference received, including interference that may cause undesired operation.

If you are using a outlet box for wall control installation, the wires coming from the wall 

control must be grounded using the attached green wire. If not placed in an outlet box, cap 

the green wire coming from the wall control with an included wire nut.

1. Tape the provided wall control 

template with painter’s tape at 

the desired installation area. 

2. Drill holes inside the four 

corners of the template.

Note:

 Make sure the wall 

control template is level before 

proceeding to the next step.

Template

Drywall

Before

After

Cover Plate

Template

Drill Holes

Painter’s 

Tape

Template

Drywall 

Anchors

Screw 

Cut-Out

Содержание M8502-01

Страница 1: ...13 Blades PA G E 16 Operation Congratulations on purchasing your new Casablanca ceiling fan It will provide comfort and performance in your home or office for many years This installation and operatio...

Страница 2: ...he circuit breakers to the outlet box and associated wall switch location If you cannot lock the circuit breakers in the off position securely fasten a prominent warning device such as a tag to the se...

Страница 3: ...227 2178 3 M8502 01 04 16 15 2013 2015 Casablanca Fan Company Tools Needed Ladder Screwdrivers Pliers Wire Strippers Power Drill optional 9 64 Drill Bit optional If mounting to a support structure yo...

Страница 4: ...nrod most common If you have a flat ceiling Hang your fan by a standard downrod included Mounting Options Support Structure Ceiling Outlet Box required Angled Mounting Style Standard Mounting Style Su...

Страница 5: ...ngs point opening toward peak If you are unable to do this call Technical Support at 1 888 227 2178 Make sure all four bumpers are still attached Use wood screws included when securing to support stru...

Страница 6: ...9 10 Sold Separately Longer Downrod for angled ceilings or ceilings 10 or higher Standard Downrod for ceilings 8 10 high Option 1 Option 2 skip to next page If you need a different downrod length fol...

Страница 7: ...so that the downrod can be inserted Slide the adapter cover onto the downrod then hand tighten the downrod at least 4 5 full turns until it stops The wires can be cut but leave at least 8 extending fr...

Страница 8: ...ablancaFanCo com Put the wires and downrod through the canopy Let the canopy sit loosely on top of the fan DO NOT PICK THE FAN UP BY THE CANOPY OR WIRES Place the downrod ball into the slot in the cei...

Страница 9: ...et box Refer to CAUTION c 1 on pg 2 FROM CEILING F R O M CEILING BRAC K E T green yellow stripe grounding green yellow stripe green yellow stripe Note To connect the wires hold the bare metal leads to...

Страница 10: ...m the hardware bag Connect the black ungrounded wire from the ceiling to the black wire from the receiver Connect the white grounded wire from the ceiling to both the white wire from the receiver and...

Страница 11: ...rol hardware bag through the wall control and into the drywall anchors Wall Control This device complies with Part 15 of the FCC Rules Operation is subject to the following conditions 1 this device ma...

Страница 12: ...2015 Casablanca Fan Company Canopy Lift the canopy into place so that the screw holes are aligned Position the canopy so that when lifted into place the canopy fits into the hanging bracket as shown S...

Страница 13: ...3 To install each blade first insert the blade into the blade slot on the side of the fan Align the screw holes in the blade with the screw holes inside the fan Screw Holes Insert the blade screws fou...

Страница 14: ...27 2178 14 M8502 01 04 16 15 2013 2015 Casablanca Fan Company Blades continued Install the blade screws washers and grommets so the grommets fit snugly into the blade screw holes Securely tighten afte...

Страница 15: ...logen bulb in each socket When necessary replace with bulbs of the same type and wattage CONGRATULATIONS YOU RE DONE See next page for fan operation instructions Globe When installing a halogen bulb c...

Страница 16: ...he control hardware bag with the positive side facing downward Reinstall the battery holder and reinsert the battery door into the wall control Battery Battery Holder Battery Door ON Turn Power The re...

Страница 17: ...nd then begin to dim After a total of 30 seconds the lights will be completely off Note For CFL lighting the lights will stay on 100 brightness for 30 seconds After a total of 30 seconds the lights wi...

Страница 18: ...Cleaning products may damage the finishes Be sure to turn off power to the fan before performing any maintenance or relamping OFF Turn Power Changing the bulbs carefully rotate the globe counterclock...

Страница 19: ...stalled matches the specifications on the light sockets see page 18 for instructions on changing the bulbs Remote does not work Make sure the battery is installed correctly Install a new battery If th...

Страница 20: ...y on to indicate successful pairing To have multiple fans operated by a single remote control you must pair the transmitter to each additional receiver The receiver that shipped with your fan is alrea...

Отзывы: