8
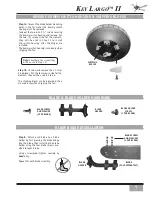
BLADE/BLADE HOLDER INSTALLATION
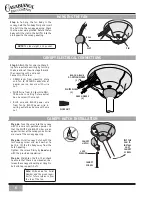
Step 9.
Using the blade holder screws, attach
each blade/bladeholder assembly to the motor
with the bamboo stitch facing down.
Using the screwdriver, tighten securely by
hand
only.
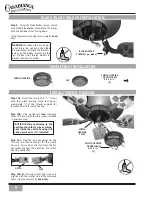
INSTALL SWITCH HOUSINg
Step 10a.
Install the two 6-32 X
3
/
8
”
screws
onto the switch housing plate, leaving ap-
proximately
1/
8
“ of the threads exposed for
installation of the switch housing.
COmpLETINg INSTALLATION
SWITCH HOUSINg
mOUNT SCREW
6-32 X
3
/
8
”
(2)
SWITCH HOUSINg
CAp
BLADE HOLDER
SCREWS(2 per blade)
WARNINg!
To reduce the risk of per-
sonal injury, do not bend the blade
brackets when installing the brackets,
balancing the blades, or cleaning the
fan. do not insert foreign objects in
etween rotation fan blades.
Step 10b.
Line up the two
inner
clearance
holes in the cup with the two screws installed
in previous step.
Step 10c.
Plug the wire connector for the
fan into the wire connector for the switch
housing. Assure that the clip from the fan
connector engages the notch on the switch
housing connector.
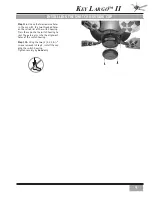
Step 10d.
Rotate cup so that the screws are
aligned with the smaller side of the clearance
holes. Tighten securely by
hand
only
.
SWITCH HOUSINg
mOUNT SCREW
6-32 X
3
/
8
”
(2)
SWITCH
HOUSINg
pLATE
CLIp
NOTCH
CAUTION! Before continuing to the
next step check that a wire or compo-
nent inside the switch housing will
not be pinched as it is installed.

