
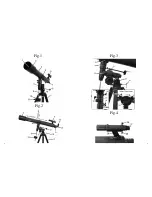

Attaching the Telescope Tube to the Mount:
Remove the cradle ring (Fig. 1-4) from the box. The top of the equatorial
mount is called the optical tube saddle plate (Fig. 2-16). Loosen the saddle
plate lock (Fig. 3-19) and slide the cradle ring into the saddle plate until the
stopper on the bottom of the cradle ring assembly rests against the front of
the saddle plate. Make sure that the cradle ring lock knob (Fig. 6-33) is on
the right side of the mount. Tighten the saddle plate lock to secure the cradle
ring in place.
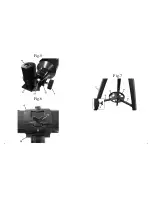
Unscrew the cradle ring lock knob (Fig. 6-33) and open the cradle ring.
Carefully remove the optical tube assembly (Fig. 1-3) from the box. Gently
rest the optical tube into the cradle ring with the eyepiece (Fig. 2-14) towards
the back. The cradle ring should be roughly in the center of the tube. We
will balance this later. Close the cradle ring around the telescope and secure
by tightening the cradle ring lock knob (Fig. 6-33).
Attaching the Finder Scope:
There are two finder scope bracket mounting bolts (Fig. 4-29) located at the
end of the optical tube near the eyepiece assembly. Remove the nuts and set
aside. Place the finder scope bracket (Fig. 4-28) onto the mounting bolts and
replace the nuts, tightening down the bracket securely to the optical tube.
Make sure the bracket is facing forward as shown in Fig. 4. Slide the finder
scope (Fig. 1-5) into the bracket facing forward.
Attaching the Eyepieces:
Insert the 90° corner lens (Fig. 5-15) into the focuser draw tube (Fig. 5-30)
and secure into place by tightening the corner lens thumbscrew (Fig. 5-32).
Insert the Plossl 20mm eyepiece (Fig. 5-14) into the corner lens (Fig. 5-15)
and tighten down using the eyepiece holder thumb screw (Fig. 5-31).
You have now completed the assembly of your Red Planet
TM
telescope.
We will now need to make the necessary adjustments in order to use your
telescope properly.
Balancing the Telescope:
Balancing the Mount in R.A.:
To reduce stress on the mount, the telescope should be balanced on the polar
axis (See Fig. 2). Instructions on how to do so are as follows:
• Loosen the R.A. lock knob (Fig. 3-22) and position the telescope off
to one side of the mount (you may need to remove the R.A. slow mo
-
tion cable (Fig. 1-8) temporarily). The counterweight bar (Fig. 1-9)
should be parallel to the ground.
• Release the telescope gradually and see which side it falls towards.
To avoid accidental damage, do not let go of the telescope complete
-
ly.
• Loosen the counterweight lock knob (Fig. 1-13) and position the
weight so that the telescope and counterweight remain stationary
(parallel to the floor) on their own.
• Tighten the counterweight into place.
Balancing the Mount in Dec.:
To prevent sudden movement when the Dec. lock (Fig. 3-24) is loosened, the
telescope must be balanced on the declination axis (See Fig. 2). Instructions
on how to do so are as follows:
• Loosen the R.A. lock knob (Fig. 3-22) and position the telescope off
to one side of the mount (you may need to remove the R.A. slow mo
-
tion cable (Fig. 1-8) temporarily). The counterweight bar (Fig. 1-9)
should be parallel to the ground.
• Tighten the R.A. lock knob (Fig. 3-22) to hold the telescope in place.
• Loosen the Dec. lock knob (Fig. 3-24) and rotate the telescope until
the tube is parallel with the ground.
• Release the telescope gradually and see which way it will rotate. To
avoid accidental damage, do not let go of the telescope completely.
• Loosen the cradle ring lock knob (Fig. 6-33) and slide the optical
tube forward or backward as needed until it remains stationary and
parallel to the ground on its own.
• Tighten the cradle ring securely around the optical tube.
• Loosen the R.A. lock knob, return the telescope to its upright posi
-
tion and retighten.
11
10
Содержание RP-400
Страница 3: ...Fig 1 Fig 3 Fig 2 5 4 Fig 4...
Страница 4: ...Fig 6 Fig 5 Fig 7 7 6...


