background image

71

฀ ฀

Notizen

Содержание CE-10 Desert Quad 50 040 4012

Страница 1: ... Instruction Manual Page 2 11 Betriebsanleitung Seite 12 21 Mode d emploie Page 22 31 Instrucciones Página 32 41 Istruzioni d uso Pagina 42 51 ...

Страница 2: ...a refund is made become the property of CARSON New or reconditioned parts and products may be used in the performance of warranty services Repaired or replaced parts and products are warranted for the remainder of the original warranty period You will be charged for repair or replacement of the product made after the expiration of the warranty period The Warranty does not cover abuse accident misu...

Страница 3: ...y Precautions 4 Additional items Needed for Starting the Model 5 Tools Needed for the Assembly a Chassis b Removing Body 7 c Installation of Antenna 7 d Loading Battery 8 e Insert Battery 8 f Turn the Power Switch on 8 11 i Troubleshooting 11 Assembly 52 Exploded View Spare parts ...

Страница 4: ... the model when lightning is present remote controlling transmitter of the model is not waterproof Therefore do not drive while raining snowing in puddles or wet grass confined or populated areas in another way before driving removing the body shell These parts become extremely hot during operation and could cause serious injury Pay attention to charge announcement of your transmitter charged and ...

Страница 5: ...of the components A single loose screw can result in a dangerous situation for your model Maintain your model regularly and replace damaged or worn out parts by genuine spare parts We wish you great fun with your CARSON model car Or as a set 8 mignon batteries and 8 mignon batteries This is a selection and recommendation of the accessory articles from the firm of CARSON Model Sport To operate the ...

Страница 6: ...5 Modelling knife 50 007 4053 Hexagonal wrench 50 001 3118 Philips screwdriver small and big 1 5 2 2 5 mm 50 007 4023 Instant adhesive 50 005 3339 Tweezers 50 007 4003 Motor Receiver Drive battery Front tyre Rear shock unit Rear tyre On Off switch Controller Steering servo Front shock unit Chassis a Chassis ...

Страница 7: ...7 GB b Removing Body Antenna pipe Antenna cord c Installation of Antenna ...

Страница 8: ...e nickel metal hydride batteries Otherwise your drive battery could be damaged No The charging time will vary according to the charger unit and battery type 1 Insert the battery 2 Put the battery plate on it and 3 Fix it with the hook pins The range of the remote control is reduced if the antenna is not pulled out completely f Turn ...

Страница 9: ...GB CAUTION Always turn the transmitter s power switch ON first on 1 Connect the rechargeable battery for the driving 2 Switch on the receiver 3 Put the body on and fix it with the body split pins 2 ON 1 3 ...

Страница 10: ...ear driving forward to give speed and or forward braking reverse movement go The wheels are to follow the steering direction servo Reverse switch ST in position REV Left Right driving forward to give speed braking reverse movement Left Right Neutral ...

Страница 11: ...wer on Polarity or battery type is wrong Check polarity and type Batteries have run down Change batteries or charge them Loss of control Batteries have run down Change batteries or charge them Antenna is missing or not attached properly Attach antenna and extend transmitter antenna to full length R C model using same band frequency is nearby Run model in different area or change crystal Steering t...

Страница 12: ... beheben werden Von der Garantie ausgeschlossen sind heitsanweisungen oder der Bedienungsanleitung höhere und vom Service vorgenommene Einstell und Wiederein richtungsarbeiten Konformitätserklärung magnetische Verträglichkeit und den anderen relevanten Bedeutung des Symbols auf dem Produkt der Elektrogeräte sind Wertstoffe und gehören Fachhändler Vor dem Gebrauch Ihres neuen Modells lesen Sie bitt...

Страница 13: ...ferumfang 13 Sicherheitsanweisungen 14 15 a Chassis b Abnehmen der Karosserie 17 c Einbau der Antenne 17 d Laden des Fahrakkus 18 e Einbau des Fahrakkus 18 f Einschalten der RC Anlage 18 g Steuern des Modells 21 i Fehlersuchtabelle 21 Montageanleitung 52 ...

Страница 14: ...u vermeiden dass der Empfänger unkontrolliert auf ein fremdes Funksignal reagiert Schalten Sie nach Beendigung des Fahr betriebes zuerst den Empfänger dann den Sender aus steuersenders beeinflussen und nicht auf öffentlichen Vekehrsflächen betrieben werden Ihrer Reaktionsfähigkeit beeinträchtigt sind Karosserie Motor Modell verlieren Bei längerem Nichtgebrauch ist der Fahr Akku unbedingt zu entfer...

Страница 15: ... durch bevor Sie irgendwelche Arbeiten beginnen Nach jeder Fahrt sollten Sie die wichtigsten Bauteile und Ver ausreichen um Ihr Modell in eine gefährliche Situation geraten aus Wir wünschen Ihnen viel Spaß mit Ihrem CARSON Modellauto und jederzeit gute Fahrt Oder als Set 8 Mignon Batterien und 8 Mignon Batterien Firma CARSON Modelsport Zum Betrieb des RC Cars benötigen Sie ...

Страница 16: ...fer Chassis a Chassis Für den Zusammenbau erforderliches Werkzeug Schere 50 001 3305 Spitzzange 50 007 4034 Seitenschneider 50 007 4035 Modellbaumesser 50 007 4053 Kreuzschlüssel 50 001 3118 Kreuzschlitz Schraubendreher klein und groß und Inbusschlüssel 1 5 2 2 5 mm 50 007 4023 Sekundenkleber 50 005 3339 Pinzette 50 007 4003 ...

Страница 17: ...17 D Antennenrohr Antennendraht b Abnehmen der Karosserie c Einbau der Antenne Chassis ...

Страница 18: ...hrakkus e Einbau des Fahrakkus f Einschalten der RC Anlage Achtung Ansonsten kann Ihr Fahrakku beschädigt werden Wir No 1 Legen Sie den Akku ein 3 fixieren Sie mit den Splinten sich die Reichweite der Fernsteuerung f Eins ...

Страница 19: ...19 D on ACHTUNG Immer zuerst den Sender einschalten 2 Schalten Sie den Empfänger ein Karosseriesplinten 2 ON 1 3 ...

Страница 20: ...ern des Modells Stellen Sie das Modell so ab dass die Räder frei in der Luft hängen links Servo Reverse Schalter ST in Position REV Links Rechts Links Rechts Neutral Vorwärtsfahrt Gas geben Bremsen Rückwärtsfahrt ...

Страница 21: ...e die Akkus neu Antenne fehlt oder ist nicht richtig befestigt Befestigen sie die Empfängerantenne und oder schrauben Sie die Senderantenne fest In der Nähe wird ein anderes Modell auf der Fahren Sie woanders oder wechseln Sie die Modell fährt nicht geradeaus Lenkungstrim ist nicht korrekt eingestellt Radmuttern sind lose Ziehen Sie die Radmuttern fest an Modell bleibt nicht stehen korrekt eingest...

Страница 22: ...au modèle réduit Cher client Toutes nos félicitations pour l acquisition de votre voiture en modèle réduit CARSON RC un modèle dernier cri En vertu de notre engagement pour un développement et une amélioration continus de nos produits nous nous réservons le droit d effectuer des modifications dans les spécifications de nos équipements nos matériaux et de notre conception à tout moment et sans aver...

Страница 23: ...rage du modèle 25 Outils nécessaires au montage de la voiture a Châssis b Retrait de la carrosserie 27 c Montage de l antenne 27 d Charger l accu moteur 28 e Montage de l accu moteur 28 f Allumer l émetteur 28 g Conduite de la voiture h Changer les fréquences 31 i Tableau de recherche des erreurs 31 Assemblage 52 Vue éclatée Pièces détachées ...

Страница 24: ...ux de votre émetteur de commande à distance flaques ou dans de l herbe mouillée terrain adapté et non sur des voies de circulation publiques d animaux capacités de réaction sont restreintes pour une quelconque raison montée d utilisation par exemple le moteur Leur contact peut entraîner des blessures Faites attention à l affichage de l état de charge de votre émetteur moitié vides ou bien des accu...

Страница 25: ...portantes et les connecteurs de la voiture doivent être inspectés Une pièce défectueuse peut provoquer à elle seule un accident Vérifier régulièrement la voiture et remplacer si nécessaire les pièces défectueuses avec des pièces de rechange d origine Nous vous souhaitons beaucoup de plaisir avec votre modèle réduit CARSON 8 piles Mignon et 8 piles Mignon Il s agit là d une sélection et recommandat...

Страница 26: ...au de bricolage 50 007 4053 Clé hexagonale Allen 50 001 3118 Tournevis petit et grand et clé à six pas 1 5 2 2 5 mm 50 007 4023 Colle à prise rapide 50 005 3339 Pincette 50 007 4003 Moteur Récepteur Accu moteur Pneu avant Pare chocs arrière Pneu arrière Interupteur Régulateur Servo de direction Pare chocs avant Châssis a Châssis ...

Страница 27: ...27 F b Retrait de la carrosserie c Montage de l antenne châssis Tube d antenne Fil d antenne ...

Страница 28: ...hydrure utiliser exclusivement les chargeurs prévus à cet effet Cela risquerait sinon d abîmer votre accu moteur Nous No La durée de recharge varie selon le chargeur et le type d accu f Allumer l émetteur La portée de la radiocommande est diminuée lorsque l antenne n est pas sortie complètement f Allum ...

Страница 29: ...29 F ATTENTION Toujours allumer l émetteur en premier on 2 ON 1 3 ...

Страница 30: ... marche avant accélération et vers l avant frein marche arrière Les roues doivent suivre le sens de rotation du volant commutateur d inversion ST en position REV Gauche Droite marche avant accélération frein marche arrière Gauche Droite Au centre ...

Страница 31: ...pe d accu sont incorrects Les piles accus sont déchargés ou complètement vides Les piles accus sont déchargés ou complètement vides L antenne n est pas montée ou elle est mal fixée l antenne de l émetteur Une autre maquette utilise la même fréquence à proximité fréquence La maquette ne va pas droit Le trim compensation automatique de direction n est pas bien réglé rotatif Les écrous des roues sont...

Страница 32: ...ción del producto tras vencer el período de garantía será abonada por usted Esta garantía no cubre anormal falta de seguimiento de las instrucciones mantenimiento o instalaciones inadecuadas alteraciones tormentas eléctricas u otros incidentes causados por exceso de voltaje o corriente modelo ajuste o reinstalación Esta garantía le da a usted derechos legales específicos y usted también podría ten...

Страница 33: ...los adicionales necesarios para el arranque del modelo 35 a Chasis b Cuitar la carrocería 37 c Instalación de la antena 37 d Cargar acumuladores de marcha 38 e Colocación de la batería 38 f Connecte el emisora 38 g Volante de dirección Controles básicos h Cómo cambiar frecuencias 41 i Fehlersuchtabelle 41 Montaje 52 Recambios ...

Страница 34: ... y desconecte el coche antes de desconectar la emisora Los modelos radio controlados no son juguetes su manejo debe ser aprendido paso a paso modelo bajo supervisión adulta La conducción de coches radio controlados es un fascinante hobby que debe ser practicado con la necesaria precaución y respeto Un coche radio controlado que tiene un peso puede causar daños y lesiones en caso de conducción inco...

Страница 35: ...llo suelto puede ser suficiente para dejar al modelo en situación peligrosa Verifique el coche periódicamente y cambie las Le deseamos buena suerte y mucha diversión conduciendo su coche radio controlado CARSON de enchufe O como set Set de carga de acumuladores 8 baterías Mignon Set de carga de acumuladores con acumulador 8 baterías Mignon Esto es una selección y una recomendación de accesorios de...

Страница 36: ...07 4053 Llave de cruceta 50 001 3118 Destornillador Phillips pequeño y grande y Llaves allen 1 5 2 2 5 mm 50 007 4023 Adhesivo instantáneo 50 005 3339 Pinzas 50 007 4003 Motor Receptor Acumuladores de marcha Neumático delantero Amortiguador trasero Neumático trasero Interruptor Regulador Servo de dirección Amortiguador delantero Chasis a Chasis ...

Страница 37: ...37 E b Cuitar la carrocería c Instalación de la antena Tubo de antena Cable de antena ...

Страница 38: ...res previstos para ello o El tiempo de carga puede variar según el cargador y el tipo de acumulador 1 Coloque la batería y 2 Ponga la tapa de batería 3 Sobre ella f Connecte el emisora El radio de acción de la emisora se reducirá si la antena no está completamente desplegada f Con ...

Страница 39: ...39 E PRECAUCION Conecte siempre primero la emisora 1 Conecte la batería recargable para conducir 2 Conecte el receptor 3 Coloque la carrocería y fíjela con los clips de carrocería on 2 ON 1 3 ...

Страница 40: ...te para ganar velocidad o empújelo frenos marcha atrás controles responden máximo recorrido Las ruedas deberían seguir el giro del volante inversor de servo ST en posición REV Izquierda Derecha Marcha adelante ganar velocidad frenos marcha atrás Izquierda Derecha Neutro ...

Страница 41: ...el tipo Las baterías están gastadas Cambie o recargue las baterías Pérdida de control Las baterías están gastadas Cambie o recargue las baterías La antena no está o está montada incorrectamente Sujete la antena y extienda la antena de la emisora completamente frecuencia Utilice el modelo en un sitio distinto o cambie los cristales por una frecuencia distinta No va recto El trim de dirección no est...

Страница 42: ...rietà della CARSON Le parti nuove sostituite o riparate possono essere Dalla garanzia sono esclusi da eccesso di voltaggio CARSON norme nello stato dove il prodotto è stato acquistato Dichiarazione di conformità in tutte le sue parti radio motore batteria caricabatteria è Il prodotto che avete acquistato è alimentato da batteria potrebbe essere illegale introdurla nei cassonetti della con il vostr...

Страница 43: ...esi per la messa in moto del modello 45 Utensili necessari al montaggio del modello a Telaio 47 c Montaggio dell antenna 47 d Come caricare la batteria ricaricabile 48 e Montare la batteria 48 f Accendere trasmettitore 48 g Come controllare il vostro modello 51 i Tabella ricerca errore 51 Montaggio 52 Ricambi ...

Страница 44: ...con la necessaria cautela e rispetto Un modello radiocomandato può causare danni e ferite in caso Non iniziare a guidare prima di avere osservato I seguenti punti carcariche e del corretto voltaggio modello correttamente al segnale del trasmettitore Segnali di disturbo possono determinare una perdita del controllo sul vostro modello antenne radio di forte vento pioggia o temporali limitate o in ar...

Страница 45: ...spina Peak A Fine Utilizzo difettoso può causare gravi danni alle persone Controllate periodicamente il vostro modello e sostituite le eventuali parti danneggiate solo con ricambi originali del modello Vi auguriamo buona fortuna e buon divertimento con il vostro modello CARSON a spina Oppure come set 8 batterie stilo e 8 batterie stilo RC Car sono necessari ...

Страница 46: ...tter 50 007 4053 Chiave candela 50 001 3118 Cacciaviti esagonali mm 1 5 2 2 5 mm 50 007 4023 Colla istantanea 50 005 3339 Pinzetta 50 007 4003 Motore Ricevete Batterie motore Gomme anteriori Ammortizzatori posteriori Gomme posteriore Interruttore Regolatore Servo sterzo Ammortizzatori anteriori Telaio a Telaio ...

Страница 47: ...47 I b Rimuovere la carrozzeria Tubetto antenna Filo antenna c Montaggio dell antenna ...

Страница 48: ...e altrimenti la batteria motore potrebbe subire dei danni No Il tempo di carica varia in base all apparecchio e al tipo di batterie 1 Inserire la batteria 3 Fissarlo con le clips f Accendere trasmettitore La gittata del radiocomando si riduce notevolmente se non estraete completamente l antenna f Acce ...

Страница 49: ...49 I ATTENZIONE Accendere sempre prima il trasmettitore on 2 Accendere la ricevente 2 ON 1 3 ...

Страница 50: ... avanti ed accelerare e o in avanti per frenare o andare in retromarcia Sinistra Destra per andare avanti ed accelerare per frenare o andare in retromarcia g Come controllare il vostro modello rispondano Sinistra Destra Neutra ...

Страница 51: ...uire le batterie Perdita di controllo Le batterie sono esaurite Sostituire le batterie L antenna è mancante o non collegata perfettamente Fissare l antenna ed estrarla completamente Portarsi in un area diversa o sostituirere la Non va dritto I dadi bloccaggio ruote anteriori e posteriori sono troppo lenti Stringete i dadi ruota Non si ferma Il trim dell acceleratore non è regolato bene Il trim del...

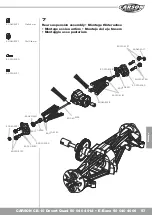
Страница 52: ...31 50 040 5131 50 040 5130 50 010 5108 1 anteriore posteriore 50 040 5075 3x30 mm 50 010 5130 M4x3 50 010 5130 50 040 5075 50 040 5134 50 040 5130 50 040 5132 50 040 5132 50 040 5071 50 040 5071 10x5x4 mm 50 040 5071 15x10x4 mm 50 040 5071 50 040 5071 50 040 5131 50 010 5278 2 ...

Страница 53: ...10x4 mm 50 040 5071 50 040 5071 50 040 5071 50 040 5071 50 010 5120 50 010 5137 50 010 5150 50 010 5150 50 010 5137 50 010 5150 50 010 5161 50 010 5161 50 010 5129 50 010 5129 50 010 5120 50 010 5150 50 010 5150 50 040 5135 50 040 5135 50 010 5137 3 ...

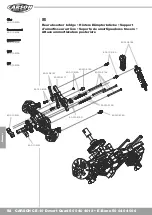
Страница 54: ...rne 50 010 5168 front vorne 2x 4x 2x 2x 2x 2x 50 040 5140 front vorne 2x 50 010 5176 front vorne 50 010 5159 4x 50 010 5138 50 010 5162 rear hinten 50 010 5169 rear hinten 2x 4x 2x 2x 2x 2x 50 040 5139 rear hinten 2x 50 010 5177 rear hinten 50 010 5159 4x 50 010 5138 4 Ammortizzatori ...

Страница 55: ...0 50 010 5190 3x18 mm 50 010 5190 3x12 mm 50 010 5184 50 010 5190 3x40 mm 50 010 5191 M3x3 50 010 5163 50 010 5150 50 010 5184 50 010 5150 50 010 5150 50 010 5171 50 010 5127 50 010 5140 50 010 5140 50 010 5191 50 010 5190 50 010 5190 50 010 5190 50 010 5190 ...

Страница 56: ...tion Position Pinion gear Ritzel Gear ratio Übersetzung A 18 11 6 B 19 10 57 C 20 10 04 D 21 9 56 50 040 5134 50 040 5071 50 040 5071 50 040 5130 50 040 5130 50 040 5075 50 040 5075 Electric motor Elektromotor 50 040 5074 50 040 5071 50 010 5112 50 040 5071 50 040 5075 3x30 mm 50 010 5130 M4x3 50 040 5071 10x5x4 mm 50 040 5071 15x10x4 mm 50 010 5130 50 010 5130 A A B B C C D D ...

Страница 57: ...040 5071 15x10x4 mm 50 010 5150 50 010 5137 50 040 5071 50 010 5137 50 010 5150 50 010 5120 50 010 5161 50 040 5071 50 010 5129 50 040 5135 50 010 5161 50 040 5071 50 010 5120 50 010 5150 50 010 5137 50 040 5071 50 010 5129 50 040 5135 7 ...

Страница 58: ...5184 50 010 5190 50 010 5190 50 010 5190 50 010 5150 50 010 5162 50 010 5127 50 010 5171 50 010 5150 50 010 5150 50 010 5190 50 010 5190 50 010 5190 50 010 5184 50 010 5191 50 010 5191 50 010 5190 8 Attaco ammortizzatore posteriore ...

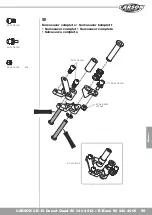
Страница 59: ...59 Montage 9 50 040 5075 M3 NUT 50 040 5075 M3 50 010 5150 50 010 5150 50 010 5150 50 010 5150 50 010 5123 ...

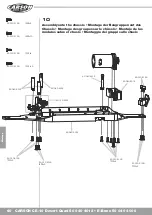
Страница 60: ...TPF3x10 50 010 5190 TPF3x8 50 010 5190 ISO3x10 50 010 5190 ISO3x8 50 040 5074 50 010 5150 50 010 5123 50 040 5072 50 040 5072 50 010 5190 TPF3x8 50 010 5190 ISO3x8 50 010 5190 TPF3x8 50 010 5190 TPF3x8 50 040 5072 50 040 5072 ...

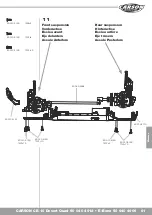
Страница 61: ... 8 50 010 5190 TPF3 10 50 010 5170 50 010 5191 50 040 5095 50 010 5190 TPF3x10 50 010 5190 TPF3x8 50 010 5190 ISO3x8 11 Front suspension Vorderachse Essieu avant Eje delantero Assale Anteriore Rear suspension Hinterachse Essieu arrière Eje trasero Assale Posteriore ...

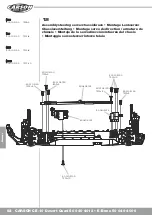
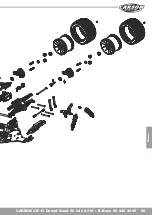
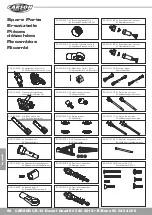
Страница 62: ...50 010 5190 TPF3x6 50 010 5190 ISO3x8 50 010 5190 TPF3x8 50 010 5190 TPF3 10 50 010 5190 TPF3 6 50 010 5190 TPF3 8 50 010 5190 ISO3 8 50 040 5072 50 010 5190 TPF3 6 50 010 5190 TPF3 6 50 010 5190 TPF3 10 50 040 5074 50 040 5072 12 ...

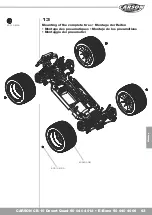
Страница 63: ...Montage 50 010 5190 50 010 5190 50 090 0047 13 ...

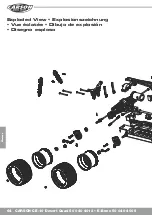
Страница 64: ...Montage ...

Страница 65: ...Montage ...

Страница 66: ...5161 2 x 2 Suspension arm 2 x 2 Querlenker 50 010 5190 Screw set CE 10 T Schraubenset CE 10 T 50 010 5162 2x Rear shock absorber 2x Dämpfer hinten 50 010 5163 2x Front shock absorber 2x Dämpfer vorn 50 010 5138 8x Pivot ball sockets short B 8x Kugelkopf Pfannen kurz B 50 010 5140 4x Wheel Hex Pin 4 12 mm 4x Felgenmitnehmer 12 mm 6 Kant Stift 50 010 5120 2x Upright set fr re le ri 2x Achsschenkel S...

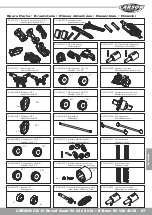
Страница 67: ...Piniongear set 18 19 T Ritzelset 18 19 Z 50 040 5077 Piniongear set 22 23 T Ritzelset 22 23 Z 50 040 5095 Centershaft Mittelwelle 50 040 5128 Differential Bevelgear Set Differenzial Kegelrad Set 50 040 5129 Differential housing w screw Differenzial Gehäuse mit Schrauben 50 040 5130 Crown bevelgear set w shaft Teller Kegelrad Set mit Welle 50 010 5278 Joint for central shaft Mitnehmer für Zentralwe...

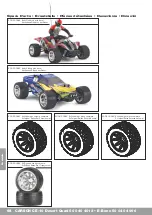
Страница 68: ...e mit Dekor 50 090 0047 2x Wheel set chrome complete 2x Felgen Reifen Set Chrom kompl 50 090 0052 2x On road tire set chrome 2x On Road Reifen Set f Truggy chrom 50 090 0048 2x Wheel set white complete 2x Felgen Reifen Set weiß kompl 50 090 0049 2x Wheel set black complete 2x Felgen Reifen Set schwarz kompl Ersatzteile ...

Страница 69: ... Notizen ...

Страница 70: ...70 Notizen ...

Страница 71: ...71 Notizen ...

Страница 72: ... Service Hotline Mo Do 8 00 17 00 Uhr Fr 8 00 14 30 Uhr 01805 73 33 00 12 ct min CARSON Model Sport Abt Service Mittlere Motsch 9 CARSON Model Sport www carson modelsport de line 00 Uhr 30 Uhr 33 00 rt ...

Отзывы: