12
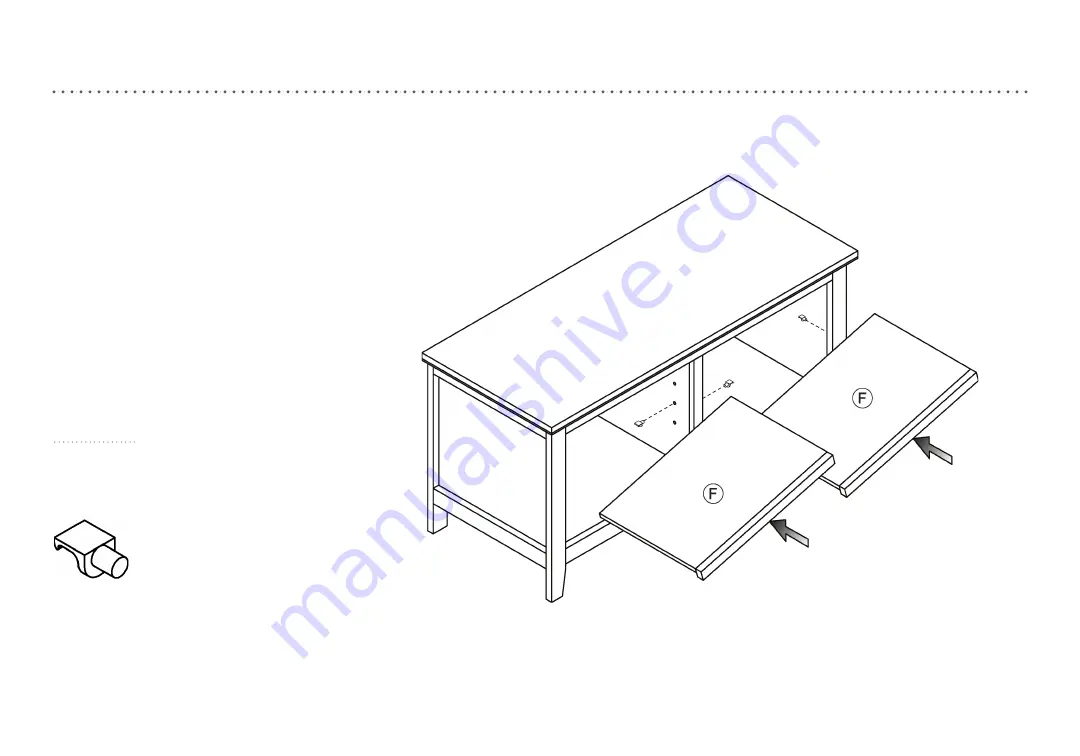
step 6: install adjustable shelves
(H6)
x 8
shelf pin
6.1. Insert shelf supports into desired hole. Different holes accommodate different shelf heights.
6.2. Angle shelf to fit between the rails and set on top of shelf supports.
Страница 1: ... Target The Bullseye Design is a trademark of Target Brands Inc All rights reserved carson media stand assembly instructions style CAMEDIAXBR rustic dpci 249 10 0807 style CAMEDIAXWL walnut dpci 249 10 2028 ...
Страница 2: ...ns and you ll be on your way to transforming your room in no time Good luck though we re confident you won t need it before you begin 1 Check for damaged or missing parts Call 1 855 MYTGTHOME 855 698 4846 to order missing supplies 2 Use the carton as a working surface to prevent product damage during assembly 3 Read through and review assembly steps 4 Gather all tools prior to assembly tools neede...
Страница 3: ...duction 2 hardware 4 parts list 5 how to use the cam lock system 6 assembly 7 13 QUESTIONS Just call 1 855 MYTGTHOME 855 698 4846 for parts and service For faster service have the style number and dpci number ready when calling ...
Страница 4: ...14 wooden dowel H2 x 12 flat head screw H3 x 14 cam bolt H4 x 14 cam H5 x 19 12mm pan head screw H6 x 8 shelf pin H7 x 1 15mm truss head screw H8 x 1 wall strap H9 x 1 wall anchor H10 x 1 wall screw H11 x 2 5 8 washer ...
Страница 5: ...iagram ITEM DESCRIPTION QUANTITY A top panel 1 B bottom assembly 1 C left side assembly 1 D right side assembly 1 E center assembly 1 F adjustable shelf 2 G back panel 1 H front beam 1 I side trim 2 J front trim 1 ...
Страница 6: ... s with cross bored hole s and insert all the way until panel s are flush 3 Push cam into panel arrow feature on cam top points to panel edge 4 Rotate cam s clockwise 180 to lock panels together 5 Panels should be tight against each other and connection should be rigid 1 2 3 4 5 ...
Страница 7: ...enter assembly to bottom assembly H1 x 2 wooden dowel H2 x 2 flat head screw 1 1 Carefully tap small wooden dowels into place in bottom assembly Leave 1 2 of the dowels sticking out 1 2 Do not over tighten screws front ...
Страница 8: ...p small wooden dowels into place in left side assembly and right side assembly Leave 1 2 of the dowels sticking out 2 2 Screw In cam bolts must be screwed down flush in left side assembly and right side assembly 2 3 Refer to page 6 for instructions on how to use the cam lock system 2 4 Do not over tighten bolts ...
Страница 9: ...9 step 3 attach front and side trim H2 x 10 flat head screw 1 1 Do not over tighten screws ...
Страница 10: ...cam 4 1 Carefully tap small wooden dowels into place in top panel Leave 1 2 of the dowels sticking out 4 2 Screw In cam bolts must be screwed down flush in top panel 4 3 Refer to page 6 for instructions on how to use the cam lock system 4 4 Do not over tighten bolts front ...
Страница 11: ...square If using a tape measure the distance from one corner diagonally to the other corner should be the same in both directions If not apply gentle pressure to the diagonally opposite corners to shift case into alignment Re measure to ensure equal distances Install the remaining screws starting with the corners H5 x 19 pan head screw 5 1 Make sure the screws go through the pre drilled holes prope...
Страница 12: ...nstall adjustable shelves H6 x 8 shelf pin 6 1 Insert shelf supports into desired hole Different holes accommodate different shelf heights 6 2 Angle shelf to fit between the rails and set on top of shelf supports ...
Страница 13: ...ole on wall Drill 1 4 hole Tap in wall anchor Fasten anti tip strap with wall screw provided 13 H10 H8 H11 H7 H9 H11 Position against wall H9 H8 Mark position of strap hole on wall H11 H7 Drill 1 4 hole Tap in wall anchor H11 H10 Fasten anti tip strap with wall screw provided H7 x 1 H8 x 1 H9 x 1 H10 x 1 H11 x 2 truss head wall strap wall anchor wall screw 5 8 washer screw ...
Страница 14: ...tory 16840041 1 WARNING Death or serious injury may occur when children climb on audio and or video equipment furniture A remote control or toys placed on the furnishing may encourage a child to climb on the furnishing and as a result the furnishing may tip over on to the child 2 WARNING Relocating audio and or video equipment to furniture not specifically designed to support audio and or video eq...
Страница 15: ... 2019 Target The Bullseye Design is a trademark of Target Brands Inc All rights reserved ...