


33
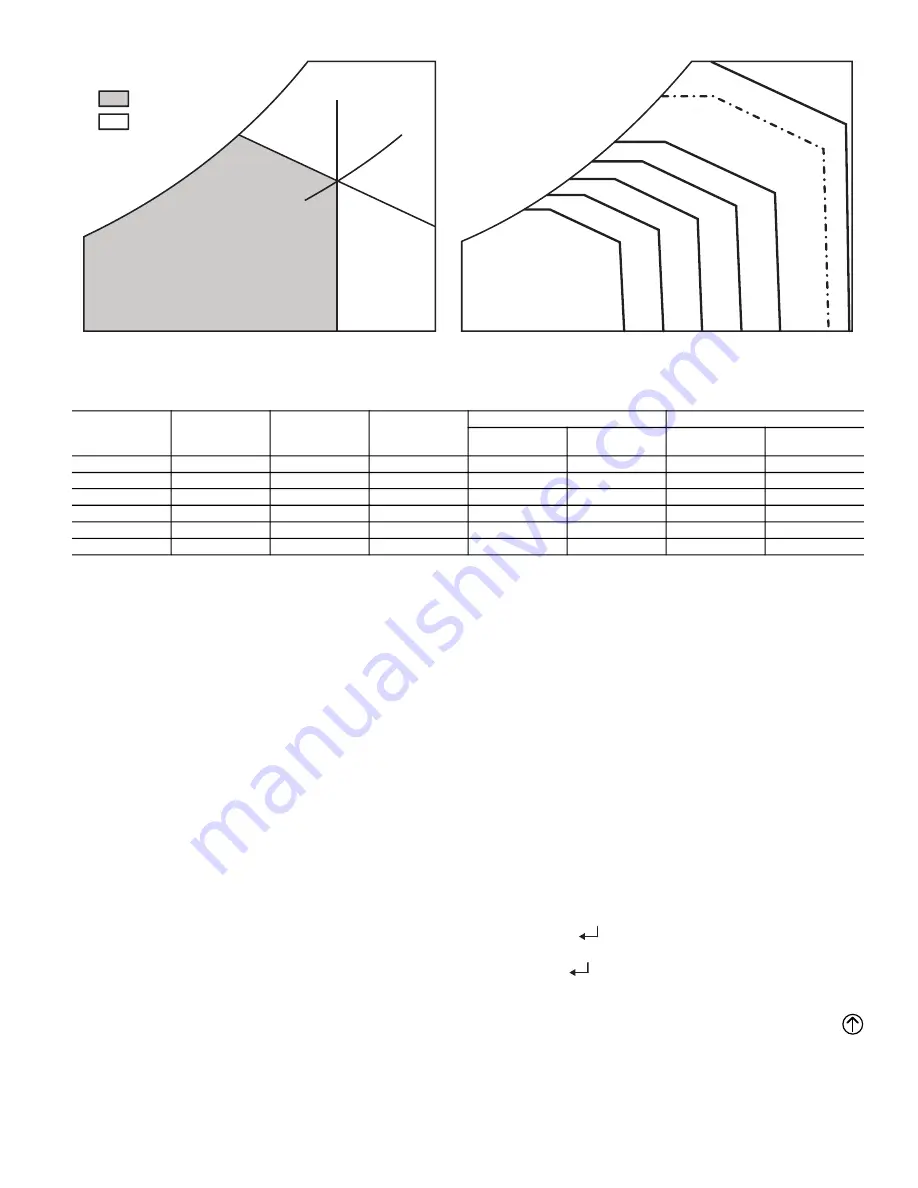
Fig. 48 — Single Enthalpy Curve Boundaries
ENTHALPY SETTINGS
When the OA temperature, enthalpy and dew point are below the
respective set points, the Outdoor Air can be used for economiz
-
ing. Figure 48 shows the new single enthalpy boundaries in the
W7220. There are 5 boundaries (set points ES1 through ES5),
which are defined by dry bulb temperature, enthalpy and dew
point.
Refer to Table 13 for ENTH CURVE set point values.
The W7220 calculates the enthalpy and dew point using the OA
temperature and humidity input from the OA enthalpy sensor.
When the OA temperature, OA humidity and OA dew point are
all below the selected boundary, the economizer sets the econo
-
mizing mode to YES, economizing is available.
When all of the OA conditions are above the selected boundary,
the conditions are not good to economize and the mode is set to
NO.
Figure 48 shows the 5 current boundaries. There is also a high lim
-
it boundary for differential enthalpy. The high limit boundary is
ES1 when there are no stages of mechanical cooling energized and
HL (high limit) when a compressor stage is energized.
CHECKOUT
Inspect all wiring connections at the economizer module’s termi
-
nals, and verify compliance with the installation wiring diagrams.
For checkout, review the Status of each configured parameter and
perform the Checkout tests.
NOTE: For information about menu navigation and use of the
keypad see Interface Overview on page 25.
Power Up
After the W7220 module is mounted and wired, apply power.
Initial Menu Display
On initial start up, Honeywell displays on the first line and econo
-
mizer W7220 on the second line. After a brief pause, the revision
of the software appears on the first line and the second line will be
blank.
Power Loss (Outage or Brownout)
All set points and advanced settings are restored after any power
loss or interruption.
NOTE: All settings are stored in non-volatile flash memory.
Status
Use the Status menu (see Table 7) to check the parameter values
for the various devices and sensors configured.
NOTE: For information about menu navigation and use of the
keypad, see Interface Overview on page 25.
Checkout Tests
Use the Checkout menu (see page 30) to test the damper operation
and any configured outputs. Only items that are configured are
shown in the Checkout menu.
NOTE: For information about menu navigation and use of the
keypad, see Interface Overview on page 25.
To perform a Checkout test:
1. Scroll to the desired test in the Checkout menu using the ▲
and ▼ buttons.
2. Press the
(Enter) button to select the item. RUN?
appears.
3. Press the
(Enter) button to start the test. The unit pauses
and then displays IN PROGRESS. When the test is complete,
DONE appears.
4. When all desired parameters have been tested, press the
(Menu Up) button to end the test.
The Checkout tests can all be performed at the time of installation
or at any time during the operation of the system as a test that the
system is operable.
ECONOMIZING
AVAILABLE
NOT AVAILABLE
ENTHALPY
RA
HUM (%RH)
RA
TEMP
TEMPERATURE
ABSOLUTE HUMIDITY
ES5
ES4
ES3
ES2
ES1
HL
P1
(T,RH)
P2 (T,RH)
SINGLE ENTHALPY
DUAL ENTHALPY
HIGH LIMIT
Table 13 — Single Enthalpy and Dual Enthalpy High Limit Curves
ENTHALPY
CURVE
TEMP. DRY
BULB (F)
TEMP.
DEWPOINT (F)
ENTHALPY
(btu/lb/da)
POINT P1
POINT P2
TEMP. (F)
HUMIDITY
(%RH)
TEMP. (F)
HUMIDITY
(%RH)
ES1
80
60
28.0
80
36.8
66.3
80.1
ES2
75
57
26.0
75
39.6
63.3
80.0
ES3
70
54
24.0
70
42.3
59.7
81.4
ES4
65
51
22.0
65
44.8
55.7
84.2
ES5
60
48
20.0
60
46.9
51.3
88.5
HL
86
66
32.4
86
38.9
72.4
80.3
Содержание 50KC04
Страница 4: ...4 Fig 2 Unit Dimensional Drawing of Units Built On and After 4 15 19...
Страница 5: ...5 Fig 3 Unit Dimensional Drawing of Units Built on and Prior to 4 15 19...
Страница 6: ...6 Fig 4 Unit Corner Weights and Clearances...
Страница 7: ...7 Fig 5 Base Rail Details...
Страница 8: ...8 Fig 6 Thru the Base Charts...
Страница 35: ...35 Fig 49 Electro Mechanical Control Wiring Diagram...
Страница 36: ...36 Fig 50 Electro Mechanical Control Wiring Diagram with Humidi MiZer System...
Страница 37: ...37 Fig 51 Electro Mechanical Power Wiring...
Страница 38: ...38 Fig 52 PremierLink Wiring Schematic...
Страница 39: ...39 Fig 53 PremierLink Wiring Schematic with Humidi MiZer System...
Страница 40: ...40 Fig 54 RTU Open System Control Wiring Diagram...
Страница 41: ...41 Fig 55 RTU Open System Control Wiring Diagram with Humidi MiZer System...
Страница 47: ...47 Fig 63 TXV Metering Device Position in Reheat Coil Typical Diagram for Sizes 04 06 TXV...
Страница 48: ......
Страница 49: ......