background image


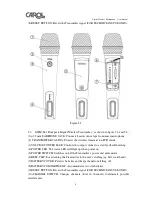
                                          Digital Wireless Microphone    User Manual


8


4.3.4


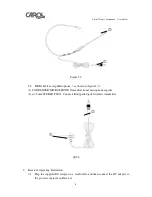
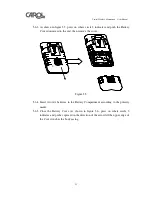
Close the battery cover. Place the cover on top front of the battery compartment, 

then press on where circle 3 indicates and push the battery cover downward to 

the  end  (CAUTION:  To  avoid  injury,  DO  NOT  place  your  fingers  at  where 

circle 4 indicates when pushing the cover). 


Figure 4.3 


4.4


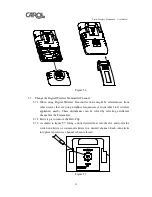
Change the Digital Wireless Microphone Channel 

4.4.1


When using wireless microphone, there might be interferences from the signals 

transmitted by another wireless microphone or other 2.4G wireless appliances 

near by. These disturbances can be solved by selecting a different channel. 

4.4.2


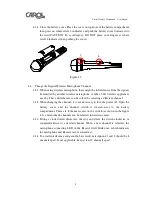
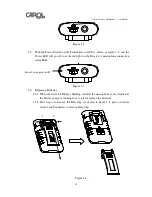
When changing the channel, it is not necessary to turn the power off. Open the 

battery  cover,  and  the  channel  switch  is  located  next  to  the  battery 

compartment. There are 8 channel scales on the switch (as shown in the figure 

4.4), and another 8 channels can be selected in between scales. 
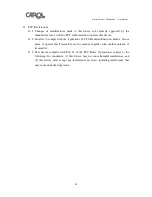
4.4.3


Fitting  a  slotted  screwdriver  into  the  slot,  and  rotate  the  switch  clockwise  or 

counterclockwise  to  a  desired  channel.  When  a  new  channel  is  selected,  the 

microphone connecting LED on the Receiver will blink once, which indicates 

the microphone and Receiver are reconnected. 

4.4.4


To avoid interference and gain the best result, microphone 1 and 2 should be 8 

channels apart. If not applicable, keep at least 2 channels apart. 

Содержание DWR-882

Страница 1: ...Bodypack Digital Wireless Transmitter DWM 881 User Manual...

Страница 2: ...Tie clip Microphone Optional 1 6 DC 7 5V Power adapter 1 7 6 3mm M XLR M XLR Cable 1 8 User s Manual 2 Parts Identification and Function 2 1 DWR 882 Digital Wireless Receiver as shown in figure 2 1 1...

Страница 3: ...n off the microphone with status LED 3 HOUSING For easy handling the microphone and protects the wireless transmitting PCB inside 4 LOGO PLATE Protects the antenna and strengthen the transmitting effe...

Страница 4: ...CONTROLLER Controls the output volume to avoid feedback howling 4 POWER LED The status LED will light up when power on 5 POWER SWITCH Switches on off the Transmitter s power and mute mode 6 BELT CLIP...

Страница 5: ...ophone User Manual 5 Figure 2 3 Figure 2 4 2 4 MUD 806 Headset Microphone as shown in figure 2 5 1 3 5mm STEREO PLUG Connects Bodypack digital wireless transmitter 2 CONDENSER MICROPHONE Uni direction...

Страница 6: ...in figure 2 6 1 CONDENSER MICROPHONE Omni directional microphone capsule 2 3 5mm STEREO PLUG Connects Bodypack digital wireless transmitter 2 6 3 Receiver Operating Instruction 3 1 Plug the supplied D...

Страница 7: ...hone to the sound source in between 2 to 5 cm 4 2 Turning OFF Keep pressing the microphone power switch for 2 to 3 seconds till the status LED goes off When the microphone is been turned off the micro...

Страница 8: ...can be solved by selecting a different channel 4 4 2 When changing the channel it is not necessary to turn the power off Open the battery cover and the channel switch is located next to the battery c...

Страница 9: ...s up red it indicates the Receiver has already picked up the signals from Microphone so you can now talk to the microphone Figure 5 1 5 3 If a feedback noise appears when the volume is too high or the...

Страница 10: ...ver s microphone connection status LED Figure 5 3 5 6 Replacing Batteries 5 6 1 When the status LED keeps blinking red after the microphone is on it indicates the battery energy is running low so plea...

Страница 11: ...ownward to the end then remove the cover Figure 5 5 5 6 4 Insert two AA batteries in the Battery Compartment according to the polarity marks 5 6 5 Close the Battery Cover As shown in figure 5 6 press...

Страница 12: ...ghbor frequencies or from other 2 4G wireless appliances nearby These disturbances can be solved by selecting a different channel for the Transmitter 5 7 2 First step is to remove the Belt Clip 5 7 3...

Страница 13: ...lease repeat steps 6 3 6 4 and speed up the process 7 Troubleshooting 7 1 No sound 7 1 1 Check if the power to Digital Wireless Receiver is well connected 7 1 2 If the status LED is not lit when the D...

Страница 14: ...Digital Wireless Transmitter Model DWM 881 Carrier Frequency 2 404G Hz 2 474G Hz Transmitting Power 10dBm 2dBm Frequency Response 30 18000Hz Current Consumption 95mA Power Supply Two AA batteries Bat...

Страница 15: ...any electric devices with CRT monitor as the product might interferes the monitor display 9 6 While using the wireless microphone keep the Receiver away from any interference sources such as computer...

Страница 16: ...ply with the regulations of FCC Radiated Emission Limits do not place or operate this Transmitter and its antenna together with another antenna or transmitter 11 3 This device complies with Part 15 of...

Отзывы: