CarNavi-Tech BM12 V2.3 Series Скачать руководство пользователя страница 15

2.4.2 Input DVD, DTV I-DRIVE 

15 

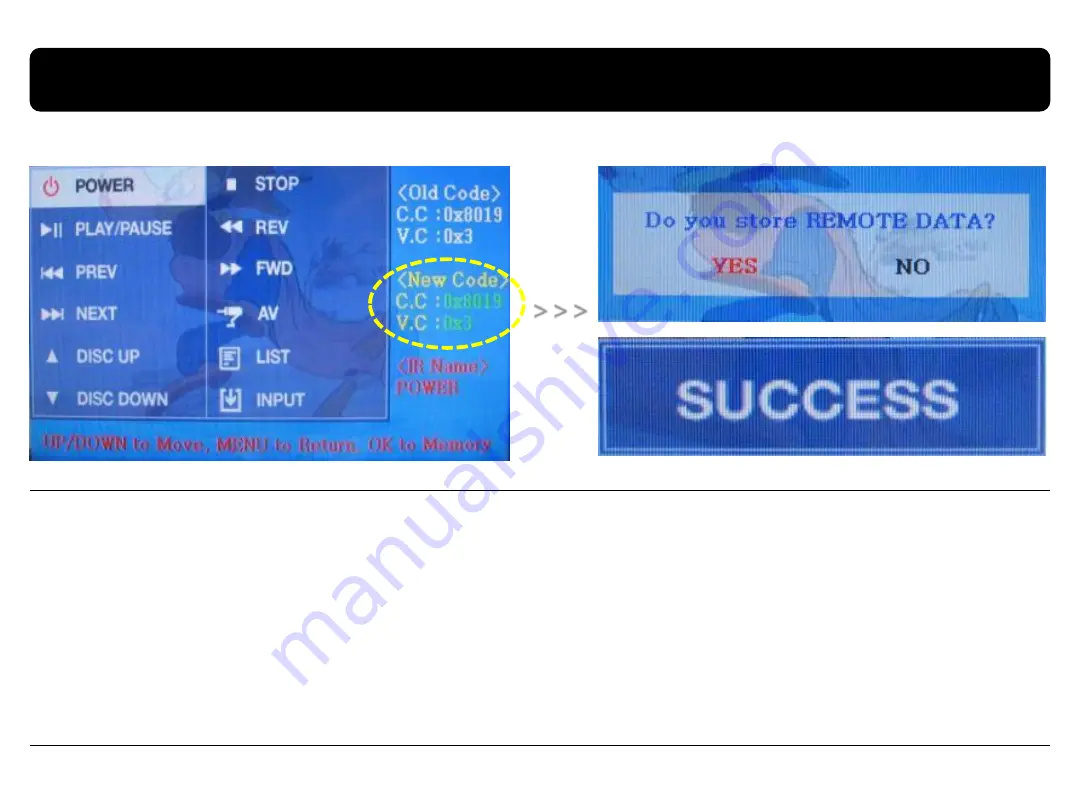
Example) continue from slide 13 

c. While pressing button, remote control’s value will

appear (picture above) in green color and automatically 

saved. 

d. Repeat this step for input other button value on OSD

menu. 

③ After value input, select INPUT on OSD

menu ,press YES button (picture above) for saving 

input value and press NO for cancel all input value. 

(if saved, DVD TYPE and DTV TYPE will be changed 

automatically to USER) 

If SUCCESS word appears, input values are 

successfully saved, user can control input DVD with 

touch screen.  

But, at this time, Factory-I_DRV-I_DRV REMOT must 

be changed into USER. 

>>> 

CarNavi-Tech

Содержание BM12 V2.3 Series

Страница 1: ...22 Model QVI BM12 Main V2 3 IF Product code QVI BM12 1207 003 SUNE TECHNOLOGY ELECTRONIC CO LTD No 9 Land 606 Anping Rd Tainan City 70849 Taiwan Tel 886 62292246 Fax 886 62288104 Website http www sun...

Страница 2: ...1 2 Features 1 3 System diagram 1 4 Components 1 5 Exterior 4 3 5 6 8 2 Setup 2 1 DIP switch 2 2 Setup for car model navigation 2 3 1 3 Factory mode 2 4 1 2 Input DVD DTV and I Drive 2 5 Original But...

Страница 3: ...nalog RGB input navigation system output 1 LCD input car system input 4 MULTIMEDIA INTERFACE output spec 1 LCD output 5 POWER spec input power 8VDC 18VDC consumption power 5WATT 6 Switch input mode In...

Страница 4: ...ion of the DVD navigation image Screen Display improvement user convenience intended interface Mode change via original button Menu button in I DRIVE Provided Power cable for connecting with rear came...

Страница 5: ...g RGB CVBS Rear camera Car Screen Input A V 2 A V 3 VIDEO CIRCUIT VIDEO MUX MCU Power Input 8VDC 18VDC POWER CIRCUIT Dip S W A V OUT HEADREST MONITOR Switch for source toggle OEM Button Can Intrface C...

Страница 6: ...cable 1EA IR cable 1EA REAR CAMERA POWER cable 1EA POWER cable 7P 1EA HPOWER0002 HARETC0002 HAVCAB0002 Remote control 1ea REMOTE0001 HARETC0001 HIRCAB0002 RGB cable 1ea HNAVIC0004 HLCDCA0005 MONITOR...

Страница 7: ...1 4 Components Option 7 10 2 Touch Panel TOUPAN0002 8 8 Touch Panel TOUPAN0012 C a r N a v i T e c h...

Страница 8: ...1 5 Exterior 8 POWER RGB IN REAR CAMERA POWER A V IN OUT LCD OUT LCD IN POWER OUT IR MODE DIP switch Dimension Horizontal length 150 4mm Vertical length 99 4mm Height 23 2mm LED C a r N a v i T e c h...

Страница 9: ...monitor size ON 6 5 OFF 8 8 10 2 6 Car model Setup ON 3D GUI Model OFF General GUI Model 7 Setup of rear camera use ON CVBS4 OFF MAIN 8 Unavailable ON DOWN OFF UP default ON DIP 8 DIP S W usage examp...

Страница 10: ...800x480 in high definition for Domestic GI8000 WVGA 800x480 in high definition for Domestic GI5000 WVGA 800x480 in high definition for Domestic I ONE WVGA 800x480 in high definition for Domestic WP92...

Страница 11: ...vigation or original mode DEFAULT Selecting AV sound just before changing navigation or original mode from the AV mode AV 1 3 Sound of the selected AV source 1 3 UTIL FACTORY RESET FACTORY MODE RESET...

Страница 12: ...ML 740T ARION PANASONIC HSD100 COMTEC NET770 PIONEER ML100 USER When use IR Memory value Selecting NAVIGATION model in RGB mode Selecting DVD model in A V mode I_DRV I_DRV CONTROL Selecting whether to...

Страница 13: ...ORY Set DVD DTV remote control value to control with I Drive To use this function select User Mode on I_DRV I_DRV REMOTE DVD DTV I_DRV MEMORY BUTTON Set up car audio number 8 Switch Mode Aux Switch ON...

Страница 14: ...n value If you want to register DTV remote control button value after selecting IR MEMORY DTV you can register button value with these following steps Example a Select POWER button on OSD menu and pre...

Страница 15: ...lue on OSD menu After value input select INPUT on OSD menu press YES button picture above for saving input value and press NO for cancel all input value if saved DVD TYPE and DTV TYPE will be changed...

Страница 16: ...NU Press long Changing modes Press short Getting back to Original image Press short Changing modes Audio Button no 8 Press short Changing modes Changing car AUX Rear Camera Steering wheel Press short...

Страница 17: ...Press short Changing modes Audio button no 8 Press short Changing modes Changing car AUX AV1 AV2 AV3 Press this button 2 seconds long in the direction of 6 O clock Activating PIP function Rear Camera...

Страница 18: ...u can change sources audio video by pressing this button without any other install process Key Function POWER PIP Unavailable MENU Activating OSD menu OK Making a selection changing image display Movi...

Страница 19: ...e parking guide line or not on rear gear default ON PARK SETUP Adjusting the position of the parking guide line available in PARK SETUP H POSITION V POSITION SAFE ENABLE If your car is connected with...

Страница 20: ...iew camera 6 5 20 Full real view on screen PIP screen Setup for displaying rear view 1 Series F20 Press button short on steering wheel you can choose full screen or PIP screen as shown below QDIS QDIS...

Страница 21: ...camera 8 8 21 Full real view on screen PIP screen QDIS QDIS Setup for displaying rear view 1 Series F20 Press button about 2 seconds long on I Drive you can choose full screen or pip screen as shown b...

Страница 22: ...odel F20 FACTORY MENU CAR MODEL F20 If PIP Screen is unstable in F20 car model select F20 7 Rear Camera Full screen 3D PDC Full Screen PIP Screen 2 After setting Dip Switch NO 6 to ON Select Car model...

Страница 23: ...n Factory Menu and move H POS V POS in sequence by pressing OK button on the remote control H POS V POS If you need to move the horizontal position press buttons on the remote control If you need to m...

Страница 24: ...TION Positioning OSD menu IMAGE BRIGHTNESS CONTRAST SHARPNESS USER IMAGE Selecting one among 4 color options COLOR RED Adjusting red GREEN Adjusting green BLUE Adjusting blue USER COLOR Selecting a co...

Страница 25: ...to navigation A V DTV rear mode respectively OSD LANGUAGE Choosing OSD language while using Touch OSD English Chinese only TRANS Adjusting transparency of OSD H_POSITION V_POSITION Positioning OSD men...

Страница 26: ...R C SAFE F CAM DET CAN L CAN H ACC 12V 24V GND R DATA red G DATA green B DATA blue NAVI SYNC white GND black DVD REAR 12V OUT GND Offered 2P Power Cable Connect CAN high Green Brown of the interface t...

Страница 27: ...agnetic pole around installation place All steps of installation should be done by well trained specialist Dismantling without manufacturer s permission can not be guaranteed No permission to break at...

Страница 28: ...to the spot that the original one is connected after disconnecting the original LCD cable from the monitor as shown left Connect the original LCD cable to LCD IN connector of the interface Warning Pow...

Страница 29: ...en Brown enclosed in our package with the original CAN H wire Yellow Red And connect CAN L wire Green enclosed in our package with the original CAN L wire Yellow Brown Offered CAN Low Offered CAN High...

Страница 30: ...A V source switching order OEM RGB AV1 AV2 AV3 A Check DIP Switch Setting Q OEM image is not displayed A Check interface s LCD In Out cable connection If the status keeps on inform to manufacturer Q...

Отзывы: