background image

Adjustments, settings and alignments 

Spectra series


38 Service 

instructions 

1108


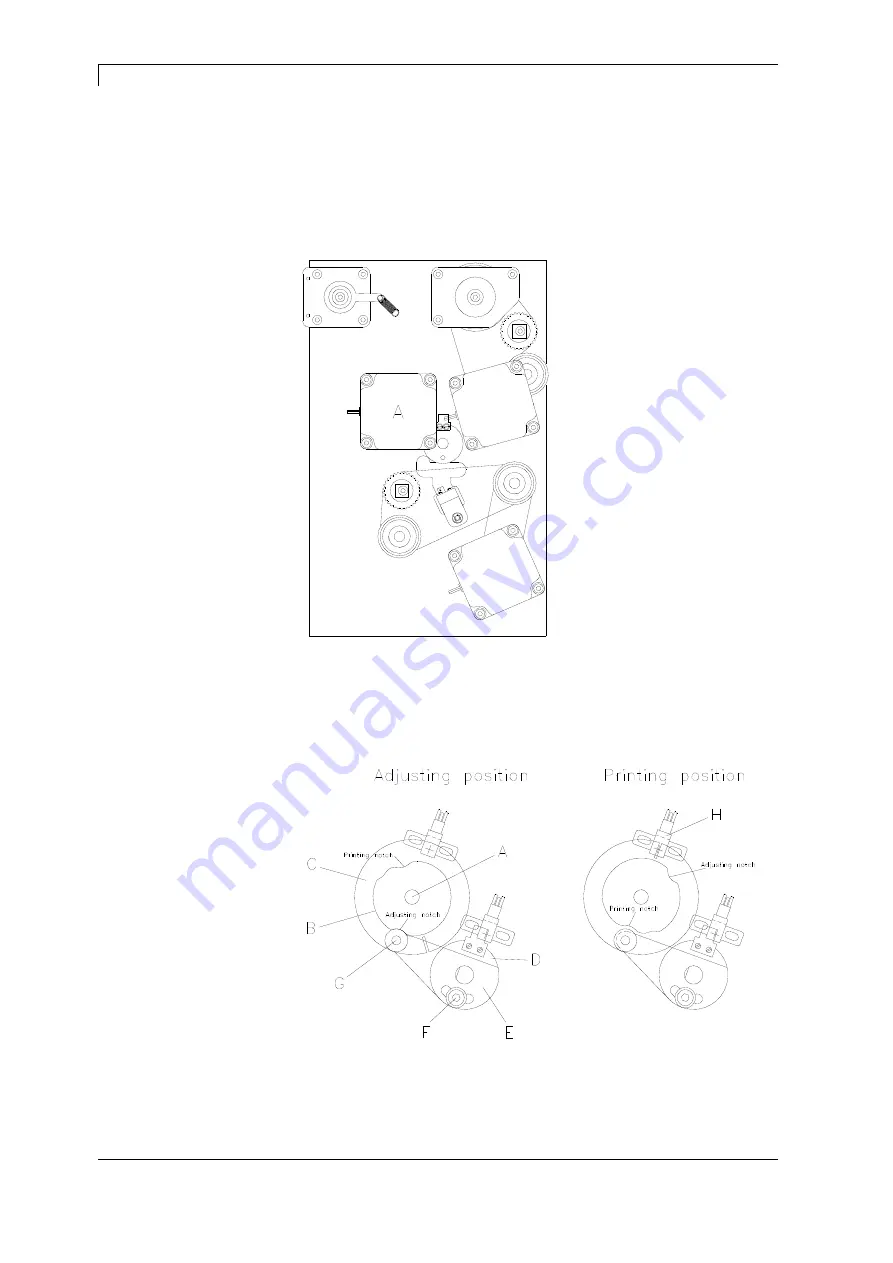
5.9  Pressure curve (ribbon save) 

If the ribbon save function is activated and the printhead is not enough 
lifted up from the label material, then the pressure curve is to be 
adjusted anew. The pressure curve is onto the shaft of the ribbon 
save motor (A). 


Figure 21 

 
1.  Remove left printer cover. 

Loosen 3 screws at the lower left printer edge and 3 screws at the 
chassis upper edge. 

2.  Remove the protective conductor at the inside of the printer cover. 


Figure 22 


Содержание Spectra series

Страница 1: ...Service instructions Label printer Spectra series November 2008 ...

Страница 2: ...duced in any form print photocopy or any other method or edited copied or distributed electronically without written permission from Carl Valentin GmbH Carl Valentin label printers comply with the following safety guidelines CE EG Low Voltage Directive 2006 95 EG EG Electromagnetic Compatibility Directive 89 336 EWG Carl Valentin GmbH Postfach 3744 D 78026 Villingen Schwenningen Neckarstraße 78 80...

Страница 3: ... 19 4 7 Print roller 20 4 8 Label photocell 21 4 9 CPU PCB 22 4 10 Power supply 24 4 11 Printhead FPGA 25 4 12 I O FPGA 25 4 13 Battery 25 5 Adjustments settings and alignments 27 5 1 Print mechanism 27 5 2 Position of printhead Flat Type 28 5 3 Position of printhead Corner Type 30 5 4 Transfer ribbon feed path 32 5 5 Ribbon rewinder unwinder 33 5 6 Head photocell 34 5 7 Cutter ledge 35 5 8 Angle ...

Страница 4: ...er supply unit revision G 63 9 3 Memory card slot option 65 9 4 Compact Flash card slot option 66 9 5 Input output board option 67 9 6 Input output board 24V option 68 9 7 Ethernet option 69 10 Pin assignment interfaces 71 10 1 Centronics 71 10 2 RS 232 71 10 3 RS 485 and RS 422 option 72 10 4 Ethernet option 73 10 5 USB 1 0 73 11 Index 75 ...

Страница 5: ...sponsible dealer 1 2 Warnings Warnings are presented with three signal words for the different levels of danger DANGER identifies an extraordinarily great and immediate danger which could lead to serious injury or even death WARNING identifies a possible danger would could lead to serious bodily injury or even death if sufficient precautions are not taken CAUTION indicates a potentially dangerous ...

Страница 6: ...ext always refer to the graphic directly above the text If a reference is made to another graphic the figure number is specified e g 2 in figure 5 For a cross reference to chapters and sections the chapter number and page number are specified e g a reference to this section see chapter 1 3 2 on page 35 References to other documents have the following form see operating manual Item numbers Cross re...

Страница 7: ...lothing by moving parts can lead to injuries If possible do not wear clothing which could be caught by moving device parts Button or roll up shirt or jacket sleeves Tie or pin up long hair Tuck the ends of scarves ties and shawls into your clothing or secure them with non conductive clips DANGER Risk of death from increased flow of current via metals parts which come into contact with the device D...

Страница 8: ...when using spring hooks when loosening or inserting springs snap rings and gripping rings when soldering when using solvents cleaning agents or other chemicals WARNING Risk of injury in case of missing or faulty protective equipment After performing maintenance work attach all safety equipment covers safety precautions ground cables etc Replace faulty parts and those which have become unusable Pro...

Страница 9: ...tive extension cables faulty protective conduction connections Give another person the task of remaining near the workplace This person must be familiar with the location and operation of the emergency stop and power switches and switch off the power if danger arises Use only one hand while working on electrical circuits when a device is switched on Hold the other hand behind your back or put it i...

Страница 10: ......

Страница 11: ...ll is changed or when the printout and label transport are adversely affected Cleaning printhead see section 3 3 page 13 Direct thermal printing Each time the label roll is changed Thermal transfer printing Each time the transfer ribbon is changed or when the printout is adversely affected Cleaning label photocell see section 3 4 page 14 When exchanging the label roll WARNING Risk of fire by easil...

Страница 12: ...ll purpose cleaner 3 2 Print roller A soiled print roll can lead to reduced print quality and can affect transport of material Figure 1 1 Open printer cover 2 Turn red lever B counter clockwise to lift up the printhead A 3 Remove labels and transfer ribbon form the label printer 4 Remove deposits with roller cleaner and a soft cloth 5 Turn the roller C manually step by step to clean the complete r...

Страница 13: ...such as dust etc CAUTION Printhead can be damaged Do not use sharp or hard objects to clean the printhead Do not touch protective glass layer of the printhead Figure 2 1 Open printer cover 2 Turn red lever B in Figure 1 counter clockwise to lift up the printhead 3 Remove labels and transfer ribbon from the label printer 4 Clean printhead surface with special cleaning pen or a cotton swab dipped in...

Страница 14: ...el detection Figure 3 1 Open printer cover 2 Turn red lever B in Figure 1 counter clockwise to lift up the printhead 3 Remove labels and transfer ribbon from the label printer 4 Blow out the photocell A with pressure gas spray Observe strictly the instructions on the spray can 5 Clean the label photocell A additionally with a cleaning card B before soaked in pure alcohol Move the cleaning card fro...

Страница 15: ...efore opening the housing cover disconnect the device from the mains supply and wait approx 2 3 minutes until the power supply unit has discharged 4 1 Tool list Some service work requires the following tools Philips head screwdriver size 2 Screwdriver size 5 Allen wrench 1 5 mm 2 mm 2 5 mm Hexagonal wrench 3 mm Spring scale 50 N ...

Страница 16: ...e micro fuse 2AT into the fuse carrier red 2 Plug the fuse carrier into the line filter block A 3 Close the cover B 4 Connect the power cable 4 3 Secondary fuse Figure 5 1 Remove left printer cover Loosen two screws at the lower left printer edge and three screws at the chassis upper edge 2 Remove the protective conductor at the inside of the printer cover 3 Replace secondary fuse A on the power s...

Страница 17: ... 2 Plug connection signal 3 Plug connection tension 4 Printhead 5 Focal line 6 Guiding 7 Knurled screw CAUTION The printhead can be damaged by static electricity discharges and impacts Set up printer on a grounded conductive surface Ground your body e g by wearing a grounded wristband Do not touch contacts on the plug connections 2 3 Do not touch printing line 5 with hard objects or your hands ...

Страница 18: ... can reach the plug connections 6 Remove plug connections and then remove printhead G 1 Attach plug connections 2 Position printhead in printhead mounting bracket in such a way that the pins are secured in the corresponding holes in the head plate 3 Lightly keep printhead mounting bracket on the printer roller with one finger and check for correct positioning of the printhead 4 Screw in screw H an...

Страница 19: ...u can reach the plug connections 6 Remove plug connections and then remove printhead G 1 Attach plug connections 2 Position printhead in printhead mounting bracket in such a way that the pins are secured in the corresponding holes in the head plate 3 Lightly keep printhead mounting bracket on the printer roller with one finger and check for correct positioning of the printhead 4 Screw in screw J a...

Страница 20: ...thead 5 Loosen pins F from belt pulley G on the print roller D 6 Remove protective disc C and ball bearing B 7 Pull print roller D through the drillings outwards 8 Hold the belt pulley G 1 Insert the new print roller D through the drillings and the belt pulley G 2 Mount protective disc C and ball bearing B 3 When reassembling the belt pulley G a pin must meet the milled surface of roller axe 4 Tig...

Страница 21: ...b A counter clockwise until the photocell C can be removed from the adjusting axis B 5 Unplug the cable from the plug on the rear end of the label photocell C 6 Connect the cable to the label photocell C 7 Place photocell C on the adjusting axis B and turn knurled knob A in clockwise direction until the photocell arrives at the desired position 8 Connect the protective conductor to the inside of p...

Страница 22: ...from the back of the printer 4 Remove left printer cover Loosen 3 screws A at the lower left printer edge and 3 screws B at the chassis upper edge 5 Remove the protective conductor at the inside of the printer cover 6 Unplug all side plug connections from the CPU PCB 7 Remove the two fixing bolts B from the Centronics interface 8 Remove the 5 fixing screws D from the CPU PCB 9 Carefully remove the...

Страница 23: ...onnect the protective conductor to the inside of printer cover 6 Install again the left printer cover with screws A B Figure 11 7 Restore all interface connections on the back of the printer 8 Connect the power cable at the rear of the printer 9 Update the firmware if necessary 10 Adjust the label photocell 11 Load the printer configuration from the memory card if possible Otherwise set the printe...

Страница 24: ...he rectifier 6 Remove the fixing screws D 7 Remove the 3 countersink screws E at the print mechanics side 8 Remove the power supply unit 1 Insert the new power supply Take care that no cables are clamped below the heat sink 2 Screw again the 3 countersink screws E 3 Insert again the fixing screws D 4 Mount the screw C at the rectifier 5 Connect all cable connections at the power supply 6 Connect t...

Страница 25: ...he CPU The I O FPGA is now visible 2 Remove defective FPGA A from PLCC support base with a suitable displacement pincer 3 Pay attention to polarity and press the new FPGA into the support base 4 13 Battery DANGER Danger of explosion when exchanging the battery improper Pay attention to polarity Figure 13 1 Lift up the fixing bracket by means of a non metallic device e g plastic ruler 2 Remove the ...

Страница 26: ......

Страница 27: ...g print quality imperfections may indicate maladjustment of the printing mechanism Print image too light Print image is spotty Print image lighter on one side Horizontal lines not parallel to the horizontal label edges Clear lateral drift of the transfer ribbon Print image errors can also arise from wrinkling of the transfer ribbon This is why the transfer ribbon feed path and the head locking sys...

Страница 28: ...ad Open and close the printhead locking device after each step of the adjustment An important characteristic for a high quality print is the parallelism of the focal line of the thermal printhead to the pressure roll Because of the fact that the position of focal line of the printhead depends on fluctuations caused by production it is necessary to adjust the parallelism Figure 14 1 Loosen the scre...

Страница 29: ...ity on the corresponding side and to a shifting of the ribbon feed path in the corresponding direction CAUTION Damage of printhead by unequal use Change factory settings only in exceptional cases The selection of the smallest value can optimise the life cycle of printhead 1 Turn the pressure screws A Figure 14 to change the pressure of printhead 2 Turning the pressure screws A Figure 14 as far as ...

Страница 30: ...he parallelism of the focal line of the thermal printhead to the pressure roll Because of the fact that the position of focal line of the printhead depends on fluctuations caused by production it is necessary to adjust the parallelism Figure 15 The form of the Corner Type printhead needs the setting of parallelism in direction of the adjusting angle and in horizontal position It needs a little bit...

Страница 31: ...ty on the corresponding side and to a shifting of the ribbon feed path in the corresponding direction CAUTION Damage of printhead by unequal use Change factory settings only in exceptional cases The selection of the smallest value can optimise the life cycle of printhead 1 Turn the pressure screws A Figure 15 to change the pressure of printhead 2 Turning the pressure screws A Figure 15 as far as t...

Страница 32: ...ghth of a turn Only turn the adjustment screw K as far as is absolutely necessary Figure 16 1 Check the transfer ribbon feed path The wound up ribbon should be the same distance from the disk of the winder as the supply roller is from the disk of the rewinder 2 If the ribbon runs inward or outward turn the corresponding screw J after loosing the screw B clockwise in small increments 3 Wait until t...

Страница 33: ...s When using a too high ribbon tension this results usually in an excellent run of the transfer ribbon but this could lead to streaks onto the label or to a rip of ribbon particularly with narrow roles Ex factory the role tension is set to a transfer ribbon 110 mm width and standard quality As approximate values for the factory setting the following can be accepted Transfer ribbon unwinder Distanc...

Страница 34: ...is upper edge 3 Lock printhead 4 Slightly loosen the fixing screws A of the photocell B 5 Shift the photocell B in the elongated hole sideways in such way that the plate C extends slightly into the centre of photocell into the fork 6 Tighten again the screws A 7 If this measure should not be sufficient the plate C can be also shifted by loosening the screws D 8 Install again the left printer cover...

Страница 35: ...pecifications Do NOT touch the area of the moving blades 1 Loosen screws E and remove front plate F of the cutter unit 2 Loosen hex socket head screws D and remove cutter unit 3 Place the cutter unit in front of the printer and make sure that the connecting cable has to be connected 4 Insert the power plug and switch on the printer 5 Insert paper or labels from behind through the inserting angle o...

Страница 36: ...lar 3 Turn the spacer pillar C slightly downwards with a flat spanner size 8 4 Tighten again the 2 screws G 5 Start a single cut In the main menu of printer of if a print order has been stopped press key to start a single cut In case the quality of the cut is not sufficient then repeat the above mentioned steps If the pressure is too strong this could result in an increased ware Therefore select t...

Страница 37: ...lexion photocell C scans the screw head B onto the belt drive A 3 If the angle of aperture is too small the photocell has to be turned slightly in clockwise direction Loosen the screw E Keep the distance of 5 mm between photocell and screw head 4 Place the cover onto the spacer pillar in order that the reflexion photocell is not exposed to extraneous light 5 Start a number of test cuts Verify if t...

Страница 38: ...head is not enough lifted up from the label material then the pressure curve is to be adjusted anew The pressure curve is onto the shaft of the ribbon save motor A Figure 21 1 Remove left printer cover Loosen 3 screws at the lower left printer edge and 3 screws at the chassis upper edge 2 Remove the protective conductor at the inside of the printer cover Figure 22 ...

Страница 39: ...nd the motor shaft with pressure curve and disk from the lift to the right until a slight resistance can be noticed If the slot in the disk can be moved slightly to the right and to the left out of the photocell H then the pressure curve is adjusted correctly 11 If the gap should not be in the range of the photocell the following causes are possible The wrong notch on the pressure curve was used f...

Страница 40: ...n with the beneath positioned transport roller is responsible for the label feed if printhead is lifted up The pressure of the supporting bar should be the same as the value for the printhead The factory setting corresponds to an average for standard labels For very narrow extremely smooth or thick labels a different setting is necessary Use the threaded pins B to change the pressure Pressure incr...

Страница 41: ...to clean the lubrication at first with alcohol Apply rather in regular intervals 1 2 per year a bit of lubricant as only rarely too much Otherwise the surplus of lubricant could settle on neighbouring components and disturb the functions In case those components should have run it because of lack of lubricant exchange these as soon as possible so the functions of the components and the printer rem...

Страница 42: ......

Страница 43: ... the cover at the breakout C The breakout is behind the CPU at height of Centronics interface 4 At the print mechanics side remove both of the label unwinding disks 5 Fix 4 enclosed distance bolts G with the corresponding washers and nuts F at the memory card plate 6 Insert connecting cable D onto memory card plate 7 Place the pre assembled memory Card plate E behind CPU and fix it with the enclos...

Страница 44: ... At the print mechanics side remove both of the label unwinding disks 5 Fix 2 enclosed distance bolts G with the corresponding washers and nuts F at the CF card plate 6 Insert connecting cable D onto CF card plate 7 Place the pre assembled CF card plate E behind CPU and fix it with the enclosed countersink screw at the chassis base 8 Insert the connecting cable D corresponding to the wiring plan s...

Страница 45: ...is aperture and fix the rewinder with the countersink screws F 6 Insert the motor cable A corresponding to the wiring plan see chapter 8 page 59 into the appropriate plug in position ST21 of the power supply 7 Push the rewinding roll G onto the tube C of the rewinding unit 8 Push the brake disc H with the punching side inwards to the rewinding axe 9 Push the pressure spring J onto the rewinding ax...

Страница 46: ...t the inside of the printer cover 3 Remove cover at the breakout C 4 Unscrew the fixing screws D and keep them safe 5 Screw the distance bolt F instead of screw D 6 Place the Ethernet plate E in the breakout C and insert it into the plug in position ST1 onto the CPU 7 Fix the plate with the previously removed screw G at the distance bolt 8 Connect the protective conductor to the inside of cover 9 ...

Страница 47: ...isruptions from the chassis rear 4 Fix the output cable D with 9 pin connector at the aft disruption 5 Fix the input cable E with 9 pin connector at the front disruption 6 Place the input output plate F carefully onto the corresponding carrier of the CPU 7 Insert the connecting cables for inputs outputs corresponding to the wiring plan see chapter 8 page 59 into the appropriate plug in positions o...

Страница 48: ...tear off edge if mounted at the front of printer 2 For an easier handling remove front plate if mounted which is fixed at the printer base 3 Pull the red knurled knob A to open the dispenser rocker 4 Place the dispensing unit B before the pressure roller Introduce the photocell cable C between the chassis and the left supporting plate of the dispenser downwards 5 Fix the dispensing unit with the h...

Страница 49: ...nted which is fixed at the printer base 3 If pre assembled remove front plate A of cutting unit B 4 Hold the cutting unit slightly inclined on the right side in front of the pressure roller so that the threaded holes of the aluminium profile have approximately the same height as the through holes at the cutting unit 5 Press the cutting unit backwards at the left side 6 Fix the cutting unit with th...

Страница 50: ...rnally supplied label material 1 Place the setup kit for Leporello guiding D as illustrated above in front of the breakout 2 Fix the Leporello guiding with the enclosed screws B and slot nuts at the rear 3 Adjust the label guiding C according to material width 4 The supplied label material should be aligned as parallel as possible to the centre panel of the printer ...

Страница 51: ...k position Selected font is not available Check font Selected font is not available Check font While measuring no layout was found Set layout length is too large Check layout length and if layouts are inserted correctly Restart measuring anew No layout available Soiled layout photocell Layouts not inserted correctly Insert new layout roll Check if layouts are inserted correctly Clean the layout ph...

Страница 52: ...al characters of the text is res are not available in the selected font Change text Change font Unknown transferred data record Check sent data Check connection PC printer For check digit control the entered res received check digit is wrong Calculate check digit anew Check code data Selected SC factor is invalid for EAN res UPC Check SC factor Entered digits for EAN res UPC are invalid 12 13 Chec...

Страница 53: ...al Time Clock function is selected but the battery is empty Defective RTC Change battery Change RTC component Interrupted connection CPU memory card Defective memory card interface Check connection CPU memory card interface Check memory card interface No print memory found Check memory assembly on CPU At start of a print order the printhead is open Close the printhead and start print order anew BC...

Страница 54: ...f path Indicate a shorter path Memory Card is write protected Deactivate write protection Attempt to indicate a directory as file name Correct your entry Attempt to change a file during an access is active Select another file File does not exist on memory card Check file name File name contains invalid characters Correct entry of name remove special characters Internal file system error Please con...

Страница 55: ...card drive found Check connection of memory card drive Contact your distributor No memory card is inserted Insert memory card in the slot Error at start of web server Please contact your distributor The direct print module is equipped with the wrong FPGA Please contact your distributor The layout length is too long The number of layouts per cycle is too much Check layout length res the number of l...

Страница 56: ...nd 9 A page which is not available is selected Check the defined pages The page is not defined Check the print definition Wrong format for customised entry Check the format string Wrong format for date time Check the format string No memory card found If option hotstart was activated a memory card must be inserted Switch off the printer before inserting the memory card Selection of print of severa...

Страница 57: ...o the layout Scanned data does not correspond to defined ID Wrong layout loaded from memory card RFID unit cannot recognise a layout Displace RFID unit or use an offset Error while checking programmed data Faulty RFID layout Check RFID definitions Error at programming the RFID layout Layout positioning Faulty layout Faulty or incomplete definition of RFID data Check RFID data definitions Definitio...

Страница 58: ...Serial interface error Check settings for serial data transmission as well as cable printer PC No printhead FPGA data available Please contact your responsible distributor Error when programming printhead FPGA Please contact your responsible distributor Sensor signal up is missing option APL 100 Check input signals compressed air supply Sensor signal down is missing option APL 100 Check input sign...

Страница 59: ...Spectra series Wiring plan 1108 Service instructions 59 8 Wiring plan Figure 34 Spectra 107 108 160 162 ...

Страница 60: ...Wiring plan Spectra series 60 Service instructions 1108 Figure 35 Spectra 216 ...

Страница 61: ...Spectra series Layout diagrams 1108 Service instructions 61 9 Layout diagrams 9 1 CPU Figure 36 ...

Страница 62: ...otocell reflexion P3 Sensibility dispenser photocell U1 U2 FLASH component U3 32 bit RISC processor U5 U6 DRAM U8 RESET component U10 RTC Real Time Clock U11 INPUT OUTPUT FPGA U13 RS 232 component U14 USB Universal Serial Bus component U20 Printhead FPGA U28 serial EEPROM ST1 Bus male connector option ETHERNET ST7 Label photocell reflexion ST8 Dispenser photocell option ST11 Printhead open closed ...

Страница 63: ...Spectra series Layout diagrams 1108 Service instructions 63 9 2 Power supply unit revision G Figure 37 ...

Страница 64: ...idge rectifier F1 Secondary fuse 10A T T2 P circuit MOS FET 100V 50A printhead voltage ST1 Motor plug internal winder option ST2 Motor plug cutter motor option ST3 Motor plug ribbon motor option ribbon save ST4 Motor plug ribbon save motor option ST5 Motor plug feed motor ST6 Heater voltage printhead ST7 Toroidal transformer ST8 Cutter photocell option ST9 Connection CPU ST10 13 Fan ST11 Valve Bra...

Страница 65: ...eries Layout diagrams 1108 Service instructions 65 9 3 Memory card slot option Figure 38 U3 Data bus driver Q1 Switching transistor for memory card voltage JP1 Connection CPU Component overview Plug in positions ...

Страница 66: ...Layout diagrams Spectra series 66 Service instructions 1108 9 4 Compact Flash card slot option Figure 39 STP1 Connection CPU Plug in positions ...

Страница 67: ...put1 U3 Optocoupler outputs 5 8 Output2 U4 Optocoupler inputs 1 4 Input1 U5 Optocoupler inputs 5 8 Input2 U6 Driver inputs U7 Driver RS 422 RS 485 U8 Optocoupler DTR DIR U9 Optocoupler TXD1 U10 Optocoupler RXD1 U11 Voltage transformer 5V 5V U20 21 Interface components RS 422 RS 485 ST1 Outputs 1 4 Output1 ST2 Outputs 5 8 Output2 ST3 Inputs 1 4 Input1 ST4 Inputs 5 8 Input2 ST5 RS 485 RS 422 ST16 17...

Страница 68: ... 4 Output1 U3 Optocoupler outputs 5 8 Output2 U4 Optocoupler inputs 1 4 Input1 U5 Optocoupler I O 24V U6 Driver inputs U7 Driver RS 422 RS 485 U8 Optocoupler DTR DIR U9 Optocoupler TXD1 U10 Optocoupler RXD1 U11 Voltage transformer 5V 5V U20 21 Interface components RS 422 RS 485 ST1 Outputs 1 4 Output1 ST2 Outputs 5 8 Output2 ST3 Inputs 1 4 Input1 ST5 RS 485 RS 422 ST7 I O 24V ST8 24V GND ST16 17 1...

Страница 69: ...s Layout diagrams 1108 Service instructions 69 9 7 Ethernet option Figure 42 U1 Ethernet processor U5 Reset inverter U6 Voltage control 3 3V ST1 Connection bus male connector CPU Component overview Plug in positions ...

Страница 70: ......

Страница 71: ...0 Pin assignment interfaces 10 1 Centronics Figure 43 PIN Signal 1 STROBE 2 9 DATA1 8 10 ACK 11 BUSY 12 PERROR 13 SELECT 14 AUTOFD 15 16 GND 18 VCC1284 4 7V 19 30 GND 31 INIT 32 FAULT 33 35 XXX 36 SELECTIN 10 2 RS 232 Figure 44 PIN Signal 1 XXX 2 RXD 3 TXD 4 5 GND 6 9 XXX ...

Страница 72: ...rvice instructions 1108 10 3 RS 485 and RS 422 option Figure 45 PIN at D SUB female connector Function RS 422 full duplex Function RS 485 half duplex 1 n c n c 2 n c n c 3 n c n c 4 TxD n c 5 TxD n c 6 n c TxD RTxD 7 n c TxD RxD 8 RxD n c 9 RxD n c ...

Страница 73: ...signment interfaces 1108 Service instructions 73 10 4 Ethernet option Figure 46 PIN RJ45 female connector Description 1 TX 2 TX 3 RX 4 n c 5 n c 6 RX 7 n c 8 n c 10 5 USB 1 0 1 2 3 4 Figure 47 PIN Signal 1 n c 2 D 3 D 4 GND ...

Страница 74: ......

Страница 75: ...usting 37 B Battery replacing 25 C Centronics pin assignment 71 Cleaning Cleaning schedule 11 Label photocell 14 Print roller 12 Printhead 13 Compact Flash card slot option Layout diagram 66 Plug in positions 66 Refit 44 Component overview CPU 62 Ethernet option 69 Input output board option 67 Input output board 24V option 68 Memory card slot option 65 Power supply unit 64 Component replacing Batt...

Страница 76: ...ng interface 46 H Head photocell adjusting 34 I I O FPGA replacing 25 I O plate refit 47 Input output board option Component overview 67 Jumper plan 67 Layout diagram 67 Plug in positions 67 Input output board 24V option Component overview 68 Jumper plan 68 Layout diagram 68 Plug in positions 68 J Jumper plan CPU 62 Input output board option 67 Input output board 24V option 68 L Label photocell Cl...

Страница 77: ...g in positions Compact Flash card slot option 66 CPU 62 Ethernet option 69 Input output board option 67 Input output board I O 24V option 68 Memory card slot option 65 Power supply unit 64 Power supply unit Component overview 64 Layout diagram 63 Measuring points 64 Plug in positions 64 Replacing 24 Pressure curve adjusting 38 39 Primary fuse replacing 16 Print mechanism adjusting 27 Print roller ...

Страница 78: ...2 pin assignment 71 RS 422 option pin assignment 72 RS 485 option pin assignment 72 S Safety handling when working with electricity 9 Safety instructions Clothing 7 Protective clothing 8 Protective equipment 8 Workplace 7 Secondary fuse replacing 16 Supporting bar adjusting 40 T Tool list 15 Transfer ribbon feed path adjusting 32 U Unwinder adjusting 33 USB 1 0 pin assignment 73 W Warnings 5 Wirin...

Отзывы: