


GB / IE / NI
73
Sewing basics
Blind stitch
Button sewing foot
Stitch
Stitch width stitch length
0~5
0
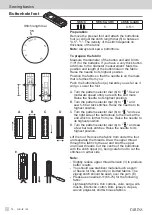
Install the embroidery and darning plate (o).
Position the work under the foot. Place
the button on the marked position, lower
the presser foot, adjust stitch width to "0"
and first sew a few securing stitches in the
left hole. Adjust the stitch width (usually
between 3 and 4). Sew some check
stitches with the handwheel (21) until the
needle goes cleanly into the right hole of
the button (vary the stitch width depending
on the button) and sew on the button.
Adjust the stitch width to "0" and sew a
few securing stitches.
If a shank is required, place a darning
needle on top of the button and sew. For
buttons with 4 holes, sew through the front
two holes first, push the work forward and
then sew through the back two holes as
described.
2
1
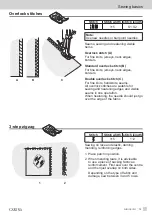
Stitch
Stitch width stitch length
3~5
1~2
For hems, curtains, trousers, skirts, etc.
Blind stitch for elastic fabrics.
1. Fold the fabric as illustrated with the left
side uppermost.
2. Place the reversed fabric under the
all purpose presser foot (a). Turn the
handwheel (21) forwards by hand
until the needle is fully to the left. It
should just pierce the fold of the fabric.
If it does not, adjust the stitch width
accordingly.
Sew slowly and guide the fabric carefully
so that its position does not change in
relation to the guide.
Содержание 340336 1910
Страница 3: ...a b c d e f g h i j k m o p l n q r t s ...


