background image

lb-05073-04-EN 

Pag. 4 

30/09/14 

TECHNICAL DATA 


Model 


A01 

A02 

Width  

mm. 

215 

215 

Height  

mm. 

584 

624 

Depth  

mm. 

420 

420 

Net weight  

Kg. 

22 

23 

Cold Room capacity   Lt. 

11,8 

Cold Room data 


  Gas type 

R134a 

  Gas Quantity - g 

35 

  Compressor Name 

PL35G 

  Climatic class 

  Pressure 

LP= 2,5 bar / HP= 14bar 

Electical data 


 100-120V @ 50/60Hz 


200V @ 50/60Hz 


220-240V @ 50/60Hz 

Power  

W. 

75 

Measured noise 

dB. 

<70  


Содержание A01-PLUS -V2

Страница 1: ...FRIDGE A01 A02 PLUS V2 220 230V 50 60Hz EN ENGLISH LB 05073 EDITION EN ENGLISH 73 04 EN EDITION SEPTEMBER 2014 www carimali com ...

Страница 2: ...mmario INTRODUCTION 3 SPECIAL NOTES 3 TECHNICAL DATA 4 POTENTIAL EQUALIZING CONNECTION 5 ASSEMBLY AND ELECTRICAL CONNECTIONS 6 STARTING UP 8 MILK TANK FILLING 9 CLEANING 10 TROUBLE SHOOTING 11 PRESET FRIDGE CONFIGURATION 13 LEGEND 15 ...

Страница 3: ... by any improper incorrect and unreasonable use of the machine The use of any electric appliance implies the observance of some fundamental rules More specifically do not touch the appliance with your hands or feet wet or damp do not use the appliance with bare feet do not pull the power cord to disconnect the plug from the power socket dot not leave the appliance exposed to the weather rain sun f...

Страница 4: ...mm 584 624 Depth mm 420 420 Net weight Kg 22 23 Cold Room capacity Lt 11 8 Cold Room data Gas type R134a Gas Quantity g 35 Compressor Name PL35G Climatic class N Pressure LP 2 5 bar HP 14bar Electical data 100 120V 50 60Hz 200V 50 60Hz 220 240V 50 60Hz Power W 75 Measured noise dB 70 ...

Страница 5: ... be installed in the same place There is a terminal connector under the device base to which an external potential equalizing wire should be connected This connection is ABSOLUTELY NECESSARY and must be made right after the device is installed Use a electric wire whose cross sectional area conforms to the existing norms Make the terminal connection and then connect the other end to the ground conn...

Страница 6: ...xplains how to fit the Fridge A01 Plus to the coffee machine Open the front door of the coffee machine and remove the upper nut that hold the left side panel Remove the left hand side panel Remove the pre cut on the machine basement by means of a screwdriver and hammer Connect the fridge serial wires to the connector CN23 232 slave Remove the master board cover Let the fridge serial wires go throu...

Страница 7: ...e lid of the milk tank Connect the power cord on the basement fridge socket and the fridge serial wire to the machine Place the tank inside the fridge with the reed milk level as shown in the picture The tank must be pushed until it touches the bottom of the fridge The reed milk level must be placed in its seat of the tank with the black top upward and the base with sign downward Make sure that th...

Страница 8: ...led The coffee machine display will show 67 FRIDGE SERIAL alarm that will disappear when the fridge is powered on Power on the fridge by means the main switch underneath the basement During the cooling phase the front fridge led will be in green color To check the fridge temperature press INFO key on the machine front panel GREEN LED If the fridge need more then 20 minutes to reach the alarm fridg...

Страница 9: ...rated milk The maximum capacity of the tank is 4 litres Insert the milk inlet pipe through the hole in the lid of the tank Place back the milk tank inside the fridge with the reed milk level as shown in the picture The tank must be pushed until it touches the bottom of the fridge REED MILK LEVEL a We recommend in case you switch off the fridge to wait at least 3 minutes before switching it on agai...

Страница 10: ...E OUTSIDE OF THE FRIDGE UNIT The inside outside walls of the fridge unit should be cleaned at the end of every working day or at least once a week with a non abrasive sponge soaked with a solution of lukewarm water and neutral detergent D DEFROSTING We recommend to defrost the inside of the fridge unit whenever ice on the walls is over 2 mm thick This is necessary to guarantee efficient refrigerat...

Страница 11: ... are disabled and the the display will show the following message Solution Place the milk tank inside the fridge If the alarm is displayed also with the milk tank positioned inside the fridge we suggest to check the reed milk tank 3 46 Fridge temperature alarm Cause if the fridge need more then 20 minutes to reach the alarm fridge temperature the front led become in yellow color In case the fridge...

Страница 12: ...sult inside the fridge is not possible to reach the set point temperature Solution the temperature probe defective short circuit the temperature probe is disconnected CN 1 on fridge pc board 6 Corrupted data alarm Any message on the display First case This alarm appears during machine functioning Cause incorrect operating data in machine memory Result machine shutdown Solution carry out the follow...

Страница 13: ... 35 6 59 F ALARM FRIDGE TEMPERATURE 13 C 55 4 F default value variable value 7 30 C 44 6 86 F TIME OUT TEMPERATURE ALARM 20 min default value 20 min variable value 5 120 min ALARM TEMPERATURE STOP MILK BASE DRINK default value desabled power ON the fridge and after 10 seconds power OFF the fridge and move the dip switch 1 in off position POSITION OF THE DIP SWITCH TO CONFIGURE THE FRIDGE V2 WITH R...

Страница 14: ...lb 05073 04 EN Pag 14 30 09 14 ...

Страница 15: ...esence microswitch 28 MPS Motore Pistone superiore Group High Motor Piston 29 MSI Microinterruttore Sportello Front Door Microswitch 30 OT Ottiche Gruppo Group Optical 31 P Ponticello Jumper 32 PL Pompa Latte Milk Pump 33 PTC Elemento riscaldante Gruppo Group Heating Element 34 RBL Reed box latte Milk box reed 35 RCC Resistenza Caldaia Caffè Coffee boiler Heating Elemen 36 RCG Resistenza Gruppo Ca...

Страница 16: ...lker Steam Milker solenoid valve 62 Y2 2 Elettrovalvola By Pass By pass solenoid valve 63 Y2 3 Elettrovalvola Carico Acqua Water inlet solenoid valve 64 Y2 4 Elettrovalvola Lancia Vapore Steam nozzle solenoid valve 65 Y2 5 Elettrovalvola Lancia Acqua Water nozzle solenoid valve 66 Y2 6 Elettrovalvola Mix Lancia Acqua Mix Water nozzle solenoid valve 67 Y2 7 Elettrovalvola Gruppo Caffe Coffee group ...

Страница 17: ...lb 05073 04 EN Pag 17 30 09 14 ...

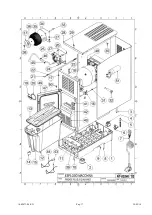
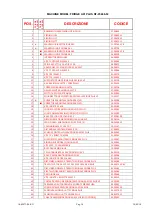
Страница 18: ... LOGO CARIMALI RESINATO ADESIVO PICCOLO 33 05043 20 BASE PER LOGO PICCOLO Ø51 5 37 05061 CR 21 DIFFUSORE LED RGB FRIDGE PLUS A01 A02 V2 95 05128 22 LED SINGOLO RGB FRIDGE A01 02 PLUS 2 96 05036 L3 23 COLONNINA M4 FF H14 CH7 22 01247 24 DISTANZIALE CENTRALINA M3 X 10 37 00430 25 SCHEDA CONTROLLO 230V FRIDGE A01 02 PLUS 96 05039 26 VITE TC ROSETTA M 3X6 91 00263 27 SUPPORTO SCHEDA TRAFO FRIDGE A01 P...

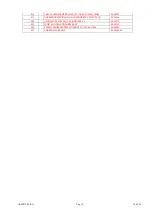
Страница 19: ...ATO MACCHINA 03 05047 47 GUARNIZIONE SPORTELLO CELLA FRIGORIFERA PLASTICA 2 95 05144 48 VENTILATORE 230V CELLA FRIGORIFERA V2 96 05210 49 SPORTELLO CELLA FRIGORIFERA V2 95 05145 50 PERNO CERNIERA SPORTELLO FRIDGE PLUS V2 A01 A02 16 05081 51 CONDENSATORE 60uF 96 05264 CA ...

Страница 20: ...ation the manufacturer declines all responsibility for any mistakes due to printing and or typing errors contained in this publication All instructions drawings tables and information contained in this publication are reserved and may not be reproduced entirely or in part or be communicated to a third party without written authorisation from the manufacturer who holds exclusive rights Tabella Revi...

Отзывы: