L
ATITUDE
Installation
Manual
Carefree of Colorado
2
070005-001r12
I
NSTALLATION
P
RE
-I
NSTALLATION
R
EQUIREMENTS
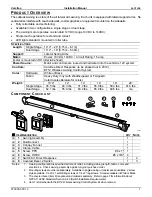
1. Ensure that the awning will not interfere with light fixtures, exhaust vents, openings, etc. The mounting area
should be clear a minimum of 6" below the awning rail and the full mounting length of the awning.
2. Actual mounting length is 2.6" longer than the stated awning length.
3. The brackets must be secured to a backing plate as large as the brackets. The backing plate must be
fully attached to the structure of the vehicle.
Aluminum backing plates must be a minimum .125" thick.
Steel backing plates must be a minimum 13 gauge (.09" thick).
Wood backing plates must be thick enough to allow a minimum of 1.5" of thread engagement.
4.
For single stage awnings:
The bottom of the awning rail should be a minimum of 11.5" above a door opening
or slide out (whichever is higher).
5.
For dual stage awnings:
The bottom of the awning rail should be a minimum of 7.5" above a door opening or
slide out (whichever is higher).
M
OUNTING THE
A
WNING
CAUTION
Do not remove any of the shipping wrap around the roller tube, the ties around the arms
or the temporary assembly pin in the idler head until instructed to do so in the installation steps.
It is recommended that 2 people lift and hold the awning while a third person installs the screws.
NOTE:
While attaching the screws, apply a quality silicone sealant
around the screws and holes.
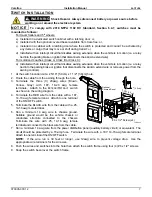
1. Lift the awning up to the desired location and place the top of the
brackets against the bottom of the awning rail.
2. Attach the brackets through the exposed holes. Additional screws
will be added later.
NOTICE
For proper awning operation, the mounting plates must be parallel to the awning rail.
2.1. Place the first screw in the outside upper
screw hole.
2.2. Lift the arm up to force the plate parallel
with the awning rail, place the second screw
in the lower inside hole.
2.3. Place screws in the remaining exposed holes.
2.4. Repeat for the other side
Notes about screws:
For installations using metal backing plates: Attach using 1/4 x 1" self-drilling screws. The screws must
be long enough for the threads to reach through the backing plate.
For installations using wood backing plates: Attach using 1/4 x 2" lag screws. The screws must be
long enough to provide a minimum of 1.5" of thread engagement in the wood.
12.25"
5.7"
6.1"
13.75"
5.7"
Awning Length
Awning 2.6"
1.3"
1.3"
7"
FL002b
FL007b
2
nd
Screw
Lift and Hold Arm
to Install 2
nd
Screw
1
st
Screw
2
nd
Screw
1
st
Screw
FL039
Awning
Rail
Awning
Rail
Mounting
Plate
Mounting
Plate


