Carefree of Colorado Service
Manual
A
SCENT
052553-301r5
11
P
ART
N
UMBER
L
ISTING
/S
ERIAL
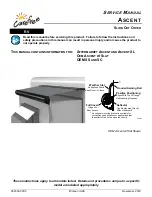
OCATION
InsideFront Cover
Rear Sideof Slat
On RollerTube
as025
Carefree of Colorado
Dt : 1234Sn : 1234567890Pn : 123456789X
Страница 1: ...T XL OEM ASCENT W SLAT OEM SS AND SC OEM Ascent w Slat Shown Deflector Can Be Mounted Directly Without Brackets Positive Positioning Aligns With Top Of Flange No Measuring Required Full Cover Hinged For Easy Access Weather Slat No Exposed Fabric when Room is Closed as001c An optional mounting bracket is available for curved flange applications or applications that the deflector cannot be mounted d...
Страница 2: ...TY INFORMATION This is the safety alert symbol It is used to alert individuals to potential personal injury hazards Obey all safety messages that follow this symbol to avoid possible personal injury or death WARNING Indicates a hazardous situation which if not avoided could result in death or serious bodily injury CAUTION Indicates a hazardous situation which if not avoided may result in minor or ...
Страница 3: ...e 4 Installing the Fabric and Roller Tube 5 Spring Roll Bar Replacement 6 Removing the Roller Tube Assembly 6 Replacing the Spring Assembly 7 Assembling the XL Roller Tube Assembly 9 Installing the Roller Tube Assembly 9 Standard Maintenance 10 Fabric Care 10 Mildew 10 Pooling 10 Hardware Maintenance 10 Part Number Listing 11 Part Number Serial Number Location 11 Illustrated Parts List 12 ...
Страница 4: ...d widths Two springs for XL models COLOR Hardware White Black Fabric Woven Acrylic Polyweave and Vinyl refer to sales literature for available colors WEIGHT Standard Base Weight 42 Box Length 22 2 lbs for every 12 increase add 3 6 lbs XL Base Weight 197 Box Length 75 2 lbs for every 12 increase add 3 6 lbs Weight calculation is approximate Actual weight may vary based on type of canopy fabric and ...
Страница 5: ... Detail A If necessary to remove the cover hold the cover perpendicular to the deflector then lift and unhook the cover from the back of the case To Install the Cover 5 Hold the cover perpendicular to the deflector lift and hook the cover onto the back of the case 6 Rotate the cover up and secure using two 2 8 x 1 1 2 socket head cap screws NOTE There will be a small gap between the cover and end ...
Страница 6: ...through the LH bearing and spindle and taped in place before continuing 4 If installed on the slat assembly remove the lower screws that secure the fabric and slat It is not necessary to remove the upper screws On one end of the slat swivel the end plate out of the way to clear the lower slot of the slat 5 Detail B Inside the end caps remove the spindle tab retaining screws and washers There is on...
Страница 7: ... fabric to extend past the roller tube 7 Lift the roller tube up and slide the fabric polyrod into the front slot of the slat or awning rail Center the fabric Trim any excess polycord that extends past the slat 8 Roll up any slack material onto the roller tube 9 Insert the roller tube into the fixed end cap Note the orientation of the spindle tabs at the ends of the roller tube these must point fo...
Страница 8: ...n the room approximately 3 4 2 Open the front cover Refer to page 3 CAUTION The springs are wound and under tension The spring locking pins must be inserted before continuing otherwise the roller tube can spin out of control and cause personal injury and or property damage 3 Detail B On the right end of the roller tube insert a spring locking pin through the bearing and spindle it may be necessary...
Страница 9: ...rn rapidly To avoid personal injury keep hands away from the spindle until the spring has unwound 1 2 Remove the spring locking pin and allow the spring to unwind 2 After the spring is unwound remove the 8 x 1 pan head square drive screw that attaches the spindle assembly to the roller tube and save 3 Remove the spring assembly from the roller tube and set aside 4 Insert the new spring assembly an...
Страница 10: ... wind 7 After adding the required number of spring winds firmly hold the ratchet handle and roller tube and insert the spring locking pin The pin will only go in partially until the 3 8 drive is removed 8 Hold the pin in place and slowly release the ratchet handle When there is no pressure on the handle remove the square drive from the spindle Press the pin in as far as possible then place tape ov...
Страница 11: ...ews are offset from the center of the polyrods Ensure that the polyrod is positioned in the large diameter of the fabric slot The screws thread into the extrusion and the top of the polyrod Tip Place a small wedge such as a small flat blade screwdriver between the top of the fabric and the slot to hold the polyrod down to start the screw in the correct position Use care to not damage the fabric 3 ...
Страница 12: ...r dry only Never apply heat to the fabric Always allow the fabric to dry thoroughly before rolling up the canopy Mildew Mildew is a fungus growth that looks like dirt Vinyl coated polyester fabrics are mildew resistant because of a chemical biocide in the vinyl coating Under ordinary conditions mildew will not appear However in areas where high temperature and humidity are common mildew can be a p...
Страница 13: ...olorado Service Manual ASCENT 052553 301r5 11 PART NUMBER LISTING PART NUMBER SERIAL NUMBER LOCATION Inside Front Cover Rear Side of Slat On Roller Tube as025 Carefree of Colorado Dt 1234 Sn 1234567890 Pn 123456789X ...
Страница 14: ...2553 301r5 ILLUSTRATED PARTS LIST 13 11 9 14 20 8 19 18 7 15 4 22 5a 10 DETAIL A XL Deflector Assy DETAIL B XL Slat Assy OEM Only 23 DETAIL C XL Cover Assy DETAIL D XL Roll Bar Assy 25 6 23 1 3 2 2 12 10 as501 16 17 XL Only 9a 9b 5b 5c 6 6 17a 21 21 ...
Страница 15: ...8 R001559 Spindle and Bearing Assy LH Standard 19 R001877 Spring Assy Kit XL Only 9 20 R001560 Spring Assy RH identified with orange marking 21 R041481 001 Spring Sleeve used with single slot roller tube 22 R001570XXX xxx Cover Assy Standard 23 R001571XXX xxx Cover Assy XL Only 2 24 R001562 Cover Glide 24 pkg of 2 25 Canopy Only Refer to Canopy Order Form 26 R012739 001 Hardware Pack Standard Not ...