A
LTITUDE
P
ATIO
A
WNING
5
A
DJUSTING THE
P
ITCH
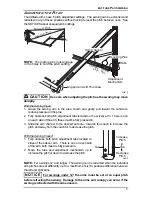
The Altitude arms have 6 pitch adjustment settings. The awning can be extended and
retracted in any of these positions without having to reset the pitch between uses. See
the NOTICES about unequal pitch settings.
CAUTION
Use care when adjusting the pitch as the awning may move
abruptly.
With the Awning Open:
1. Grasp the awning arm in the area shown and gently pull toward the vehicle to
reduce pressure on the pins.
2. Fully depress both pitch adjustment tabs located on the scissor arm. There is one
on each side of the arm; these must be fully pressed in.
3. Slide the arm channel to the desired set hole - towards the coach to increase the
pitch and away from the coach for to decrease the pitch.
With the Awning Closed:
1. Fully depress both pitch adjustment tabs located on
sides of the scissor arm. There is one on each side
of the arm; both must be fully pressed in.
2. Move the tabs and adjustment mechanism up to
increase the pitch or down to decrease the pitch.
NOTE:
For awnings 12' and longer: The awning can be retracted when the individual
arm pitches are set differently up to a maximum of six (6) positions difference between
the left and right arms.
NOTICE
For awnings under 12': the arms must be set at an equal pitch
before retracting the awning. Damage to the arms and canopy can occur if the
awning is retracted with the arms uneven.
Tabs
Decrease
Pitch
Minimum Pitch
Maximum Pitch
Support and Lift This Area
Alt012
NOTE:
The locking pins must engage
in the holes to hold the pitch setting.
Increase
Pitch
Adjustment
Mechanism
Locking Pins
Arm Channel
Tab
Tab
Increase
Pitch
Decrease
Pitch
Alt013


