


V
ACATION
'
R
7
S
IDE
P
ANELS
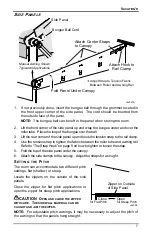
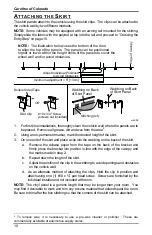
1. If not previously done, insert the bungee ball through the grommet located in
the front upper corner of the side panel. The cord should be inserted from
the outside face of the panel.
NOTE:
The bungee ball can be left in the panel when storing the room.
2. Lift the front corner of the side panel up and wrap the bungee under and over the
roller tube. Place the loop of the bungee over the ball.
3.
Lift the rear corner of the side panel up and hook the tension strap to the rail clamp.
4. Use the tension strap to tighten the fabric between the roller tube and awning rail.
Refer to “The Strap Hook” on page 9 on how to tighten or loosen the strap.
5.
Fold the top of the side panel under the canopy.
6.
Attach the side clamps to the canopy. Adjust the straps for a snug fit.
S
ETTING THE
P
ITCH
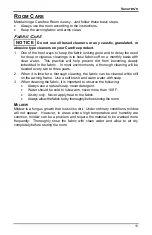
The room can accommodate two different pitch
settings, flat (shallow) or steep.
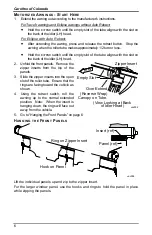
Locate the zippers on the outside of the side
panels.
Close the zipper for flat pitch applications or
open the zipper for steep pitch applications.
CAUTION
O
PEN AND CLOSE THE ZIPPER
WITH CARE
.
T
HE SIDE WALL MATERIAL CAN BE
CAUGHT AND JAM THE ZIPPER
.
NOTE:
For adjustable pitch awnings, it may be necessary to adjust the pitch of
the awning so that the panels hang straight.
Bungee Ball Cord
Side Panel
Manual Awning Shown
Typical All Applications
Attach Center Straps
to Canopy
Fold Panel Under Canopy
Adjust Strap to Tension Fabric
Between Roller and Awning Rail
Attach Hook to
Rail Clamp
vac021b
Close
for Flat Pitch
Open
for Steep Pitch
vac009
Zipper on Outside
of Side Panel
Содержание VACATION'R
Страница 15: ...VACATION R 15...


