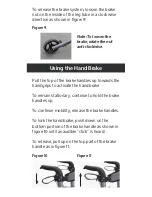
CareCo Tuni Spectra Скачать руководство пользователя страница 6

Figure 5

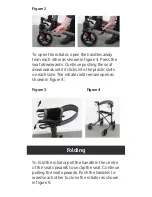
To completely fold the rollator, unlock the left 

and right black metal levers from the slots on 

the leg tubes. Rotate by 90 degrees and place 

towards the front wheel. Pull the handle tubes 

carefully down towards the back wheels. The 

red levers will engage and click into place when 

this is fully folded. The rollator can now be 

stored or transported as necessary.

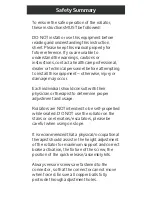
Assembly: Insert the wheel axle into the hole 

inside the wheel support. When a “click” is 

heard, the wheel is fixed into the correct 

position - see figure 6.

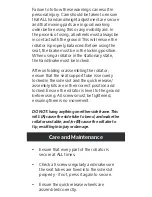
Disassembly: Press the red button with one 

hand. Take the wheel kit out of the wheel 

support with the other hand as per figure 7:

Assembling and Disassembling the 

Quick Release Kit

Содержание Tuni Spectra

Страница 1: ...Spectra Rollator OWNERS HANDBOOK Product Code WA01064 ...

Страница 2: ... handles for the user s safety and comfort are included 3 Swivel front wheels offer easy control 4 The curb climber design manoeuvres easily over obstructions 5 There is a brake system for parking and stopping 6 Reflectors on the handgrips and front and back wheels are included for the user s safety Product Features ...

Страница 3: ...fer stability and security to the user The Spectra is designed for use indoors and outdoors and will take a maximum user weight of 136kg NOTE Check all parts for shipping damage In case of shipping damage DO NOT use contact the dealer carrier for further instruction Rollator Dimensions 68cm Length x 64cm Width x 81 5 94 5cm Height Seat Dimensions 22cm Depth x 45cm Width Folded Dimensions 87cm Leng...

Страница 4: ...amage Remove the rollator from the box Lay the rollator down on the floor with the handle tubes on top Unhook the red levers from the inside of the leg tubes Push the handle tubes forward so that they are standing upright at a right angle to the leg tubes as shown in figure 1 Pull the black metal levers on each side backwards to push the washer inwards Clasp into the plastic slot on the leg tubes ...

Страница 5: ... until it clicks into the plastic slots on each side The rollator will remain open as shown in figure 4 Figure 3 Figure 2 Figure 4 To fold the rollator pull the handle in the centre of the seat upwards to unclip the seat Continue pulling the seat upwards Push the handles to wards each other to close the rollator as shown in figure 5 Folding ...

Страница 6: ...rs will engage and click into place when this is fully folded The rollator can now be stored or transported as necessary Assembly Insert the wheel axle into the hole inside the wheel support When a click is heard the wheel is fixed into the correct position see figure 6 Disassembly Press the red button with one hand Take the wheel kit out of the wheel support with the other hand as per figure 7 As...

Страница 7: ...Slide the handle tube up or down to the desired height Ensure the metal button protrudes through the appropriate adjustment hole on the handle tube as in figure 8 Note DO NOT remove the brake cable from the handle tube or the brakes will not work For the brakes to function properly the brake cable should be flush alongside the frame and correctly hidden inside the tube Adjusting the Handle Tube Ad...

Страница 8: ...ull the top of the brake handles up towards the hand grips to activate the hand brake To remain stationary continue to hold the brake handles up To continue mobility release the brake handles To lock the hand brake push down on the bottom portion of the brake handle as shown in figure 10 until an audible click is heard To release pull up on the top part of the brake handle as in figure 11 Using th...

Страница 9: ...hould consult with their physician or therapist to determine proper adjustment and usage Rollators are NOT intended to be self propelled while seated DO NOT use the rollator on the stairs or on elevators escalators please be careful when using on slope It is recommended that a physical occupational therapist should assist in the height adjustment of the rollator for maximum support and correct bra...

Страница 10: ...ling the rollator ensure that the seat support tube is securely locked in the side slot and the quick release assembly kits are in their correct position and locked Ensure the rollator is level to the ground before using All screws must be tightened ensuring there is no movement DO NOT hang anything on either side frame This will A cause the side tube to bend and make the rollator unstable and or ...

Страница 11: ...uct is under warranty to be free from defects in material and workmanship for one year from date of receipt The warranty does not extend to non durable parts such as rubber accessories castors and grips which are subject to normal wear and tear and require periodic replacement If you have any queries please contact your supplier The manufacturer reserves the right to alter without notice any weigh...

Страница 12: ......

Отзывы: