


12
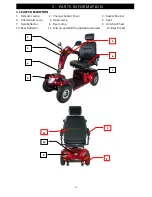
4 . OPER AT ION
H ARI N G AN D CA RE
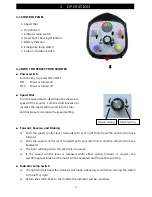
Main Circuit Breaker (Reset Button)
When the voltage in your scooter’s batteries becomes low or the scooter is heavily strained
because of excessive loads or steep inclines, the main circuit breaker may trip to protect the
motor and electronics from damage
.
4 . OPER AT ION
5 . BAT T ERY CHA RGING A N D CA R E
5.1
CHARGING THE BATTERIES
Follow the procedure below step by step:
1.
Turn the power switch to OFF
2.
Connect the charger’s power cord into the power outlet.
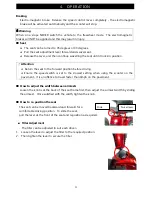
3.
Open the charging socket cap on the scooter’s tiller. Then
connect the charger’s round plug to the charging socket.
4.
Turn on the switch on the charger.
5.
Both the charger’s red and orange LEDs will be lit when
beginning to charge. The charging duration is about 8 hours.
To ensure optimum performance a 12-14 hour charge is
recommended. However, we do not recommend a charging
of more than 24 consecutive hours.
6.
Both the charger’s LEDs will be lit during the charging process.
The orange LED will turn green after 1-4 hours but continue to
charge for between 8 – 14 hours.
7.
Turn off the charger; disconnect the power cord and the round plug from charger socket on
the scooter.
Warning
The fan inside the charger will be activated accordingly when you turn on the charger. If
the fan does not work when connected to the charger or the green light is not showing, DO
NOT use this charger. The charger may overheat and cause a fire as a result.
There is a red LED present on the charger to illustrate operation. If this LED does not
illuminate the charger is defective - please contact CareCo Customer Service on 0845 611
8022 or email: cs@careco. co.uk


