background image

5

Before First Use

After unpacking your coffee maker, clean all the loose parts with warm water
and make yourself familiar with the different functions. After reading these
instructions, clean the internal parts of the machine by brewing a mug of only
water, without any ground coffee inside the filter.

Brewing Coffee with Loose Ground Coffee

1. Lift the coffee maker lid. Pour cold filtered water up to the MAX fill line in the 

water reservoir.

NOTE:

You can add less water to the water reservoir if you will be adding milk

or creamer to the coffee after brewing.

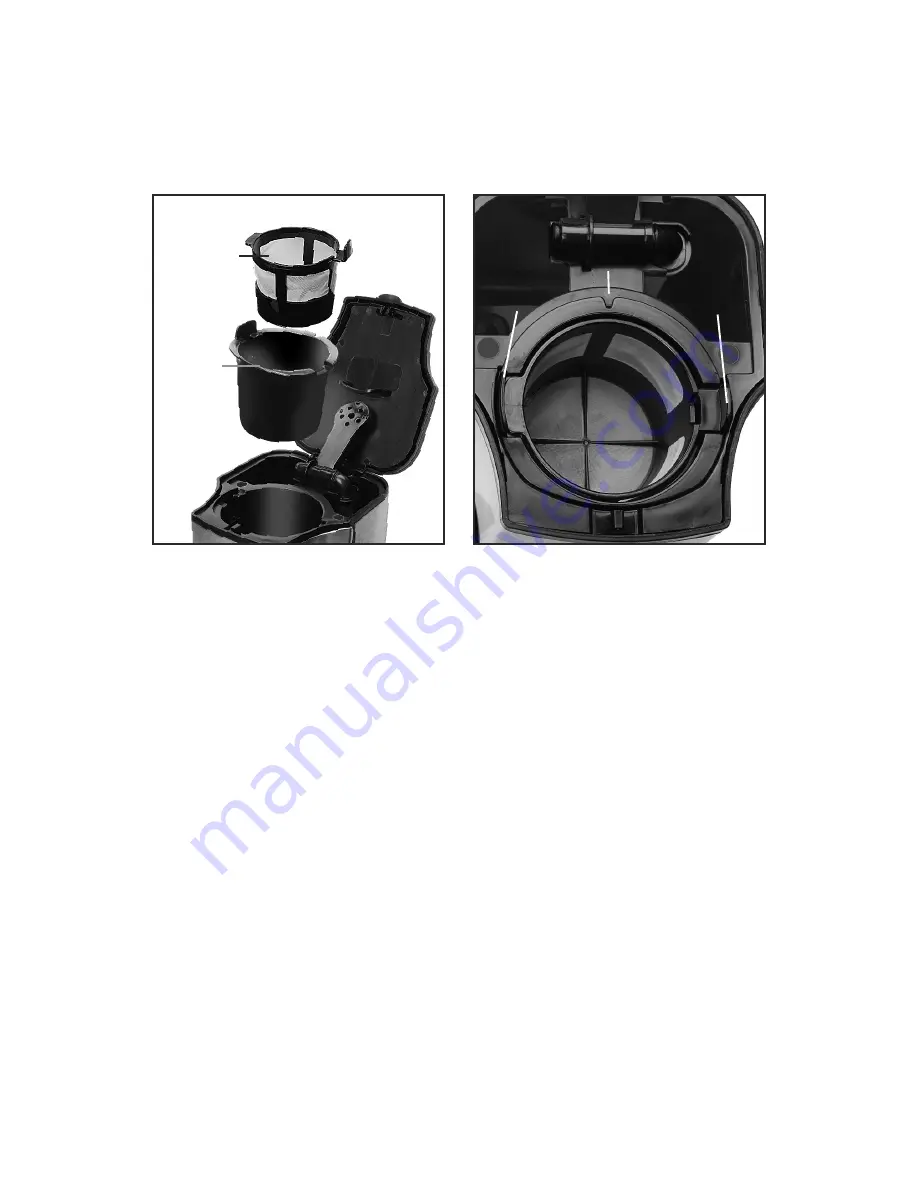
2. Place removable filter basket into filter holder with basket handle resting in the

slot on the left side of the basket holder rim. (Fig 2.) Correct position is indicated
by a triangle on the holder rim that lines up to the filter basket placement 
notch. (Fig 3.)

3. Place the permanent filter into the basket with the filter handle resting in the 

slot on the right side of the basket holder. 

IMPORTANT

: If the basket and 

filter are not properly positioned, the coffee maker will not operate correctly.

4. Add ground coffee (3-5 tablespoons is recommended but can be adjusted to 

taste. DO NOT use more than 6 tablespoons or the filter can overflow). Use a 
medium grind coffee for automatic drip coffee makers. Close the lid.

5. Place travel mug with the lid in place on the mug rest directly. Ensure that the 

lid of the travel mug is in the OPEN position so that the coffee can travel into 
the mug and does not collect on the travel mug lid and overflow.

NOTE:

Do not tighten the lid too much as the heat during brewing can lock 

the lid into place making it difficult to remove the lid to add milk or sugar.

6. Ensure the machine is powered ON using the switch on the side of the machine.
7. Press the BREW button on the front of the machine; the indicator light 

illuminates and brewing will begin. The coffee maker and light turn off 
automatically when brewing is finished. Allow coffee to finish dripping from 
the unit before removing your travel mug.

Fig. 2                                                   

Fig. 3

Permanent

filter

Filter

basket

Permanent

filter

handle

Filter

basket
handle

Notch

Содержание 425

Страница 1: ...Model 425 Instructions Warranty 650W 120V 60 Hz On the Go Personal Coffee Maker ...

Страница 2: ...the nearest authorized service facility for examination repair or adjustment 8 The use of accessory attachments not recommended by Capresso may result in fire electric shock or personal injury 9 Do not use outdoors 10 Never let cord hang over edge of table or counter or touch hot surfaces including the stove 11 Do not place on or near a hot gas or electric burner or in a heated oven 12 The travel ...

Страница 3: ...tative Do not immerse base in water or try to disassemble To reduce the risk of fire or electric shock do not remove the base No user serviceable parts inside Repair should be done by authorized service personnel only Never use warm or hot water to fill the water container Use cold water only Keep your hands and the cord away from hot parts of the appliance during use Never clean with scouring pow...

Страница 4: ...Please go to our website www capresso com to register your product and to order any additional parts and accessories Additional travel mugs are available for purchase to use with this machine Handle Lid Placement notch Permanent filter Water reservoir On Off button Permanent filter Handle Filter basket Travel Mug Brew Button Fig 1 ...

Страница 5: ...lder IMPORTANT If the basket and filter are not properly positioned the coffee maker will not operate correctly 4 Add ground coffee 3 5 tablespoons is recommended but can be adjusted to taste DO NOT use more than 6 tablespoons or the filter can overflow Use a medium grind coffee for automatic drip coffee makers Close the lid 5 Place travel mug with the lid in place on the mug rest directly Ensure ...

Страница 6: ... 3 Place the filter basket with coffee pod into the coffee maker as instructed in steps 2 and 3 in BREWING COFFEE WITH LOOSE GROUND COFFEE Close the lid 4 Place travel mug with the lid in place on the mug rest directly Ensure that the lid of the travel mug is in the OPEN position so that the coffee can travel into the mug and does not collect on the travel mug lid and overflow NOTE Do not tighten ...

Страница 7: ...rest without travel mug lid attached to mug 4 Press the BREW button and let the cleaning solution brew through until the unit shuts off automatically Discard the solution in the travel mug 5 Repeat the process using a new solution of 1 3 vinegar and 2 3 water or the remainder of the Capresso Cleaning Solution packet mixed with 16 oz of cool water do not reuse the first solution 6 Use the mug to fi...

Страница 8: ...y or association Thermal travel mug Other limitations and exclusions Any implied warranties including fitness for use and merchantability are limited in duration to the period of the express warranty set forth above and no person is authorized to assume for JURA any other liability in connection with the sale of the machine JURA expressly disclaims liability for incidental and consequential damage...

Отзывы: