background image

Care and maintenance 

Cleaning your wine cabinet 

Turn off the power, unplug the appliance, and remove all items including shelves and rack. 

Wash the inside surfaces with a warm water and baking soda solution. The solution should be 

about 2 tablespoons of baking soda to 2 pints of water. 

Wash the shelves with a mild detergent solution. 

Wring  excess  water  out  of  the  sponge  or  cloth  when  cleaning  area  of  the  controls,  or  any 

electrical parts. 

Wash the outside cabinet with warm water and mild liquid detergent.  Rinse well and wipe dry 

with a clean soft cloth. 

Power failure 

Most power failures are corrected within a few hours and should not affect the temperature of 

your appliance if you minimise the number of times the door is opened. If the power is going to 

be off for a longer period of time, you need to take the proper steps to protect your contents. 

Vacation time 

Short vacations: Leave the wine cabinet operating during vacations of less than three weeks. 

Long vacations:


If the appliance will not be used for several months, remove all items and turn off 

the appliance.  Clean and dry the interior thoroughly. To prevent odour and mould growth, leave 

the door open slightly (blocking it open if necessary). 

Moving your wine cabinet 

Remove all items. 

Securely tape down all loose items (shelves) inside your appliance. 

Wind the adjustable legs up to the base to avoid damage. 

Tape the door shut. 

Be sure the appliance stays secure in the upright position during transportation.  Also protect 

outside of appliance with a blanket, or similar item. 

Energy saving tips 

The wine cabinet should be located in the coolest area of the room, away from heat producing 
appliances, and out of the direct sunlight. 

8

Содержание WF1105

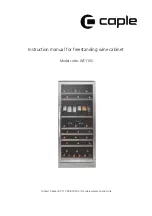
Страница 1: ... Instruction manual for freestanding wine cabinet Model code WF1105 Contact Caple on 0117 938 7420 or for spares www caple co uk ...

Страница 2: ...sting condensation 10 The humidity system 10 Recommended storage temperature 10 Recommended drinking temperature 10 Thank you for buying your new Caple wine cabinet To ensure that you get the best results from your new purchase we strongly suggest that you read this instruction manual thoroughly before use This manual contains installation advice usage instructions and other important facts about ...

Страница 3: ...en when pulling shelves out Ensure that you fully understand these instructions before operating this appliance Caple are NOT responsible for 1 Damage caused by incorrect mistaken or irrational use 2 Any errors in this manual or for any damage linked to or following the provision performance or use of any wine cabinet Due to our policy of constant product improvement the information in this docume...

Страница 4: ...be installed well away from any heat source It must not be placed in direct sun light It must not be in a damp location laundry pantry bathroom etc It must be perfectly level It must have a correctly installed and reliable electricity supply correctly earthed Use of a multi socket or extension lead is not recommended This wine cabinet must be earthed to provide protection in the event of an electr...

Страница 5: ...ol Each compartment of the wine cabinet upper lower is independently controlled To set the temperature Connect the power cord to a properly grounded outlet In the event of a power interruption all previous temperature settings are automatically erased and each compartment will default to a preset temperature setting of 7 for upper zone and 12 for lower zone Set the desired cooling temperature by p...

Страница 6: ...ert back and conserve energy recommended press and hold the LIGHT button for 5 seconds the display will show LF After 4 seconds the display will revert back to normal and the light will automatically switch off after 10 minutes Locking the door The door lock keys are located inside the plastic bag that contains the instruction manual Insert the key into the lock and turn it anticlockwise to unlock...

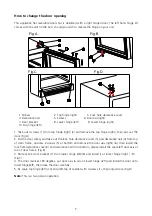
Страница 7: ...or safety and take out the lock hole decorative cover 3 and decorative nail 4 from top of door frame unscrew 2 screws 5 at bottom and remove the door axis right 6 then install the lock hole decorative cover 3 and decorative nail 4 at bottom please install the spare left door axis at top of door frame Fig B 3 Remove the door bracket 7 from lower hinge left 8 and install it at lower hinge right 9 Fi...

Страница 8: ...er is going to be off for a longer period of time you need to take the proper steps to protect your contents Vacation time Short vacations Leave the wine cabinet operating during vacations of less than three weeks Long vacations If the appliance will not be used for several months remove all items and turn off the appliance Clean and dry the interior thoroughly To prevent odour and mould growth le...

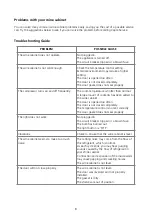
Страница 9: ...A large amount of contents has been added to the wine cabinet The door is opened too often The door is not closed completely The temperature control is not set correctly The door gasket does not seal properly The light does not work Not plugged in The circuit breaker tripped or a blown fuse The bulb has burned out The light button is OFF Vibrations Check to ensure that the wine cabinet is level Th...

Страница 10: ...em for maintaining the correct level of humidity If humidity is too low insert the small plastic reservoir on to the top shelf Fill this reservoir 3 4 full with water Check the water level occasionally and refill as necessary Recommended storage temperatures For storage of ALL TYPES OF WINES 12 oc to 14 oc Recommended drinking temperatures Champagne NV Sparkling 6 oc Champagne Vintage 10 oc Dry Wh...

Страница 11: ...Caple Fourth Way Avonmouth Bristol BS11 8DW www caple co uk 11 ...

Отзывы: