


Preparation
Installation
(
(
(
(
(
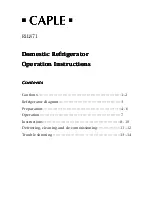
Figure C
)
)
)
)
)
1.Check that the kitchen unit door is in the correct operating position.
2.Run the mains cable through the unit such that it can be connected to the power supply
after installing the appliance. Remove the cover (6) only if space is restricted.
3.Place the refrigerator into the kitchen unit. Fix the mountings (1) with screws (2) onto the
upper frame when two third of the refrigerator has been pushed in. Then push the
refrigerator in completely, ensuring that the gib clamp of the mountings stuck on the
horizontal frame of the kitchen unit. Adjust the position of the refrigerator making a 6mm
space between inside wall of the kitchen unit and external sides of the refrigerators. Fix
the mountings to the horizontal frame of the kitchen unit with screws.
4.Insert the seal in the aperture (approx. 10mm) between the lower front frame and bottom
board of the kitchen. Fix lower mountings (3) to the lower front frame with screws (2). Fix
the lower mountings to the bottom board of the kitchen unit with screws (2).
5.Properly insert seals in the apertures on the left, upper and right sides of the refrigerator.
6.Fix the door to the holders (4) (each upper and lower position has one) with screws (2).
Press close the doors of the refrigerator and of the kitchen unit, and then completely
open the doors, and then place the connecting plate (5)to the corresponding holder and
fix it to the door of the kitchen unit (space between the connecting plate and the edge of
the kitchen unit "t" equals to the thickness of the external board of the kitchen unit, about
20mm).Adjust the connecting element so that the handle side of the kitchen unit door
does not make contact with the unit body when closed. (Approximately 1mm gap for
large appliances), mount the second door connecting element where appropriate.
7.Plug the open hole in the appliance door.
(Figure C )
⑹
6mm
⑵
⑵
⑶
⑷
t
⑴
x
b
a
⑵
⑸
⑵
⑴
⑵
⑵
⑵
6
Содержание RiL871
Страница 3: ...Cautions 2...
Страница 16: ......


