Caple RIL124 Скачать руководство пользователя страница 16

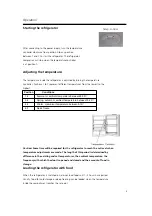
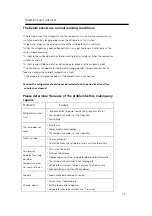
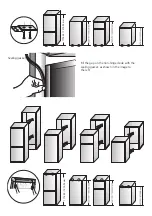
Positioning and installing the appliance 

1.

Once the appliance has been unpacked, check the main voltage is the same as that


indicated on the

rating plate.

2.

If  the  door  opening  direction  is  as  required, 

contine  with  the  installation

.  Otherwise,


reverse the

position


of the hinges. To do this, carefully 

follow the guide on page 7

When installing the appliance, remember the following: 
A

.

 Do not install 

the appliance

 near 

any

 sources of heat such as heaters, radiators,

 ovens,

 cookers, etc. or 

in direct sunlight. 
B

.

  Make  sure  that  during  the  automatic  defrost,  any  water  on  the  back  wall  of the compartment 

runs into the drain channel. 
C

.

  After  the  appliance  has  been  placed  in  its  final  position,  leave  it for  at  least 12 hours before 

connecting it to the power supply. 
D

.

 Make sure that the appliance is working 

correctly

 before placing any food in it. 

WARNING

: DO NOT INSTALL THE APPLIANCE NEAR TO ANY HEAT SOURCES AND LEAVE A GAP OF AT LEAST 5 

CM ABOVE IT. 

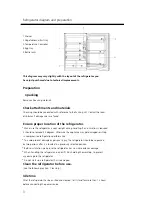
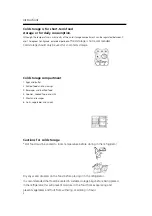
INSTALLATION IN THE TALL UNIT HOUSING 
The dimensions of the tall unit housing must  correspond to those illustrated 

on pages 4 and 

5. 

I

nsert the appliance in the housing against the side panel adjacent to the opening.

Adjust 

the foot until the top panel is not in contact with the unit, and anchor the upper part  of the 

appliance,  using  the  screws  supplied,  in  the  pre-drilled  panel  over  the  front fascia. Anchor the 

two 

bottom brackets to the base of the cabinet and the 

center of the appliance to the wall of the unit using the 

special brackets. Fix the two bottom feet in the holes in the base of the unit. 

A

pply the plastic joint gasket. 

Position the door sliders and fix in place. Also clip in the screw cover sections.
Fit and secure the slider blocks to the door.

Содержание RIL124

Страница 1: ...Model code RIL124 Contact Caple on 0844 800 3830 or for spare parts www caple co uk Instruction manual for integrated larder fridge...

Страница 2: ...Contents Cautions 1 2 Diagram 3 Preparation 3 Operation 4 Instruction 5 7 Defrosting cleaning and de commissioning 8 9 Trouble shooting 10...

Страница 3: ...electrical appliances inside the food storage compartments of the appliance unless they are of the type recommended by the manufacturer Do not store explosive substances such as aerosol cans with a f...

Страница 4: ...to the environment The cardboard box may be broken or cut into smaller pieces and given to a waste paper disposal service The wrapping foil is made of polyethylene and the polyethylene pads and stuff...

Страница 5: ...Cautions 2 to be carried out in strict compliance The refrigerating circuit is leak proof...

Страница 6: ...ndling If an inclination is required it should not exceed 45 degrees Otherwise the appliance may get damaged resulting in compromised refrigeration performance To avoid product damage or personal inju...

Страница 7: ...perature between25 35 3 4 Spring autumn or ambient temperature between15 25 4 5 Winter or ambient temperature between5 15 6 7 Quick freeze Caution Some time will be required for the refrigerator to re...

Страница 8: ...ter 2 Pickled food and seasonings 3 Beverages and bottled food 4 Cookies cooked food and milk 5 Meat and sausages 6 Fruits vegetables and salads Cautions for cold storage Hot food must be cooled to ro...

Страница 9: ...s as they may collapse under excessive loads Food to be stored should be sorted according to consumer requirements Food consumed daily should be placed in the most convenient area this will minimize o...

Страница 10: ...a wad of tissue on the bottle holder before placing bottles on it so that later cleaning is easier Onions garlic ginger water chestnuts and other root vegetables should not be stored in the refrigera...

Страница 11: ...t the power before cleaning the refrigerator Do not use a hard brush steel brush detergent gasoline or other solvents hot water acid or alkali for cleaning Wipe water drops on the surface of the refri...

Страница 12: ...the event of technical problems and the storage period will be reduced During Vacations Remove any food from refrigerator is the vacation is short Turn the temperature selection knob to the proper pos...

Страница 13: ...Caution The refrigerator should never be restarted until a period of at least five minutes has elapsed Please determine the cause of the problem before making any repairs Problems Causes Refrigerator...

Страница 14: ...Caple Fourth Way Avonmouth Bristol BS11 8DW www caple co uk...

Страница 15: ...Installation guide Contact Caple on 0117 938 7420 or for spare parts www caple co uk...

Страница 16: ...ply D Make sure that the appliance is working correctly before placing any food in it WARNING DO NOT INSTALL THE APPLIANCE NEAR TO ANY HEAT SOURCES AND LEAVE AGAP OF AT LEAST 5 CM ABOVE IT INSTALLATIO...

Страница 17: ...1776 00 1570 00 mm 1776 00 1570 00 mm Sealing gasket Fill the gap on the non hinged side with the sealing gasket as shown in the image to the left...

Страница 18: ...fitted to to the furniture door please add the decorative cover to cover the screw fixings This simply clips into place Tip It can help if the door slider blocks are fitted after the sliders have been...

Страница 19: ...required to allow for the correct air flow recommended 500mm x 40mm If preferred a decorative stainless steel plinth grille is available product code GRILL SENSE600 This can be purchased from your re...

Страница 20: ...550 560 1778 1785 560 1 1440 540 1440 540 550 560 1442 1449 560 2 1574 540 1574 540 550 560 1576 1580 560 2 1440 540 1440 540 550 560 1442 1449 560 1 RIF123 540 1221 540 550 560 1223 1230 560 1 RIL12...

Страница 21: ...sembly in such a way so that pin of the lower hinge is aligned with the appropriate hole of the lower door bracket 10 Attach the middle hinge on the other side of the appliance so that the lower pin o...

Отзывы: