background image

Instruction manual DD901BK

8

Please keep this instruction manual for future reference 

I N S TA L L AT I O N

 
Before carrying out the appliance installation, please check that all components are not damaged, 
in such a case contact your retailer and do not carry out any installation operation.

Before the installation of the Downdraft, please remove all of the packaging. Furthermore, please 
read carefully all of the following installation instructions.


»

Use an air exhausting pipe whose maximum length does not exceed 5 meters.


»

 Limit the number of elbows in the piping, since each elbow reduces the air capacity of 1 linear 
meter. (Eg: if you use no. 2 x 90˚ elbows, the length of piping should not exceed 3 meters).


»

Avoid abrupt direction changes.


»

Use a 150mm. constant diameter pipe for the whole length.


»

Use piping approved by standards in force.

The manufacturer shall not be deemed responsible for air capacity or noise problems caused by 
failure to comply with the above instructions and no warranty on the product shall be provided.

Before making the worktop cut out, check that there are no structural interference or other parts 
inside the cabinet, where the appliance is to be placed, which could hinder a proper installation. 
Check that the dimensions of the Downdraft and the ones of the hob are compatible with the 
cabinet so that the installation can be carried out properly.
 
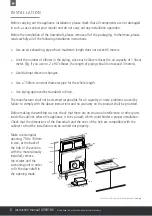
Make a rectangular 
opening, 790 x 100mm 
in size, at the back of 
the hob. In the version 
with the motor already 
installed, remove 
the screws and the 
suctioning unit in order 
to fit the downdraft in 
the opening made.

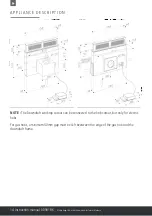
D I M E N S I O N S

510mm

785mm

75mm

325mm

200m

m

96mm

1.6mm

4mm

140mm

790mm

758mm

810mm

68mm

116mm

100mm

Downdraft cut-out can be 

connected to hob cut-out*

Ø150mm

*For electric hobs only. Gas hobs will require a 50mm gap

Содержание DD901BK

Страница 1: ...Downdraft Extractor Instruction Manual DD901BK Contact Caple on 0117 938 7420 for spare parts or www caple co uk ...

Страница 2: ...anual for future reference C O NTE NT S Introduction 3 Safety Instructions and Warnings 4 Installation 8 Electrical Connection of the Downdraft Extractor 12 Appliance Description 14 Operating the Downdraft Extractor 15 Care and Maintenance 17 Troubleshooting 18 ...

Страница 3: ...ou with all the required information related to the installation use and maintenance of the appliance This downdraft extractor is designed to extract unpleasant odours and cooking vapours from the kitchen In order to operate the unit correctly and safely please read this instruction manual carefully before installation and use Please read this manual carefully before using your appliance It contai...

Страница 4: ...retailer straight away Your appliance is designed for normal domestic use It is not designed for commercial or industrial use or for purposes other than those for which it was designed Any consequences of or damage from incorrect installation or incorrect use of the appliance will not be covered by the manufacturer s guarantee Do not ever change or try to change the characteristics of this applian...

Страница 5: ...vels that could damage the appliance Never use steam or high pressure devices for cleaning your hood regulations regarding electrical safety Never use the cooker hood without the grease filters The minimum distance between the Downdraft closed and the surface above it must be at least 200mm When handling the downdraft never put your hands in the field of action of the extractable unit There must b...

Страница 6: ...edge unless they have been given supervision or instruction concerning use of the appliance by a person responsible for their safety Children should be supervised to ensure that they do not play with the appliance G E N E R A L I N F O R M AT I O N O N T H E D O W N D R A F T E X T R A C T O R It is designed to work in both vented mode with outside evacuation and recirculation mode Keep these inst...

Страница 7: ... by inappropriate waste handling of this product The symbol on the product indicates that this product may not be treated as household waste Instead it shall be handed over to the applicable collection point for the recycling of electrical and electronic equipment Disposal must be carried out in accordance with local environmental regulations for waste disposal For more detailed information about ...

Страница 8: ...approved by standards in force The manufacturer shall not be deemed responsible for air capacity or noise problems caused by failure to comply with the above instructions and no warranty on the product shall be provided Before making the worktop cut out check that there are no structural interference or other parts inside the cabinet where the appliance is to be placed which could hinder a proper ...

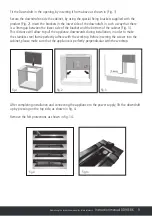
Страница 9: ...en the lower side of the bracket and the bottom of the cabinet Fig 3 This distance will allow to pull the appliance downwards during installation in order to make the stainless steel frame perfectly adhere with the worktop Before inserting the screws into the cabinet please make sure that the appliance is perfectly perpendicular with the worktop After completing installation and connecting the app...

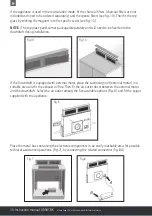
Страница 10: ... and will need to be fixed onto the downdraft during installation If the Downdraft is equipped with external motor place the suctioning unit external motor in a suitable area and fit the exhaust air flue Then fit the air outlet ducts between the external motor and the downdraft Select the air outlet among the five available options Fig 6 and fit the spigot supplied with the appliance Place the met...

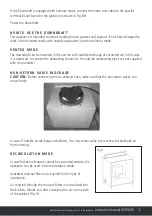
Страница 11: ... of suctioned air in this case it is necessary to connect the exhausting channel to the outside exhausting pipes are not supplied with the products NON RETURN VALVE BLOCKAGE CAUTION Before connecting the air exhaust hose make sure that the non return valves can rotate freely In case of outside air discharge installation fit a non return valve to prevent wind and back air from entering RECIRCULATIO...

Страница 12: ...into their seat by bringing them close to the magnets until they keep them into place The charcoal filter is installed directly on the grease filter rear side see Fig 11 Charcoal filters shall be replaced accordingly to the effective use of the Downdraft and in any case at least once every 6 months NOTE Replacement filters CAP67CF can be purchased at www caple co uk WARNING After having replaced t...

Страница 13: ...led and suitable electrical network The electrical system must comply with VDE0100 standard DANGER If the downdraft presents any anomaly disconnect the appliance or remove the fuse corresponding to the appliance power disconnecting line If the appliance has no plug or if the plug is not easily accessible then a device needs to be fitted to cut it off from the electric network this device must have...

Страница 14: ...ndraft frame S DD11 L 16 DESCRIPTION OF THE APPLIANCE INC 6 Note The Downdraft worktop cutout can be connected to the hob cutout but only for electric hobs For gas hobs a minimum 50mm gap must be left beetween the edge of the gas hob and the downdraft frame S DD11 L 16 DESCRIPTION OF THE APPLIANCE INC 6 Note The Downdraft worktop cutout can be connected to the hob cutout but only for electric hobs...

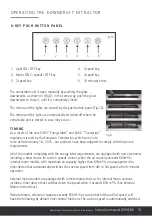
Страница 15: ...s are equipped with new electronics including a timer device for suction speeds control when the air capacity exceeds 650m h Internal motor models with maximum air capacity higher than 650m h are equipped with a timer device that automatically switches the suction speed from 4th to 3rd speed after 6 minutes operation External motor models are equipped with remote motors that as for internal motor ...

Страница 16: ...ed indicators D will all flash simultaneously signaling the grease filters saturation To reset this alarm hold the TIMER button down for at least 3 seconds while the extractable unit is open SELF CALIBRATION The downdraft will carry out a self calibration every 3 complete cycles of its extractable unit By pushing the TIMER key 6 times consecutively MAX break between one push and the other is 3 sec...

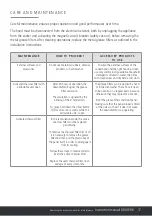
Страница 17: ...filter with extractable unit open After 30 hours of operation the downdraft will signal the grease filter saturation The saturation is signaled by the blinking of the 4 central leds To reset hold down the timer button S DD11 L 67 9 8 7 10 11 12 6 5 7 8 9 10 11 12 14 for at least 3 seconds while the extractable unit is open The grease filters can be washed by hand or in the dishwasher These fil ter...

Страница 18: ...ox is pushed Make sure that the wires of the 9 pole connection are inserted properly in the connector itself during the connection phase an excessive pressure could bend the contacts The cooker hood has low performances Check that The motor speed selected is sufficient for the quantity of fumes and vapors present in the room The kitchen is ventilated well enough to allow air for intake The charcoa...

Страница 19: ...Instruction manual DD901BK 19 Please keep this instruction manual for future reference ...

Страница 20: ...Caple Service Fourth Way Avonmouth Bristol BS11 8DW T 0117 938 1900 E service caple co uk www caple co uk ...

Отзывы: