background image


53 

 
Reject All: Reject wireless clients with MAC address listed 
here to be connected to this access point. 

MAC address 

Input the MAC address of the wireless client you wish to 
allow or reject here. No colon (:) or hyphen (-) required. 

Add 

Add the MAC address you inputted in ‘MAC address’ field 
to the list. 

Delete   

Please select a MAC address from the list, then click 
‘Delete’ button to remove it. 

Remove All 

Delete all MAC addresses in the list. 

 
When you finish with setting and want to save changes, click ‘Apply’ button. 
 

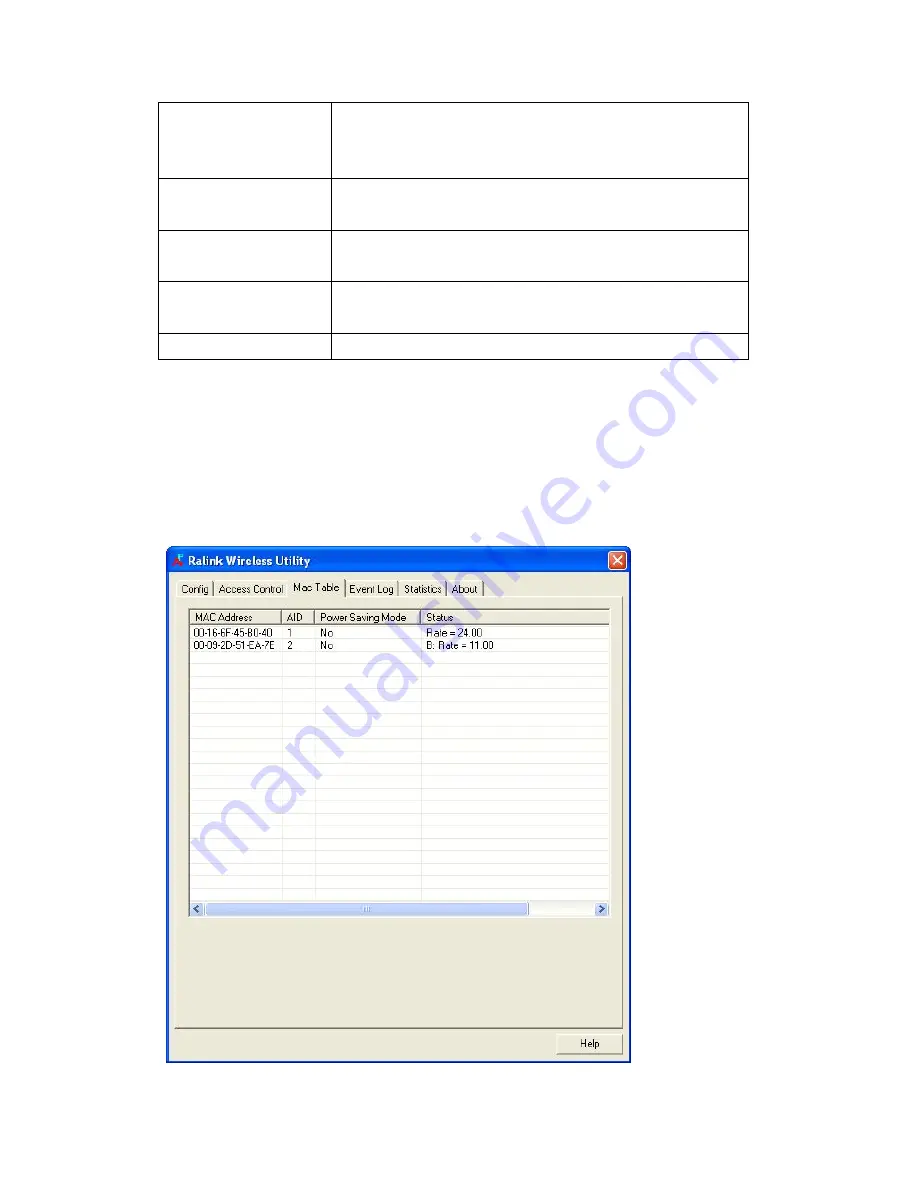
Connection Table 

 
If you want to see the list of all wireless clients connected to this access point, please 
select ‘Mac Table’ tab from the utility. 


Содержание CNP-WF518N1

Страница 1: ...CNP WF518N1 Wireless USB Adapter User Manual ...

Страница 2: ...rofile 16 Using Windows Zero Configuration 22 Profile Management 27 Add a profile 28 Edit an existing profile 29 Delete an existing profile 30 Activate a profile 31 Advanced Settings 32 View Network Statistics 35 WMM Setting 36 WPS Configuration 38 WPS Setup PBC Push Button Configuration 39 WPS Setup PIN 42 Radio ON OFF 44 About 45 Online Help 46 Soft AP Function 47 Switch to AP Mode and Basic Con...

Страница 3: ...Appendix 57 Specification 57 Troubleshooting 57 Glossary 59 ...

Страница 4: ... described in this guide z Do NOT place the device in contact with water or any other liquids The device is NOT designed to be liquid proof of any sort z In the event of liquid entry into device interior immediately disconnect the device from the computer Continuing use of the device may result in fire or electrical shock Please consult your product distributor or the closest support center z To a...

Страница 5: ...2 Package Contents Product Image Item Name CNP WF518N1 Main Unit USB Extension Cable Warranty Card Quick Guide Driver and Documentation CD ...

Страница 6: ... LED Status Device Activity Radio Off Off Wireless LAN function is disabled Radio On No Connection Off No link to wireless AP or Router Flashing Transmitting management information Radio On Connecting to AP or Router On Link to wireless AP or Router Flashing Transmitting data or management information Status LED Indicator Device Cap USB Connector ...

Страница 7: ...stallation NOTE It is recommended to install driver from Driver CD for full functionalities Installing Device Driver 1 After inserting Driver CD click on Setup exe to start driver installation process 2 Click on the option I accept the terms of the license agreement and click on Next to continue driver installation NOTE Please click on Ok when prompted to install Unsigned Driver This is a Windows ...

Страница 8: ...n interface to set up wireless network z Ralink Configuration Tool Software specifically designed to set up wireless network with device z Microsoft Zero Configuration Tool Configure device using Microsoft Window embedded function 6 Click on Next to continue driver installation process NOTE It is recommended to set up wireless network using Ralink Configuration Tool for it fully enhances all devic...

Страница 9: ...be also created at Notification Area 10 Right click on the icon and click on Launch Config Utility to launch Ralink Configuration Tool or click on Exit to stop wireless network connection NOTE Click on Start Æ All Programs Æ Ralink Wireless Æ Ralink Wireless Utility to re launch utility ...

Страница 10: ...tatus of wireless connection will be displayed by Ralink configuration utility icon Wireless connection is established good signal reception Wireless connection is established normal signal reception Wireless connection is established weak signal reception Connection is not established yet Wireless network card is not detected There are two ways you can configure your wireless network card to conn...

Страница 11: ...ink setup utility RaUI will launch and begin to scan for all wireless access points automatically RaUI consists two parts Menu and setup area You can select a setup function Profile Network etc from menu and corresponding setup items will be displayed at setup area Some function includes more information and can not be fitted in setup area In this case you can click More less button to expand the ...

Страница 12: ...wireless connection for you and other wireless wired network clients Ad Hoc mode is also know as point to point mode and in this mode wireless devices such as computer or PDA will not be capable to establish wireless connection with more than one wireless device and is suitable for establishing a one to one wireless connection between two wireless devices Tip If a setup item requires more informat...

Страница 13: ...ess device you wish to connect is hidden you must know exact SSID before you can establish connection with it b If the wireless device you wish to connect uses encryption you must know its encryption key Please launch Ralink setup utility and it will scan for wireless access points near by Scan results will be displayed here please check if the wireless device access point or another computer with...

Страница 14: ...te When the access point supports WPS and WPS icon is appeared you will not see the key icon here even through the access point uses encryption D Shows the signal strength of access point by percentage E Shows the bar graph of the signal strength If you can not see the access point you wish to connect here please click Rescan button to scan for access point again until the one you preferred is dis...

Страница 15: ...ion encryption type channel etc WPS If this access point supports WPS Wi Fi Protected Setup related information will be displayed here CCX If this access point supports CCX Cisco Compatible eXtension related information will be displayed here 802 11n If this access point complies with 802 11n draft related information will be displayed here ...

Страница 16: ...ink to that access point directly next time without inputting authentication key again To add an access point to profile you have to select an access point from the list first then click Add to Profile button Detailed instructions will be given below Connect Connect to a selected access point You have to select an access point from the list first and then click Connect to connect to the selected a...

Страница 17: ...tep 3 2 If the wireless access point does not have SSID you ll be prompted to input it now Please ask the owner of wireless access point for the exact SSID and input it here then click OK when ready If the SSID you provided here is wrong you ll not be able to connect to this access point 3 If the wireless access point uses encryption you will be prompted to input its WEP key or WPA preshared key ...

Страница 18: ... t change it However if you re connecting to an access point uses 802 1x authentication you have to check 802 1x box and input related information Instructions for 802 1x authentication will be given later 5 If the wireless access point is successfully connected you ll see a symbol appears in front of the name of wireless device You can put the mouse cursor over the Ralink configuration utility ic...

Страница 19: ... of access points and you can recall them anytime you wish to establish connection You can add a found access point to profile or input all information of an access point by yourself To add a found access point to profile please select a found access point first to make it highlighted then click Add to Profile button to input the information of access point by yourself please go to Profile menu an...

Страница 20: ...cess point from the list and its SSID is not hidden the SSID will be filled automatically however you can modify the SSID by yourself Network Type Please select the network type Ad hoc or Infrastructure If you re connecting to an access point please select Infrastructure for point to point wireless connection i e connecting to another computer using Ad Hoc mode please select Ad hoc here If you sel...

Страница 21: ...CAM constantly awake mode keep wireless radio activity even when not transferring data or PSM Power saving mode switches radio off when not transferring data It s recommended to choose PSM if you re using this network card with notebook computer to help the battery live longer RTS Threshold Check this box to set the RTS threshold by yourself You can drag the slider to set the threshold value or in...

Страница 22: ...l be prompted to input LEAD specific settings Please input LEAP identity password domain name and select encryption type You can check Show Password box so the password you inputted will be displayed as you type but not replace by asterisk Encryption Select the encryption type of the wireless access point or wireless device you wish to connect When you re adding a profile from an existing access p...

Страница 23: ...ou selected You can input 10 or 26 hexadecimal characters and 5 or 13 ASCII characters as WEP key Show Password Check this box and all passphrases or security keys you inputted will be displayed as you type but not replace your input with asterisk Use 802 1x If the access point you wish to connect requires 802 1x authentication please click on Use 802 1x box then click 802 1X tab to set 802 1x par...

Страница 24: ...redential file click Remove Session Resumption You can enable or disable session resumption here If you don t know if you should enable session resumption or not please ask your 802 1x authentication administrator ID Password tab Input 802 1x username ID and password and other information if it is required here Click Show Password to show the password you typed Client Certification tab Use this ta...

Страница 25: ...ile If the profile is created you will see the information in the Profile List Using Windows Zero Configuration Windows XP and Vista has a built in wireless network configuration utility called as Windows Zero Configuration WZC You can also use WZC to configure your wireless network parameter 1 Right click Ralink configuration utility icon and select Use Zero Configuration as Configuration utility...

Страница 26: ...23 3 Click Start button should be located at the bottom left corner of windows desktop click Control Panel then click Network and Internet Connections in Control Panel HERE ...

Страница 27: ...link 802 11n Wireless LAN Card then select View Available Wireless Networks 6 All wireless access points in proximity will be displayed here If the access point you want to use is not displayed here please try to move your computer closer to the access point or you can click Refresh network list to rescan access points Click the access point you want to use if it s shown then click Connect ...

Страница 28: ...e here It must match the encryption setting on the access point If the access point you selected does not use encryption you ll not be prompted for security key or passphrase 8 If you can see Connected message the connection between your computer and wireless access point is successfully established ...

Страница 29: ...26 ...

Страница 30: ...profile for every access point so you don t have to input these parameters every time when you want to connect to a specific wireless access point To manage profiles right click the Ralink configuration utility icon located at lower right corner of computer desktop then click Launch Config Utility Click the Profile menu All profiles will be listed in Profile List and you can select a profile from ...

Страница 31: ...28 Add a profile If you want to click new profile click Profile menu then click Add button You ll be prompted to input detailed information of access point as described in Section 2 2 1 3 ...

Страница 32: ...wish to change the content of the profile you can use this function Please select a profile from the list first then click Edit button You ll be provided with the contents of selected profile and you can edit them Click OK to save changes or click Cancel to discard changes ...

Страница 33: ...30 Delete an existing profile If you no longer need a profile you can delete it Select the profile you wish to delete from the list and click Delete button to delete it ...

Страница 34: ... select it and click Activate button to establish connection with it When you selected a profile and click Activate button to activate the profile a icon will be displayed in front of the profile to show that the connection is failed When the connection is successfully established a icon will be displayed ...

Страница 35: ...ngs to increase data transfer performance or change operation mode Please follow the following instructions to set advanced wireless settings 1 Right click the Ralink configuration utility icon located at lower right corner of computer desktop and then click Launch Config Utility 2 Click Advanced menu and the following settings will appear ...

Страница 36: ...ints Show Authentication Status Dialog When your computer is being authenticated by wireless authentication server a dialog window with the process of authentication will appear This function is helpful to find out the problem when you can not be authenticated and you can provide this information to authentication server s administrator for debugging purpose Enable CCX Enable Cisco Compatible eXte...

Страница 37: ...el Measurements Limit When you re connecting to CCX compatible access point check this box to enable measurement on unused radio channels to improve wireless connectivity After you finish the settings click Apply to apply new settings ...

Страница 38: ... instructions to check network statistics 1 Right click the Ralink configuration utility icon located at lower right corner of computer desktop and then click Launch Config Utility 2 Click Statistics menu and the statistics of wireless connection will be displayed All connection related statistics is displayed here You can click Transmit or Receive tab to view the statistics of transmitted or rece...

Страница 39: ...u can define the priority of different kinds of data to give higher priority to applications which require instant responding Therefore you can improve the performance of such network applications Please follow the following instructions to set advanced wireless settings 1 Right click the Ralink configuration utility icon located at lower right corner of computer desktop and then click Launch Conf...

Страница 40: ...battery live longer You also have to select WMM power save modes here AC_BE Best Performance AC_BK Worst Performance AC_VI Video data has priority AC_VO Voice data has priority Direct Link Setup Enable If you have another WMM enabled wireless device you can enter its MAC address here then click Apply button and this network card will establish a direct link to the wireless device you specified her...

Страница 41: ...simple steps For older wireless access points it s possible to perform a firmware upgrade to become a WPS enabled access point Since they may not have a hardware button to press for WPS setup you can use an alternative WPS setup method input the pin code Every WPS compatible wireless network card support pin code configuration method you can just input the code to wireless access point and the wir...

Страница 42: ...other way to start WPS PBC standby mode as the instruction given by your wireless access point s user manual You can also set Config Mode to Registrar In this mode this wireless network card will wait for other WPS enabled access points to send WPS pairing requests Please refer to the instruction given by your wireless access point s user manual to understand how to send WPS requests 4 Before you ...

Страница 43: ...by WPS Please be patient This may require several seconds to one minute to complete When you see WPS status is connected successfully message means the connection between this wireless network card and access point is successfully established by WPS and the information about access point you connected to will be displayed 6 You can click Detail button to see detailed information of connected acces...

Страница 44: ...point or select another WPS enabled wireless access point then click Connect to establish connection to selected access point if there are more than one WPS enabled access point found You can also click Rotate button and next access point on the list will be selected to establish connection If you want to delete a found access point from the list select it and click Delete button ...

Страница 45: ...code of your wireless network card is an eight digit number located at the upper right position of configuration utility Remember it and input the number to your wireless access point as the WPS PIN code Please refer to the user manual of your wireless access point for instructions about how to do this 4 Click PIN button now and wait for few seconds to one minute If a wireless access point with co...

Страница 46: ...ciate IE Check this box to send the association request with WPS IE during WPS setup This is optional and you can use default value if you don t know what will be affected WPS probe IE Check this box to send the WPS probe request with WPS IE during WPS setup This is optional and you can use default value if you don t know what will be affected Auto When in PIN mode wireless access point to be conn...

Страница 47: ...twork function you don t have to remove the network card physically 1 Right click the Ralink configuration utility icon located at lower right corner of computer desktop and then click Launch Config Utility 2 To switch wireless radio on off please click Radio On Off button Wireless radio is on Green Wireless radio is off Red ...

Страница 48: ... important information about your wireless network card Please follow the following instructions to see these information 1 Right click the Ralink configuration utility icon located at lower right corner of computer desktop and then click Launch Config Utility 2 Click About tab and the following information will appear ...

Страница 49: ...f you need to know the directions of how to use specific function in the utility please click Help button On line help documents will be presented in Windows help format Click this button to view on line help documents ...

Страница 50: ...less card Switch to AP Mode and Basic Configuration The operating mode of the wireless card is Station Mode becoming a client of other wireless access points by default If you want to switch to AP mode please right click Ralink utility icon and select Switch to AP Mode After you select Switch to AP Mode the Ralink utility icon will be changed to Which indicated the wireless card is operating in AP...

Страница 51: ...net please select it from Name dropdown menu and click Enable ICS if your computer does not have another network card with Internet connection please click Not enable ICS After you click Enable ICS or Not enable ICS you ll see the basic configuration menu of the AP function ...

Страница 52: ...y Region Code Please select the country code of the country or region you live Available options are 0 7 which will affect the available wireless channels you can use 0 FCC US Canada and other countries uses FCC radio communication standards 1 ETSI Europe 2 SPAIN 3 FRANCE 4 MKK 5 MKKI TELEC 6 ISERAL Channel 3 to 9 7 ISERAL Channel 5 to 13 Please note that only change the country code if you are in...

Страница 53: ...not need 100 of output power if other wireless clients are not far from you Idle Time Select the idle time for the wireless access point Default value is 300 Do not modify this value unless you know what will be affected To save changes click Apply button Or you can click Default to reset all values to factory default value Security Setting This wireless card supports wireless encryption in AP mod...

Страница 54: ...he time interval to re issue the key to your wireless clients here You can click the button 10 seconds or Kpackets to change the unit of time interval every 10 seconds or a thousand data packets times the value you specified in Group Rekey Interval field Wep Key Please input the WEP encryption key here when you select WEP as encryption type There are 2 types of WEP key Hex number 0 to 9 and ASCII ...

Страница 55: ...force your access control policy so only wireless clients with MAC address you defined by this function can be connected to your software access point Here are descriptions of every setup item Item Name Description Access Policy Select the policy type of your access rule Disable Allow any wireless client with proper authentication settings to connect to this access point Allow All Only allow wirel...

Страница 56: ... Add Add the MAC address you inputted in MAC address field to the list Delete Please select a MAC address from the list then click Delete button to remove it Remove All Delete all MAC addresses in the list When you finish with setting and want to save changes click Apply button Connection Table If you want to see the list of all wireless clients connected to this access point please select Mac Tab...

Страница 57: ...isplays the capability of power saving function of this wireless client Status Displays additional information of this wireless Connection like current wireless operating mode and data transfer rate Event Log This software access point will log all wireless related activities as a log Click Event Log tab and the event log will be displayed You can click Clear to remove all entries in the log ...

Страница 58: ...ks click Statistics tab and the event log will be displayed You can click RESET COUNTERS button to reset all counters to zero About The About tab provides you the information about version number of the configuration utility driver and other important information about your wireless access point ...

Страница 59: ...56 ...

Страница 60: ...g Certification FCC CE Troubleshooting If you encounter any problem when you re using this wireless network card don t panic Before you call your dealer of purchase for help please check this troubleshooting table the solution of your problem could be very simple and you can solve the problem by yourself Scenario Solution I can t find any wireless access point wireless device in Site Survey functi...

Страница 61: ...e driver and re install 5 Contact the dealer of purchase for help I can not establish connection with a certain wireless access point 1 Click Connect for few more times 2 If the SSID of access point you wish to connect is hidden nothing displayed in SSID field in Site Survey function you have to input correct SSID of the access point you wish to connect Please contact the owner of access point to ...

Страница 62: ...he same OFDM modulation technique specified in IEEE 802 11a for the 5 GHz frequency band and applies it in the same 2 4 GHz frequency band as IEEE 802 11b The 802 11g standard requires backward compatibility with 802 11b The standard specifically calls for A A new physical layer for the 802 11 Medium Access Control MAC in the 2 4 GHz frequency band known as the extended rate PHY ERP The ERP adds O...

Страница 63: ...ic Service Set BSS Computers in a BSS must be configured with the same BSS ID 7 What is WEP WEP is Wired Equivalent Privacy a data privacy mechanism based on a 40 bit shared key algorithm as described in the IEEE 802 11 standard 8 What is TKIP TKIP is a quick fix method to quickly overcome the inherent weaknesses in WEP security especially the reuse of encryption keys TKIP is involved in the IEEE ...

Страница 64: ...ant bit pattern for each bit to be transmitted This bit pattern is called a chip or chipping code The longer the chip is the greater the probability that the original data can be recovered Even if one or more bits in the chip are damaged during transmission statistical techniques embedded in the radio can recover the original data without the need for retransmission To an unintended receiver DSSS ...

Страница 65: ...Power Save uses mechanisms included in the IEEE 802 11e standard and is an enhancement of IEEE 802 11 legacy power save With WMM Power Save the same amount of data can be transmitted in a shorter time while allowing the Wi Fi device to remain longer in a low power dozing state 16 What is GI GI stands for Guard Interval It s a measure to protect wireless devices from cross interference If there are...

Отзывы: